Chassis
Rear Stabilizer Bar Removal and Installation
418140

- Vehicle Lift
|
|
1. |
Raise the vehicle on a lift, and make sure it is securely supported. |
|
- Rear Wheel
 |
|
1. |
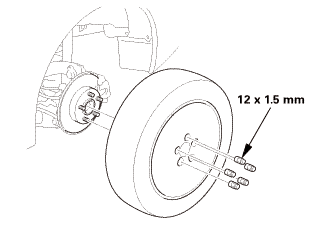
Remove both rear wheels. |
|
- Fuel Tank Undercover (For Some Models)
 |
|
1. |
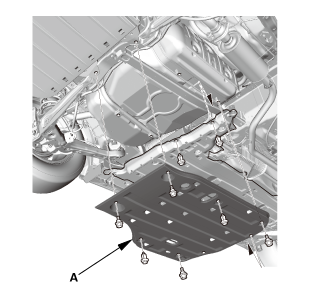
Remove the fuel tank undercover (A). |
|
- Rear Stabilizer Link Stabilizer Bar Side - Disconnection
 |
|
1. |
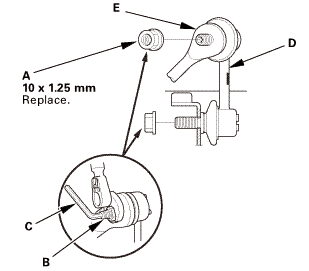
Remove the self-locking nut (A) while holding the respective joint pin (B) with a hex wrench (C). |
|
2. |
Disconnect stabilizer link (D) from the stabilizer bar (E). |
|
- Rear Stabilizer Bar
 mm125mmno.125mmmm
|
|
1. |
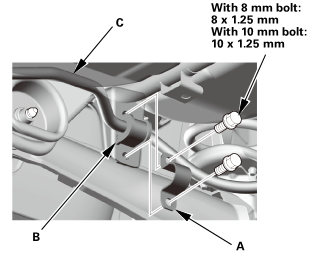
Remove the bushing holders (A). |
|
2. |
Remove the bushings (B). |
|
3. |
Remove the stabilizer bar (C). |
|
- Rear Stabilizer Bar Bracket
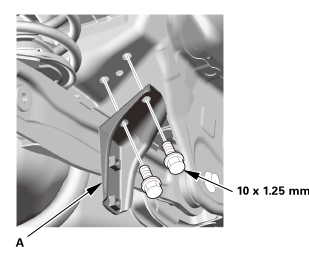 |
|
1. |
Remove the stabilizer bar bracket (A). |
|

- Rear Stabilizer Bar Bracket
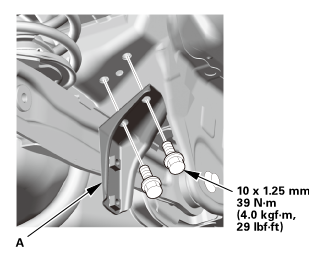 |
|
1. |
Install the stabilizer bar bracket (A). |
|
- Rear Stabilizer Bar
Except '12 models
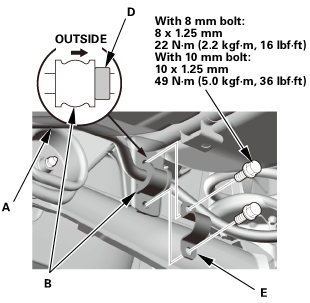 inmmmm22inmminmmouvsnz
'12 models
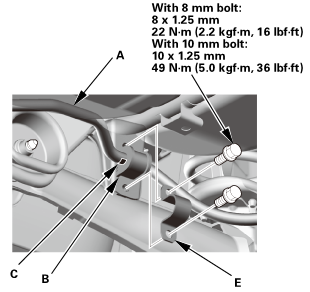 wm.mmmm22(2.2usnommball:nommm.
|
|
1. |
Install the stabilizer bar (A). |
|
Note the right and left direction of the stabilizer bar. |
|
2. |
Install the bushings (B). |
|
NOTE: Align the paint marks (C) or the stabilizer band clamp (D) on the stabilizer bar with the side of the bushings. |
|
3. |
Install the bushing holders (E). |
|
- Rear Stabilizer Link Stabilizer Bar Side - Reconnection
 |
|
1. |
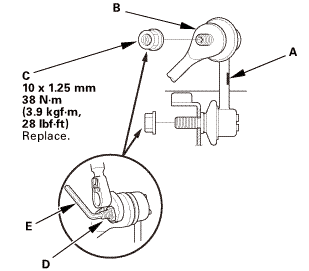
Connect both stabilizer link (A) to the stabilizer bar (B). |
|
2. |
Install the new self-locking nut (C) while holding the respective joint pin (D) with a hex wrench (E). |
|
- Fuel Tank Undercover (For Some Models)
 |
|
1. |
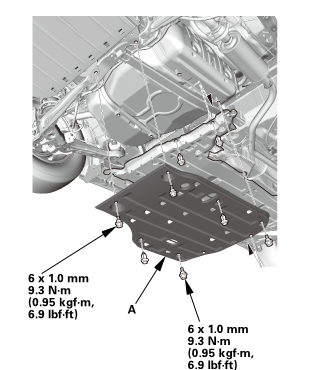
Install the fuel tank undercover (A). |
|
- Rear Wheel
 15mmumum
|
|
1. |
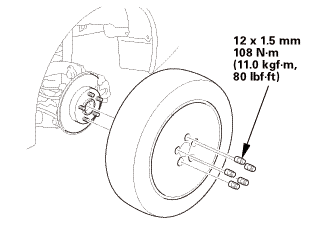
Install both rear wheels. |
|
NOTE: Before installing the wheel, clean the mating surfaces between the brake disc or the brake drum and the inside of the wheel. |
|
- Test Drive
|
|
1. |
Test-drive the vehicle. |
|
- Rear Stabilizer Link - Tighten
|
|
1. |
After 5 minutes of driving, torque the self-locking nut again to the specified torque. |
|
?
Test yourself
A quick Honda Civic quiz: every answer comes with an explanation and a link to the manual page.
Was this page helpful?