Heating, Ventilation and Air Conditioning
Heating and Air Conditioning Control Unit (Manual)
In this manual: Heating, Ventilation and Air Conditioning
6steps
~36min
2/5difficulty
Done 0 of 6
Components and Component Location
COMPONENTS
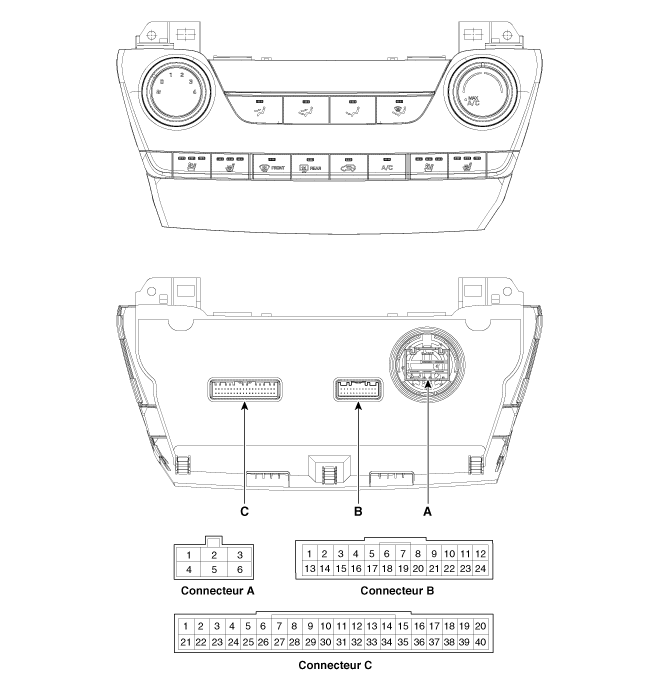
| PIN | Function | PIN | Function |
| 1 | Medium Low | 4 | High |
| 2 | Medium High | 5 | - |
| 3 | Ground | 6 | Down |
Connector "B"
| PIN | Function | PIN | Function |
| 1 | Battery (+) | 21 | ALL1 |
| 2 | ECL+ (Rear) | 22 | SS ISG |
| 3 | ALL2 | 23 | - |
| 4 | Mode Control Actuator (Event) | 24 | Rear Window Defogger Switch (Bottom) |
| 5 | Mode Control Actuator (Def) | 25 | HTD (Rear Window Defogger Indicator) |
| 6 | Temperature Control Actuator (Cold) | 26 | - |
| 7 | Temperature Control Actuator (Hot) | 27 | - |
| 8 | Intake Actuator (Fresh Air) | 28 | C_CAN - HIGH |
| 9 | Intake Actuator (Recirculation) | 29 | C_CAN - LOW |
| 10 | (Feedback) Mode Control Actuator | 30 | EVAPORATOR SENSOR (+) |
| 11 | (Feedback) Temperature Control Actuator | 31 | AMB Sensor (+) |
| 12 | Intake Actuator (Feedback) | 32 | - |
| 13 | Trigger Signal | 33 | Positive (Low) Temperature Index Enable Signal |
| 14 | - | 34 | PTC Relay 2 |
| 15 | Air Duct Feedback | 35 | PTC Relay 3 |
| 16 | - | 36 | - |
| 17 | - | 37 | ECV (-) (Ground) |
| 18 | - | 38 | ECV+ |
| 19 | - | 39 | Blower Common Signal (-) |
| 20 | ECL-(REO) | 40 | Ground |
Connector (C)
| PIN | Function | PIN | Function |
| 1 | Setting Sensor (+5V) | 13 | Passenger Seat Cooling Indicator (Bottom) |
| 2 | Driver Seat Heater Switch | 14 | Passenger Seat Heater Switch |
| 3 | Driver Seat Heater Indicator (Top) | 15 | Passenger Seat Heater Indicator (Top) |
| 4 | Driver Seat Heater Indicator (Middle) | 16 | Passenger Seat Heater Indicator (Middle) |
| 5 | Driver Seat Heater Indicator (Low) | 17 | Passenger Seat Heater Indicator (Bottom) |
| 6 | Driver Seat Cooling Switch | 18 | - |
| 7 | Driver Seat Cooling Indicator (Top) | 19 | - |
| 8 | Driver Seat Cooling Indicator (Middle) | 20 | - |
| 9 | Driver Seat Cooling Indicator (Bottom) | 21 | - |
| 10 | Passenger Seat Cooling Switch | 22 | - |
| 11 | Passenger Seat Cooling Indicator (Top) | 23 | Mass Air Flow Sensor |
| 12 | Passenger Seat Cooling Indicator (Middle) | 24 | Ground |
Repair Procedures
REPLACEMENT
- Disconnect the negative (-) battery terminal.
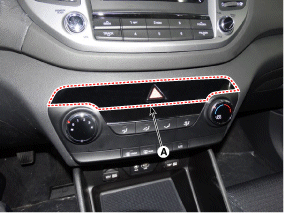
- Using a screwdriver or removal tool, remove the center console panel switch (A).
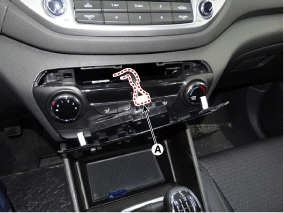
- Disconnect the connector of the hazard warning switch (A).
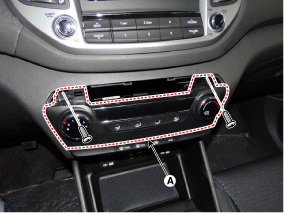
- Loosen the mounting screws, then remove the heater and A/C control unit (A).
- Disconnect the air conditioner controller connector and heater connector (A).
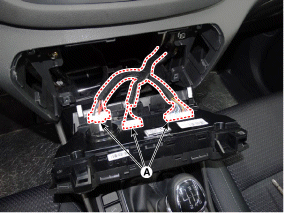
- To install, perform the removal procedure in reverse order.
Test yourself
A quick Hyundai Tucson quiz: every answer comes with an explanation and a link to the manual page.
Was this page helpful?