Fully close the sunroof glass and sunshade (fully closed position).
Disconnect the negative (-) battery terminal.
Remove the roof headliner assembly. (Refer to Body - "Roof Trim")
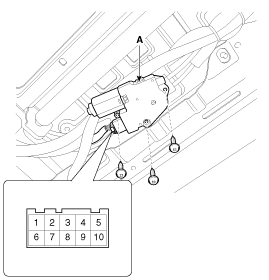
Remove the sunroof glass regulator motor (A) after loosening the screws and disconnecting the connector.
Inspect the sunroof glass regulator motor wiring connector according to the table below.
Terminal
Test Conditions
Test: Expected Result
3 - Ground
IG2 ON
Check the voltage to ground: There should be battery voltage
1 - Ground
Under any condition
Check continuity to ground: Continuity should be present.
6 - Ground
Under any condition
Check voltage to ground: Battery voltage should be present.
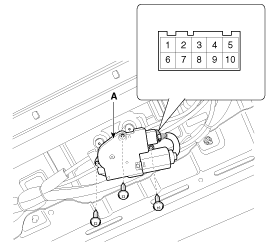
Remove the sunshade motor (A) after loosening the screws and disconnecting the connector.
Check the sunshade motor wiring connector as shown in the table below.
Terminal
Test Conditions
Test: Expected Result
1 - Ground
Under any condition
Check continuity to ground: Continuity should be present.
6 - Ground
Under any condition
Check voltage to ground: Battery voltage should be present.
Connect the sunroof glass and sunshade motor, and all connectors.
Be careful not to reverse the sunroof motors when installing them.
Connect the negative (-) battery terminal.
Start the vehicle engine.
Check the motor operation by pressing the sunroof switch.
Terminal
Operation Test
Glass open switch
Glass and sunshade motors operate
Glass close switch
Both glass regulator motors operate
Glass tilt up switch
Glass and sunshade motors operate
Sunshade Open Switch
Sunshade motor operates
Sunshade Close Switch
Sunshade motor operates
After checking the motor operation, turn on the auto close switch.
Install the sunroof glass regulator motor and the sunshade motor. Then perform the sunroof reset procedure.
Use only the auto close switch.
Replacement
Sunroof Reset Whenever the vehicle battery is disconnected or discharged, or when the emergency handle is used to operate the sunroof, the sunroof system must be reset as follows:
Turn the ignition switch to ON and fully close the panoramic sunroof.
Release the sunroof control lever.
Press and hold the CLOSE button for more than 10 seconds until the sunroof moves slightly.
Release the sunroof control lever.
Press and hold the CLOSE button again for 5 seconds until the sunroof does the following:
Sunshade open and glass open > Glass closed > Sunshade closed. Then release the switch.
The panoramic roof reset procedure is complete.
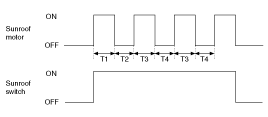
The sunroof ECU determines the motor operating time.
The motor can operate continuously for the 1st operating time (120 ± 10 sec.).
The motor, which operates continuously, stops after the 1st operating time (120 ± 10 s).
The motor then stays off for the 1st cooling time (18 ± 2 sec.).
The motor operates for the 2nd operating time (10 ± 2 sec.) when motor operation continues after the 1st cooling time (18 ± 2 sec.).
The motor, which operates continuously, stops after the second start (10 ± 2 s).
The motor does not operate for the 2nd cooling time (18 ± 2 sec.).
The motor repeats the 2nd operating time and 2nd cooling time while motor operation continues.
If the motor does not operate continuously, the operating time limit for motor overheat protection is increased.
The motor operating time resets to "0" if the battery or fuse is reconnected after being disconnected, discharged, or blown.
Engine Overheat Protection: To protect the sunroof motor from overheating, during continuous operation the sunroof ECU monitors the operating time and cooling time of the motor as shown below:
?
Test yourself
A quick Kia Soul EV Owner's Manual quiz: every answer comes with an explanation and a link to the manual page.