Fuel Gauge Sender Unit Inspection
The fuel gauge sender unit is integrated with the fuel pump unit.
1. Disconnect the negative battery cable..
2. Remove the rear seat cushion..
3. Remove the fuel pump unit..
4. Verify that the resistance between terminals A and C of the fuel gauge sender unit based on the height of the float as shown in the figure.
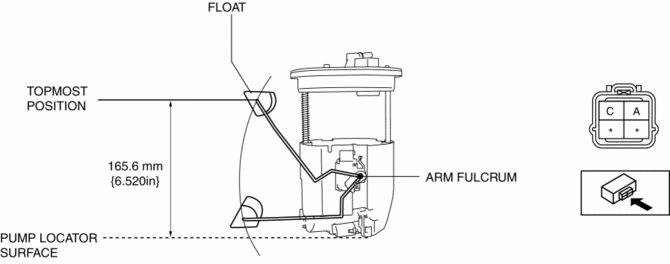
If they are not as shown in the figure, replace the fuel pump unit.
Float height (mm {in}) |
Resistance (ohms) |
165.6 {6.520} |
9.5—12.5 |
159.3 {6.272} |
20.0 |
130.1 {5.122} |
109.4 |
91.3 {3.59} |
194.8—222.2 |
52.2 {2.06} |
307.6 |
25.7 {1.01} |
400.0 |
20.0 {0.787} |
414.5—405.5 |
MZR 2.0, MZR 2.5 NOTE:
The fuel gauge sender unit is integrated with the fuel pump unit.
1. Disconnect the negative battery cable..
2. Remove the rear seat cushion..
3. Remove the fuel pump unit..
4. Verify that the resistance between terminals B and D of the fuel gauge sender unit based on the height of the float as shown in the figure.
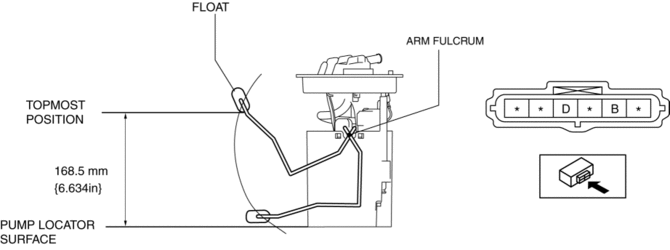
If they are not as shown in the figure, replace the fuel pump unit.
Float height (mm {in}) |
Resistance (ohms) |
168.5 {6.634} |
18—22 |
130.1 {5.122} |
107.2—111.6 |
91.3 {3.59} |
206—211 |
52.2 {2.06} |
304.6—310.6 |
40.6 {1.60} |
333.5—339.5 |
12.1 {0.476} |
396.8—403.2 |
Test yourself
A quick Mazda 3 quiz: every answer comes with an explanation and a link to the manual page.