Master Cylinder Removal/Installation [Mzr 2.3 Disi Turbo]
1. Remove the battery and battery tray..
2. Pinch open the clamps using pliers and disconnect the vacuum hoses from the insulator bracket as shown in the figure.
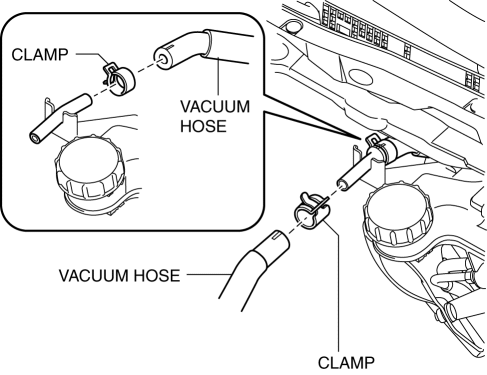
3. Remove in the order indicated in the table.
4. Install in the reverse order of removal.
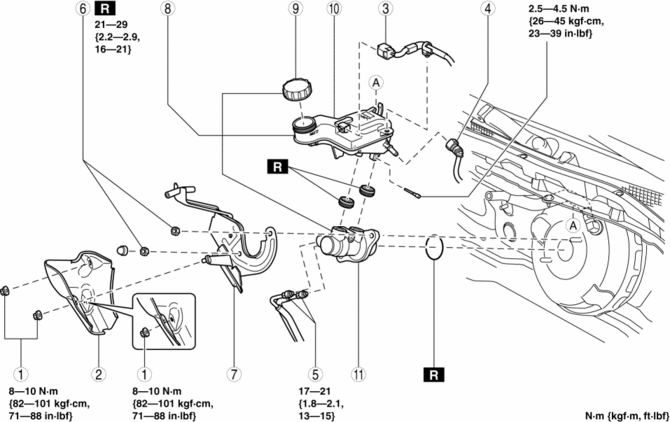
Nut
Insulator
Brake fluid level sensor connector
Reserve hose
(See Reserve Hose Removal Note.)
(See Reserve Hose Installation Note.)
Brake pipe
Nut
Insulator bracket
(See Insulator Bracket, Master Cylinder Removal Note.)
(See Master Cylinder, Insulator Bracket Installation Note.)
Master cylinder
(See Insulator Bracket, Master Cylinder Removal Note.)
(See Master Cylinder, Insulator Bracket Installation Note.)
Cap
Reserve tank
Cylinder component
Reserve Hose Removal Note
1. Remove the reserve hose from the reserve tank while pressing the point indicated by the arrow in the figure.
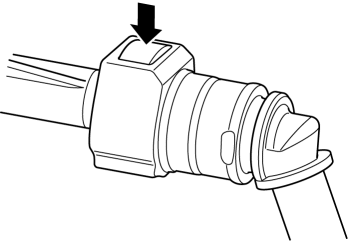
Insulator Bracket, Master Cylinder Removal Note
1. Remove the insulator bracket and master cylinder from the power brake unit as a single unit.
2. Remove the insulator bracket from the master cylinder.
Master Cylinder, Insulator Bracket Installation Note1. Temporarily install the insulator bracket to the master cylinder.
2. Install the insulator bracket and master cylinder to the power brake unit as a single unit.
Reserve Hose Installation Note1. Insert the reserve hose to the reserve tank until a click is heard.
2. Verify that the reserve hose is firmly installed by pulling it, and push it into the reserve tank again.
Test yourself
A quick Mazda 3 quiz: every answer comes with an explanation and a link to the manual page.