Sunroof Unit Disassembly/Assembly
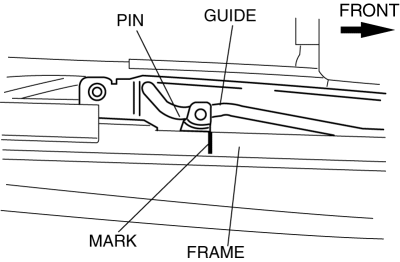
If the guide or sunroof motor is removed, the glass panel will not be positioned properly after the re-installation. To ensure proper positioning of the glass panel, place alignment marks on the guide pin and frame before removing the guide or sunroof motor.
1. Disassemble in the order indicated in the table.
2. Assemble in the reverse order of disassembly.
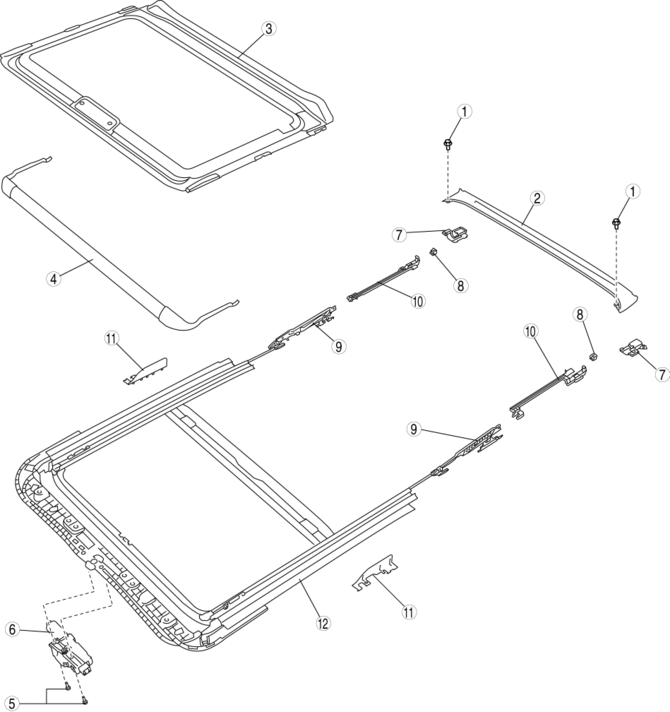
Screw A
Drip rail
Sunshade
Deflector
Screw C
Sunroof motor
(See Sunroof Motor Assembly Note.)
Rear drip
(See Rear Drip Assembly Note.)
Guide stopper
Guide
(See Guide Disassembly Note.)
(See Guide Assembly Note.)
Decoration link
(See Decoration Link Assembly Note.)
Bracket
Frame
Sunroof Motor Assembly Note NOTE:
If the guide or sunroof motor is removed, the sunroof motor initial position setting has to be performed. After installing the sunroof unit, perform the initial position setting using the following procedure.
towards the closed position.
NOTE:Only the tilt up switch is available during the initialization mode.
The initialization may finish at the first inching operation depending on the glass position when the motor is installed.
If the glass position is between the closed and semi-tilt positions when the motor is removed, the glass moves in the tilt up direction (to the full tilt position stored in the motor). However, if the tilt up switch is pressed and held, the initialization mode starts.
and stops.
3. Repeat this procedure several times so that the glass moves to the fully closed, full tilt (normal operation position), and full tilt (mechanical stopper position) positions.
4. After the glass is moved to the full tilt position (mechanical stopper position), it returns to the tilt down direction slightly and the initialization is completed.
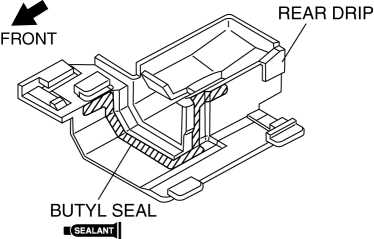
Rear Drip Assembly Note NOTE:If the rear drip is removed, butyl seal must be applied when re-installing.
wide line of butyl seal to the area shown in the figure.
Guide Disassembly Note
1. Place an alignment mark on the guide pin and flame.
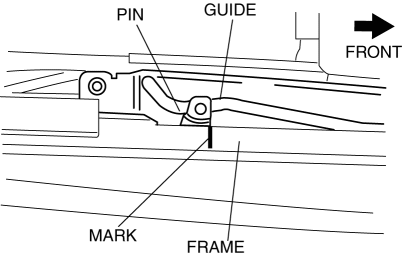
2. Slide the guide to the rear of the sunroof frame, and remove the guide and decoration link as a single unit.
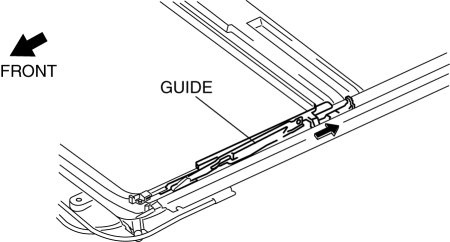
Guide Assembly Note
1. Move the pin to the position shown in the figure.
Decoration Link Assembly Note
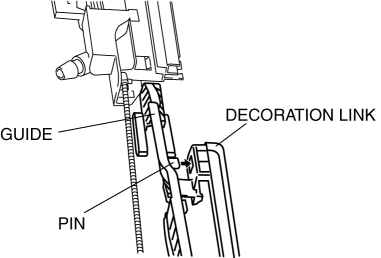
1. Set the guide pin to the decoration link.
Test yourself
A quick Mazda 3 quiz: every answer comes with an explanation and a link to the manual page.