Windshield wipers. Replacing wiper blades
Replacing the wiper blades on the Mercedes E-Class (4th generation, W212, 2009–2016) should be done with care to avoid damage to the windshield and rear window. The following instructions explain the safe procedure step by step. Mercedes recommends having the wiper blades replaced by a qualified specialist workshop to ensure optimal function.
Important Safety Notes
WARNINGIf the windshield wipers start moving while you are replacing the wiper blades, you can get your fingers caught in the wiper arm. There is a risk of injury!
Always switch off the windshield wipers and the ignition before replacing the wiper blades.
NOTE
When replacing, hold only the wiper blade holder to avoid damaging the wiper rubber.
Never open the hood/tailgate when a wiper arm is folded away from the windshield/rear window.
Never fold the wiper arm back onto the windshield/rear window if no wiper blade is fitted.
Hold the wiper arm firmly when replacing a wiper blade. If you let go of the wiper arm without a wiper blade and it falls onto the windshield/rear window, the impact can damage the glass.
Mercedes-Benz recommends that you have the wiper blades replaced by a qualified specialist workshop.
Replacing wiper blades
Removing wiper blades
 Remove the key from the ignition lock or set it to key position 0 (KEYLESS-GO).
Fold the wiper arm away from the windshield.
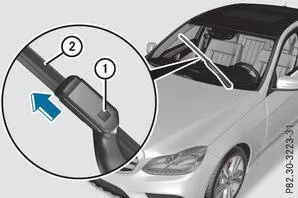
Press the release button firmly and pull the wiper blade
 upwards off the wiper arm in the direction of the arrow.
Fitting wiper blades
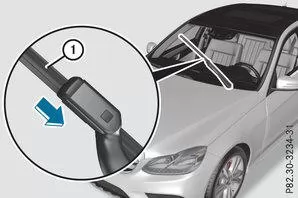
Place the new wiper bladeonto the holder on the wiper arm and slide it in the direction of the arrow.
Check the seating of the wiper blade.
Fold the wiper arm back onto the windshield.Replacing the rear window wiper blade
Removing the wiper blade
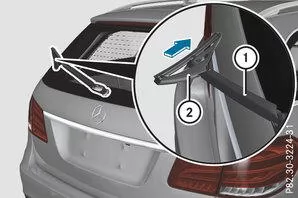
Remove the key from the ignition lock.
Fold the wiper armaway from the rear window.The wiper bladeat a right angle to the wiper armposition.
Fold the wiper armHold the wiper arm and pull the wiper bladein the direction of the arrow until it unlatches.The wiper bladecarefully.
Fitting the wiper blade
Place the new wiper bladeonto the wiper arm.Fold the wiper armHold the wiper arm and pull the wiper bladepress against the direction of the arrow until it clicks into place.
Check the seating of the wiper blade.The wiper bladeparallel to the wiper armposition.
Fold the wiper armFold it back onto the rear window.Problems with the windshield wipers
| Problem | Possible causes/consequences and solutions |
|---|---|
| The windshield wiper is blocked. | For example, leaves or snow prevent the windshield wiper from moving. The wiper motor has switched off.
Remove the cause of the blockage.
|
| The windshield wiper fails completely. | The windshield wiper drive is faulty.
Have the windshield wiper checked by a qualified specialist workshop. |
Replacing the wiper blades on the Mercedes E-Class W212 (model years 2009–2016) is easy and safe thanks to clear instructions. Great importance is placed on protecting the windshield, the rear window and the wiper arms.
Replacing the wiper blades regularly ensures the function of the windshield wipers and improves visibility in traffic.
Question: What must be observed when replacing the wiper blades?
Answer: Switch off the ignition and hold the wiper arm carefully to avoid damaging the windshield.
Question: Why should you never fold back the wiper arm without the wiper blade installed?
Answer: The impact can damage the windshield.
Test yourself
A quick Mercedes-Benz E-Class quiz: every answer comes with an explanation and a link to the manual page.