Basic inspection
2. Open engine hood and check the following: - Harness connectors for improper connections - Wiring harness for improper connections, pinches and cut - Vacuum hoses for splits, kinks and improper connections - Hoses and ducts for leaks - Air cleaner clogging
- Gasket

3. Confirm that electrical or mechanical loads are not applied. - Headlamp switch is OFF. - Air conditioner switch is OFF. - Rear window defogger switch is OFF.
- Steering wheel is in the straight-ahead position, etc.
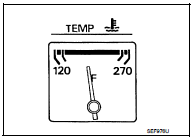
4. Start engine and warm it up until engine coolant temperature indicator points the middle of gauge.
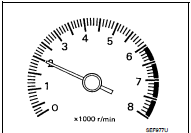
Ensure engine stays below 1,000 rpm.
5. Run engine at about 2,000 rpm for about 2 minutes under no load.
6. Make sure that no DTC is displayed with CONSULT-III or GST.
Is any DTC detected? YES >> GO TO 2.
NO >> GO TO 3.
2.REPAIR OR REPLACE
Repair or replace components as necessary according to corresponding Diagnostic Procedure.
>> GO TO 3.
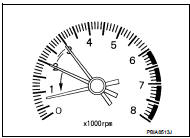
3.CHECK TARGET IDLE SPEED 1. Run engine at about 2,000 rpm for about 2 minutes under no load. 2. Rev engine (2,000 to 3,000 rpm) two or three times under no load, then run engine at idle speed for about 1 minute.3. Check idle speed.
For procedure, refer to EC-443, "Special Repair Requirement".
For specification, refer to EC-449, "Idle Speed".
Is the inspection result normal? YES >> GO TO 10.
NO >> GO TO 4.
4.PERFORM ACCELERATOR PEDAL RELEASED POSITION LEARNING 1. Stop engine.
2. Perform EC-134, "Work Procedure".
>> GO TO 5.
5.PERFORM THROTTLE VALVE CLOSED POSITION LEARNINGPerform EC-135, "Work Procedure".
>> GO TO 6.
6.PERFORM IDLE AIR VOLUME LEARNINGPerform EC-136, "Work Procedure".
Is Idle Air Volume Learning carried out successfully? YES >> GO TO 7.
NO >> Follow the instruction of Idle Air Volume Learning. Then GO TO 4.
7.CHECK TARGET IDLE SPEED AGAIN 1. Start engine and warm it up to normal operating temperature.2. Check idle speed.
For procedure, refer to EC-443, "Special Repair Requirement".
For specification, refer to EC-449, "Idle Speed".
Is the inspection result normal? YES >> GO TO 10.
NO >> GO TO 8.
8.DETECT MALFUNCTIONING PARTCheck the Following.
• Check camshaft position sensor (PHASE) and circuit. Refer to EC-274, "DTC Logic".• Check crankshaft position sensor (POS) and circuit. Refer to EC-271, "DTC Logic".
Is the inspection result normal? YES >> GO TO 9.
NO >> Repair or replace. Then GO TO 4
9.CHECK ECM FUNCTION1. Substitute another known-good ECM to check ECM function. (ECM may be the cause of an incident, but this is a rare case.)
2. Perform initialization of NATS system and registration of all NATS ignition key IDs. Refer to SEC-50, "ECM : Work Procedure".
>> GO TO 4.
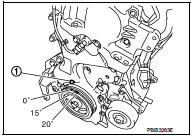
10.CHECK IGNITION TIMING 1. Run engine at idle.2. Check ignition timing with a timing light.
For procedure, refer to EC-444, "Special Repair Requirement" For specification, refer to EC-449, "Ignition Timing".
1 : Timing indicator
Is the inspection result normal? YES >> INSPECTION END.
NO >> GO TO 11.
11.PERFORM ACCELERATOR PEDAL RELEASED POSITION LEARNING 1. Stop engine.
2. Perform EC-134, "Work Procedure".
>> GO TO 12.
12.PERFORM THROTTLE VALVE CLOSED POSITION LEARNING12.PERFORM THROTTLE VALVE CLOSED POSITION LEARNING Perform EC-135, "Work Procedure".
>> GO TO 13.
13.PERFORM IDLE AIR VOLUME LEARNINGPerform EC-136, "Work Procedure".
Is Idle Air Volume Learning carried out successfully? YES >> GO TO 14.
NO >> Follow the instruction of Idle Air Volume Learning. Then GO TO 4.
14.CHECK TARGET IDLE SPEED AGAIN 1. Start engine and warm it up to normal operating temperature.2. Check idle speed.
For procedure, refer to EC-443, "Special Repair Requirement".
For specification, refer to EC-449, "Idle Speed".
Is the inspection result normal? YES >> GO TO 15.
NO >> GO TO 17.
15.CHECK IGNITION TIMING AGAIN 1. Run engine at idle.2. Check ignition timing with a timing light.
For procedure, refer to EC-444, "Special Repair Requirement".
For specification, refer to EC-449, "Ignition Timing".
1 : Timing indicator
Is the inspection result normal? YES >> INSPECTION END.
NO >> GO TO 16.

16.CHECK TIMING CHAIN INSTALLATION
Check timing chain installation. Refer to EM-67, "Exploded View".
Is the inspection result normal? YES >> GO TO 17.
NO >> Repair the timing chain installation. Then GO TO 4.
17.DETECT MALFUNCTIONING PARTCheck the following.
• Check camshaft position sensor (PHASE) and circuit. Refer to EC-274, "DTC Logic".• Check crankshaft position sensor (POS) and circuit. Refer to EC-271, "DTC Logic".
Is the inspection result normal? YES >> GO TO 18.
NO >> Repair or replace. Then GO TO 4
18.CHECK ECM FUNCTION1. Substitute another known-good ECM to check ECM function. (ECM may be the cause of an incident, but this is a rare case.)
2. Perform initialization of NATS system and registration of all NATS ignition key IDs. Refer to SEC-50, "ECM : Work Procedure".
>> GO TO 4.