Engine Mechanical K9K

Camshaft valve clearance

In this manual: Engine Mechanical K9K
Foreword — 1General information — 45Engine Mechanical MR16DDT — 61Engine Mechanical HR16DE — 52Engine Mechanical K9K — 46Engine Lubrication System MR16DDT — 18Engine Lubrication System HR16DE — 14Engine Lubrication System K9K — 11Engine Cooling System MR16DDT — 28Engine Cooling System HR16DE — 29Engine Cooling System K9K — 24Engine Control System MR16DDT — 163Engine Control System HR16DE — 115Engine Control System K9K — 129Fuel System MR16DDT — 13Fuel system HR16DE — 11Fuel system K9K — 12Exhaust system MR16DDT — 7Exhaust system HR16DE — 10Exhaust system K9K — 7Starting system — 24Accelerator control system — 6Clutch — 25Driveline transfer: TY21B — 77Driveline rear propeller Shaft: 3Fφ16-ETJ75 — 12Driveline rear final drive: RTVS — 31Transaxle & transmission 5MT: RS5F92R — 31Transaxle & transmission 6MT: RS6F94R — 30Transaxle & transmission CVT: RE0F10B — 93Transaxle & transmissioN CVT: RE0F11A — 103Front Axle MR16DDT — 18Front Axle HR16DE — 17Front Axle K9K — 17Rear Axle 2WD — 6Rear Axle 4WD — 13Front Suspension — 21Rear Suspension 2WD — 13Rear Suspension 4WD — 17Road Wheels & Tires — 6Brake System LHD — 24Brake System RHD — 24Parking Brake System — 8Brake Control System without ESP — 44Brake Control System with ESP — 63Steering System — 14Steering Control System — 27Seat Belt — 8SRS Airbag — 24SRS Airbag Control System — 93Ventilation System — 11Heater & Air Conditioning System HR16DE — 28Heater & Air Conditioning System MR16DDT — 28Heater & Air Conditioning Control System Type 1 — 49Heater & Air Conditioning Control System Type 2 — 51Heater & Air Conditioning Control System Type 3 — 32Heater & Air Conditioning Control System Type 4 — 40Heater & Air Conditioning Control System Type 5 — 21Interior — 16Instrument Panel — 10Seat — 18Door & Lock Type 1 — 83Door & Lock type 2 — 80Door & Lock type 3 — 65Door & Lock type 4 — 60Security Control System with intelligent key system — 82Security Control System without intelligent key system — 41Glass & Window System — 15Power Window Control System — 28Body Repair — 13Exterior — 20Mirrors — 26Exterior Lighting System Halogen type — 51Interior Lighting System — 24Wiper & Washer — 45Defogger — 31Horn — 4Power Outlet — 4Body Control System With intelligent key system — 21Body Control System Without intelligent key system — 23LAN system can fundamental — 6LAN system can — 31LAN System can system (type 1) — 1LAN System can system (type 2) — 1LAN System can system (type 3) — 1LAN System can system (type 4) — 1LAN System can system (type 5) — 1LAN System can system (type 6) — 1LAN System can system (type 7) — 2LAN System can system (type 8) — 1LAN System can system (type 9) — 1LAN System can system (type 10) — 1LAN System can system (type 11) — 1Power Control System IPDM E/R (with I-key) — 14Power Control System IPDM E/R (without I-key) — 14Power Control System Power distribution system — 25Charging System — 22Power Supply, Ground & Circuit Elements — 20Meter, Warning Lamp & Indicator — 33Warning Chime System — 22Audio, Visual & Navigation System Audio without navigation — 30Audio, Visual & Navigation System Audio with navigation — 33Audio, Visual & Navigation System NISSAN dynamic control system — 22Cruise Control System — 1Drive Mode System — 10Maintenance — 14
~2min read
01020304050118N·mlb·ft
Tightening torque found on this page

Valve Clearance

CHECKING AND ADJUSTING THE VALVE CLEARANCE

1. Install the tappet. 2. Install the camshaft.

3. Install the camshaft brackets.

4. Place the valves of the cylinder concerned at the “end of: 11 N·m


4. Place the valves of the cylinder concerned at the “end of exhaust - beginning of inlet” position and check the clearance (X).

NOTE

:
Dimension (Y) corresponds to the tappet thickness sizes (there are 25 sizes at the service parts).
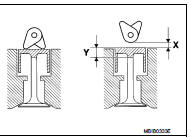
5. Compare the values recorded with the values specified, then replace the

5. Compare the values recorded with the values specified, then replace the tappets which are not within tolerance.

Clearance, when the engine cold: Intake : 0.125 - 0.25 mm (0.0049 - 0.0098 in) Exhaust : 0.325 - 0.45 mm (0.0128 - 0.0177 in)

6. Remove the camshaft brackets. 7. Remove the camshaft.

8. Remove the tappet not within tolerance.

Determining dimension Y.

Set up the following assembly using KV113B0050 (Mot. 252-01) (Commercial service tool) or equivalent tool and dial gauge, then calibrate the gauge.
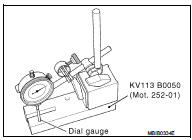
9. Raise the gauge extension (without modifying the position of the

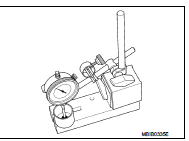
9. Raise the gauge extension (without modifying the position of the magnetic support/gauge assembly), then slide in the tappet to be measured.

• Note dimension (Y) and repeat the operation for the tappets where the valve clearance is not within tolerance.

• Refer to the Replacement Parts Catalogue for the vehicle concerned to select the various thicknesses of the tappet(s).

10. Check the valve clearance again. 11. Remove the camshaft brackets. 12. Remove the camshaft.

13. Remove the tappet(s) not within tolerance.
14. Grease the underside of the tappets and the camshaft brackets.

14. Grease the underside of the tappets and the camshaft brackets.

15. Degrease the gasket faces (of the cylinder head and brackets 1 and 6). They should be clean, dry and free from grease (in particular, remove finger marks).

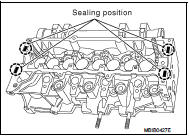
16. Lay four beads of Loctite with a width of 1 mm (0.04 in) on brackets 1 and 6 of the cylinder head.

17. Install the camshaft.

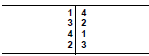
18. Install the camshaft brackets (these are numbered from 1 to 6 and bearing (1) should be positioned on the flywheel end).

: 11 N·m

Symptom diagnosis