Cooler pipe and hose
Exploded View
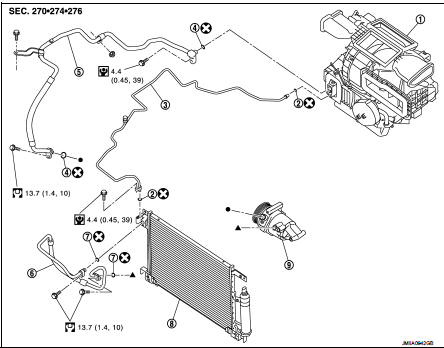
1. A/C unit assembly 2. O-ring
3. High-pressure pipe
4. O-ring
5. Low-pressure flexible hose 6. High-pressure flexible hose 7. O-ring
8. Condenser
9. Compressor
 : Do not reuse
 : N·m (kg-m, in-lb)
 : N·m (kg-m, ft-lb)
High-pressure flexible hose : Removal and Installation
CAUTION:Perform lubricant return operation before each refrigeration system disassembly. However, if a large amount of refrigerant or lubricant is detected, never perform lubricant return operation. Refer to HA- 78, "Perform Lubricant Return Operation".
REMOVAL
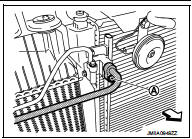
1. Use a refrigerant collecting equipment (for HFC-134a) to discharge the refrigerant. Refer to HA-76, "Recycle Refrigerant". 2. Remove front bumper fascia assembly. Refer to EXT-13, "Removal and Installation".3. Remove mounting bolt (A), and then disconnect high-pressure flexible hose from condenser.
CAUTION:Cap or wrap the joint of the A/C piping and condenser with suitable material such as vinyl tape to avoid the entry of air.
 : Vehicle front
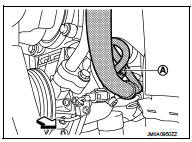
4. Remove mounting bolt (A), and then disconnect high-pressure flexible hose from compressor.
CAUTION:Cap or wrap the joint of the A/C piping and compressor with suitable material such as vinyl tape to avoid the entry of air.
 : Vehicle front
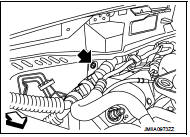
5. Remove high-pressure flexible hose from vehicle.
INSTALLATION
Note the following items, and then install in the reverse order of removal.
CAUTION:• Replace O-rings with new ones. Then apply compressor oil to them when installing.
• Check for leakages when recharging refrigerant. Refer to HA-74, "Leak Test".
Low-pressure flexible hose : Removal and Installation
CAUTION:Perform lubricant return operation before each refrigeration system disassembly. However, if a large amount of refrigerant or lubricant is detected, never perform lubricant return operation. Refer to HA- 78, "Perform Lubricant Return Operation".
REMOVAL
1. Use a refrigerant collecting equipment (for HFC-134a) to discharge the refrigerant. Refer to HA-76, "Recycle Refrigerant". 2. Remove front bumper fascia asembly. Refer to EXT-13, "Removal and Installation". 3. Remove cowl top extension. Refer to EXT-20, "Removal and Installation".4. Remove mounting nut, and then move lower dash insulator aside.
 : Nut
 : Vehicle front
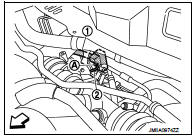
5. Remove mounting bolt (A), and then disconnect low-pressure flexible hose (1) and high-pressure pipe (2) from expansion valve. Refer to HA-116, "EXPANSION VALVE : Removal and Installation".
CAUTION:Cap or wrap the joint of the A/C piping and expansion valve with suitable material such as vinyl tape to avoid the entry of air.
: Vehicle front
6. Remove mounting bolt (A) of low-pressure flexible hose front side (1) and mounting nut (B) of low-pressure flexible hose rear side (2).
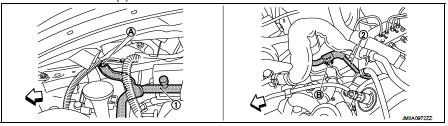
: Vehicle front
7. Remove ground wire mounting bolt (A), and then move ground wire (1) aside.
: Vehicle front
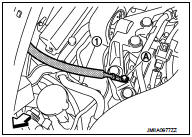
8. Remove mounting bolt (A), and then disconnect low-pressure flexible hose from compressor.
CAUTION:Cap or wrap the joint of the A/C piping and compressor with suitable material such as vinyl tape to avoid the entry of air.
: Vehicle front
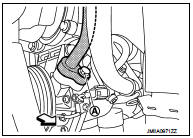
9. Remove low-pressure flexible hose from vehicle.
INSTALLATION
Note the following items, and then install in the reverse order of removal.
CAUTION:• Replace O-rings with new ones. Then apply compressor oil to them when installing.
• Check for leakages when recharging refrigerant. Refer to HA-74, "Leak Test".
High-pressure pipe : Removal and Installation
CAUTION:Perform lubricant return operation before each refrigeration system disassembly. However, if a large amount of refrigerant or lubricant is detected, never perform lubricant return operation. Refer to HA- 78, "Perform Lubricant Return Operation".
REMOVAL
1. Use a refrigerant collecting equipment (for HFC-134a) to discharge the refrigerant. Refer to HA-76, "Recycle Refrigerant". 2. Remove low-pressure flexible hose. Refer to HA-91, "LOW-PRESSURE FLEXIBLE HOSE : Removal and Installation".3. Remove mounting bolt (A), and then disconnect high-pressure pipe (1) from condenser.
CAUTION:Cap or wrap the joint of the A/C piping and condenser with suitable material such as vinyl tape to avoid the entry of air.
: Vehicle front
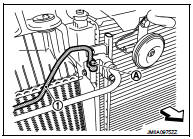
4. Remove high-pressure pipe (1) fixing clips (B), and then remove high-pressure pipe from vehicle.
: Vehicle front

INSTALLATION
Note the following items, and then install in the reverse order of removal.
CAUTION:• Replace O-rings with new ones. Then apply compressor oil to them when installing.
• Check for leakages when recharging refrigerant. Refer to HA-74, "Leak Test".