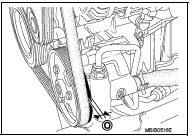
Drive belt
Checking Drive Belts
WARNING:Be sure to perform when the engine is stopped. 1. Inspect belts for cracks, fraying, wear and oil. If necessary, replace.
2. Evaluate manually if the belt is enough tensioned (tension cannot be measured by way of frequency meter).
CAUTION:Auto-tensioner must be replaced with a new one when the belt is replaced.
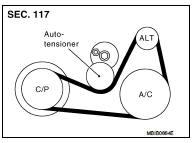
Tension Adjustment
Belt tensioning is not necessary, as it is automatically adjusted by auto-tensioner.
Removal and Installation
CAUTION: • Replace any belt that has been removed with a new one. • Auto-tensioner must be replaced with new ones when the belt is replaced.• Never run the engine without the drive belts to avoid damaging the crankshaft pulley
.
REMOVAL
1. Remove engine undercover. 2. Remove RH front wheel. 3. Remove fender protector RH. Refer to EXT-22, "Exploded View".4. Remove drive belt.
• Turn clockwise adjusting bolt.
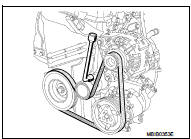
5. If necessary, remove auto-tensioner.
INSTALLATION
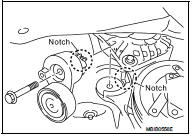
1. Install auto-tensioner mounting bolt.
Auto-tensioner mounting bolt : 40 N·m
• Align the notch and tighten mounting bolt.
2. Install the drive belt.
CAUTION:• Make sure belt is correctly engaged with the pulley groove. • Check for oil and coolant on belt and each pulley groove.
• Certain drive belts have five teeth whereas the air conditioning compressor pulley, power-assisted steering pump pulley, and alternator pulley all have six teeth.In this case, it is essential to check that inner tooth (O) of the pulleys remains free when fitting the drive belt.
Never turn the engine in the opposite direction to its normal operating direction.
Use a brush to remove any deposits from the crankshaft pulley V grooves.
For engines fitted with a mechanical tensioning roller, it is essential to replace the tensioning roller mounting bolts.
3. Make sure that tension of each belt is within the standard.