Driveline rear final drive: RTVS

Electric controlled coupling

In this manual: Driveline rear final drive: RTVS
Foreword — 1General information — 45Engine Mechanical MR16DDT — 61Engine Mechanical HR16DE — 52Engine Mechanical K9K — 46Engine Lubrication System MR16DDT — 18Engine Lubrication System HR16DE — 14Engine Lubrication System K9K — 11Engine Cooling System MR16DDT — 28Engine Cooling System HR16DE — 29Engine Cooling System K9K — 24Engine Control System MR16DDT — 163Engine Control System HR16DE — 115Engine Control System K9K — 129Fuel System MR16DDT — 13Fuel system HR16DE — 11Fuel system K9K — 12Exhaust system MR16DDT — 7Exhaust system HR16DE — 10Exhaust system K9K — 7Starting system — 24Accelerator control system — 6Clutch — 25Driveline transfer: TY21B — 77Driveline rear propeller Shaft: 3Fφ16-ETJ75 — 12Driveline rear final drive: RTVS — 31Transaxle & transmission 5MT: RS5F92R — 31Transaxle & transmission 6MT: RS6F94R — 30Transaxle & transmission CVT: RE0F10B — 93Transaxle & transmissioN CVT: RE0F11A — 103Front Axle MR16DDT — 18Front Axle HR16DE — 17Front Axle K9K — 17Rear Axle 2WD — 6Rear Axle 4WD — 13Front Suspension — 21Rear Suspension 2WD — 13Rear Suspension 4WD — 17Road Wheels & Tires — 6Brake System LHD — 24Brake System RHD — 24Parking Brake System — 8Brake Control System without ESP — 44Brake Control System with ESP — 63Steering System — 14Steering Control System — 27Seat Belt — 8SRS Airbag — 24SRS Airbag Control System — 93Ventilation System — 11Heater & Air Conditioning System HR16DE — 28Heater & Air Conditioning System MR16DDT — 28Heater & Air Conditioning Control System Type 1 — 49Heater & Air Conditioning Control System Type 2 — 51Heater & Air Conditioning Control System Type 3 — 32Heater & Air Conditioning Control System Type 4 — 40Heater & Air Conditioning Control System Type 5 — 21Interior — 16Instrument Panel — 10Seat — 18Door & Lock Type 1 — 83Door & Lock type 2 — 80Door & Lock type 3 — 65Door & Lock type 4 — 60Security Control System with intelligent key system — 82Security Control System without intelligent key system — 41Glass & Window System — 15Power Window Control System — 28Body Repair — 13Exterior — 20Mirrors — 26Exterior Lighting System Halogen type — 51Interior Lighting System — 24Wiper & Washer — 45Defogger — 31Horn — 4Power Outlet — 4Body Control System With intelligent key system — 21Body Control System Without intelligent key system — 23LAN system can fundamental — 6LAN system can — 31LAN System can system (type 1) — 1LAN System can system (type 2) — 1LAN System can system (type 3) — 1LAN System can system (type 4) — 1LAN System can system (type 5) — 1LAN System can system (type 6) — 1LAN System can system (type 7) — 2LAN System can system (type 8) — 1LAN System can system (type 9) — 1LAN System can system (type 10) — 1LAN System can system (type 11) — 1Power Control System IPDM E/R (with I-key) — 14Power Control System IPDM E/R (without I-key) — 14Power Control System Power distribution system — 25Charging System — 22Power Supply, Ground & Circuit Elements — 20Meter, Warning Lamp & Indicator — 33Warning Chime System — 22Audio, Visual & Navigation System Audio without navigation — 30Audio, Visual & Navigation System Audio with navigation — 33Audio, Visual & Navigation System NISSAN dynamic control system — 22Cruise Control System — 1Drive Mode System — 10Maintenance — 14
~4min read

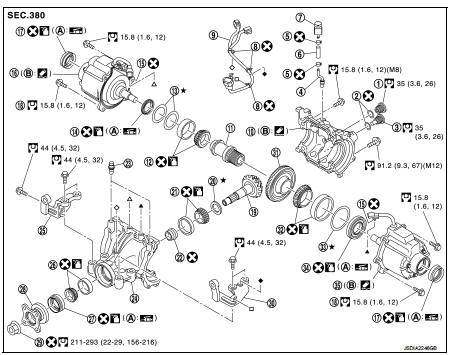
Exploded View

1. Filler plug

1. Filler plug
2. Gasket
3. Drain plug
4. Breather tube
5. Clip
6. Breather hose
7. Breather
8. sub-harness clip
9. sub-harness
10. Rear cover
11. Center stem
12. Side bearing (right) 13. Side bearing adjusting shim (right) 14. Side oil seal (right) 15. Connector clip
16. Electric controlled coupling (right) 17. Electric controlled coupling oil seal 18. Reamer bolt
19. Drive pinion
20. Drive pinion adjusting shim 21. Pinion rear bearing
22. Collapsible spacer
23. Breather
24. Gear carrier
25. Carrier bracket (right) 26. Pinion front bearing 27. Front oil seal
28. Companion flange
29. Drive pinion lock nut 30. Carrier bracket (left) 31. Drive gear
32. Side bearing (left) 33. Side bearing adjusting shim (left) 34. Electric controlled coupling (left) 35. Side oil seal (left)

A. Oil seal lip B. Gear carrier mounting face

: Always replace after every: N·m (kg-m, ft-lb)
disassembly.: Always replace after every
disassembly. : Apply anti-corrosive oil.: Apply gear oil.
: Apply multi purpose grease: Apply anti-corrosive oil.
: Apply Genuine Liquid Gasket 1217: Apply multi purpose grease
or equivalent.: Apply Genuine Liquid Gasket 1217
or equivalent.

Disassembly: Select with proper thickness.


Disassembly

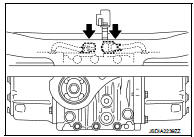
1. Disconnect electric controlled coupling connector (1) from subharness (2).
2. Remove connector clip ( )

2. Remove connector clip ( from final drive assembly.)
from final drive assembly.

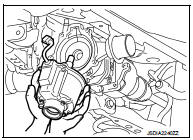
3. Remove electric controlled coupling from final drive assembly.

3. Remove electric controlled coupling from final drive assembly.

4. Remove sub-harness from final drive assembly.

CAUTION:
Remove sub-harness only when necessary.
5. Remove electric controlled coupling oil seals from electric controlled

5. Remove electric controlled coupling oil seals from electric controlled coupling, using a suitable tool.

CAUTION:
Never damage electric controlled coupling.
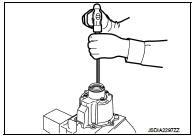
6. Remove side oil seals with a suitable tool.

6. Remove side oil seals with a suitable tool.

CAUTION:
Never damage gear carrier and rear cover.

7. Perform inspection after disassembly. Refer to DLN-150, "Inspection".

Assembly

Assembly

1. Install side oil seal (right side) until it becomes flush with the carrier end, using the drift (A) (SST: KV38100200).

CAUTION:
• Never reuse oil seals. • When installing, never incline oil seals.

• Apply multi-purpose grease onto oil seal lips, and gear oil onto the circumference of oil seal.
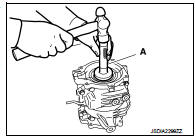
2. Install side oil seal (left side) until it becomes flush with the carrier

2. Install side oil seal (left side) until it becomes flush with the carrier end, using the drift (A) (SST: KV38100500).

CAUTION:
• Never reuse oil seals. • When installing, never incline oil seals.

• Apply multi-purpose grease onto oil seal lips, and gear oil onto the circumference of oil seal.
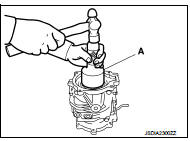
3. Install electric controlled coupling oil seals to electric controlled

3. Install electric controlled coupling oil seals to electric controlled coupling, using the drift (A) (SST: KV38109700).

NOTE

:
The use of the special service tool satisfies the mounting dimensions.

CAUTION:
• Never reuse oil seals. • When installing, never incline oil seals.

• Apply multi-purpose grease onto oil seal lips, and gear oil onto the circumference of oil seal.

4. Install new sub-harness clip to sub-harness.

CAUTION:
• Check original mounting dimensions to install clip to the original position.

• Baffle pin must be functioning normally.

5. Install sub-harness to final drive assembly.
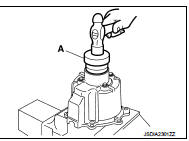
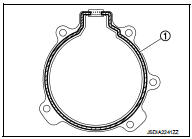
6. Apply liquid gasket (1) to mating surface of coupling cover.

6. Apply liquid gasket (1) to mating surface of coupling cover.

Also remove any moisture, oil, or foreign material adhering to the mounting surfaces. • Overlap both ends of the bead for at least 3 mm (0.12 in).
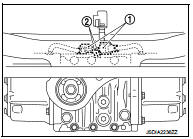
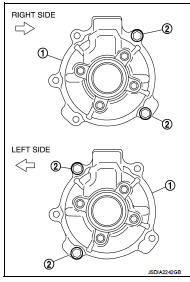
7. Install electric controlled coupling (1) to spline of stem center

7. Install electric controlled coupling (1) to spline of stem center with grommet of harness facing upward, temporarily tighten reamer bolts (2) to the positions shown in the figure.

8. Tighten reamer bolts and coupling cover mounting bolts to the specified torque.

CAUTION:: Vehicle front


CAUTION:
Never allow harness to get caught in the bolt.
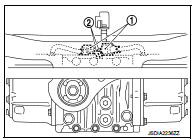
9. Install the new connector clip (

9. Install the new connector clip () to final drive assembly.
) to final drive assembly.

CAUTION:
Never reuse connector clip.
10. Connect electric controlled coupling connector (1) to sub-harness

10. Connect electric controlled coupling connector (1) to sub-harness (2).

11. When oil leaks while removing, check oil level after the installation.

Refer to DLN-132, "Inspection".
Inspection

Inspection

INSPECTION AFTER DISASSEMBLY

Oil Seal
• Whenever disassembled, replace.

• If wear, deterioration of adherence (sealing force lips), or damage is detected on the lips, replace them.