Engine coolant
Inspection
LEVEL
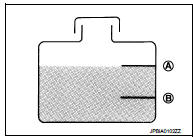
• Check that the reservoir tank engine coolant level is within the “MIN” to “MAX” when the engine is cool.
A : MAX
B : MIN
• Adjust the engine coolant level if necessary.
LEAKAGE
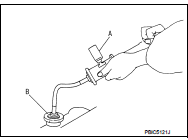
• To check for leakage, apply pressure to the cooling system with the radiator cap tester (commercial service tool) (A) and the radiator cap tester adapter (commercial service tool) (B).
Testing pressure: Refer to CO-76, "Radiator".
WARNING:Never remove radiator cap when engine is hot. Serious burns may occur from high-pressure engine coolant escaping from radiator. CAUTION:
Higher test pressure than specified may cause radiator damage. NOTE:
In a case that engine coolant decreases, replenish radiator with engine coolant.
• If anything is found, repair or replace damaged parts.
Draining
WARNING:• Never remove radiator cap when engine is hot. Serious burns may occur from high-pressure engine coolant escaping from radiator.
• Wrap a thick cloth around the radiator cap. Slowly turn it a quarter of a turn to release built-up pressure.
Then turn it all the way.
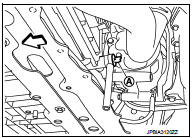
1. Remove engine under cover.2. Open radiator drain plug (A) at the bottom of radiator, and then remove radiator cap.
 : Vehicle front
CAUTION:
Perform this step when engine is cold. 3. Remove reservoir tank if necessary, and drain engine coolant and clean reservoir tank before installing. Refer to CO-66, "Exploded View". 4. Check drained engine coolant for contaminants such as rust, corrosion or discoloration. If contaminated, flush the engine cooling system. Refer to CO-63, "Flushing".
5. Remove air relief plug from water outlet. Refer to CO-75, "Exploded View".
Refilling
• Before start working, turn off the automatic air conditioner and the blower motor.
1. Install reservoir tank, radiator drain plug and air relief plug.2. Fill reservoir tank slowly with coolant until coolant spills from the air relief hole. Refer to CO-58, "Cooling Circuit".
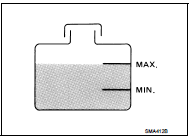
• Put a cloth under the air relief plug to prevent engine coolant to dampen the crankshaft position sensor.• Fill coolant to the MAX level line of the reservoir tank at a rate of 2 liter (1-3/4 lmp qt)/min or lower.
3. Close the air relief plug.
Use Genuine NISSAN Anti-freeze Coolant or equivalent mixed with water (distilled or demineralized).
Refer to MA-13, "Fluids and Lubricants".Engine coolant capacity Approx. 6.7 (5 - 7/8 Imp qt) Reservoir tank capacity 0.7 (5/8 lmp qt)
4. Warm up the engine for approximately five minutes without reservoir tank cap installed, and then turn off the engine and loose air relief plug until coolant spills from air relief hole.
• If coolant overflows reservoir tank hole, install filler cap.• Watch engine coolant temperature warning light so as not overheat the engine during all of the operation.
WARNING:• Be careful not be scaled with hot engine coolant or vacuum pump when operating.
• Radiator fan blade can start at any time and make personal injuries.
5. Close the air relief plug and run the engine at 2,000 rpm until the upper hose comes hot and radiator fan operates. Let the engine running approximately 5 minutes at idle speed and check for sound of coolant flow while running engine from idle up to 3,000 rpm.
• Sound may be noticeable at heater water cock.
6. If sound is heard, bleed air from cooling system by repeating steps 4 through 5 until coolant level no longer drops.
• Check the radiator lower hose for any signs of leakage.
7. Turn off the engine and let it cool down.
• Cool down using a fan to reduce the time.
8. After cooling period, loose the air relief plug and check if coolant spills from the air relief hole. In other case, remove the air relief plug until the coolant spills, and then close the relief air plug. Bleed air from cooling system by repeating steps 5 through 8 until the coolant spills immediately.9. Check the engine coolant level when engine is cool and refill to MAX level line if the level is lower.
• Clean excess coolant from engine.
Flushing
1. Fill reservoir tank with water until water spills from the air relief hole, then close air relief plug. Reinstall reservoir tank cap.1. Fill reservoir tank with water until water spills from the air relief hole, then close air relief plug. Reinstall reservoir tank cap. 2. Run engine and warm it up to normal operating temperature. 3. Rev engine two or three times under no-load. 4. Stop engine and wait until it cools down. 5. Drain water. 6. Repeat steps 1 through 5 until clear water begins to drain from radiator.7. Blow compressed air into cooling circuit through the reservoir tank valve hole to drain all the water.