Oil pan (upper)
Exploded View
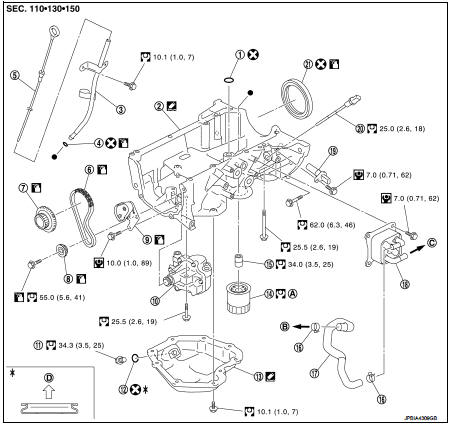
1. O-ring
2. Oil pan (upper)
3. Oil level gauge guide 4. O-ring
5. Oil level gauge
6. Oil pump drive chain
7. Crankshaft sprocket
8. Oil pump sprocket
9. Oil pump chain tensioner 10. Oil pump
11. Drain plug
12. Drain plug washer
13. Oil pan (lower)
14. Oil filter
15. Connector bolt
16. Clamp
17. Water hose
18. Oil cooler
19. Crankshaft position sensor 20. Oil level sensor
21. Rear oil seal
A. Refer to LU-11
B. Oil pan side
C.To thermostat haosing (M/T models) To CVT fluid cooler (CVT models) D. Oil pan side
 : N·m (kg-m, ft-lb)
 : N·m (kg-m, in-lb)
 : Always replace after every
disassembly.
 : Should be lubricated with oil.
 : Sealing point
Removal and Installation
REMOVAL
1. Remove oil pan (lower). Refer to EM-99, "Exploded View". 2. Remove oil filter. Refer to LU-11, "Removal and Installation". 3. Remove front cover, timing chain, oil pump drive chain, and other related parts. Refer to EM-67, "Exploded View". 4. Remove oil level gauge and oil level gauge guide.5. Remove oil pump. Refer to LU-15, "Exploded View".
NOTE:
The oil pan (upper) can be removed and installed without removing the oil pump.
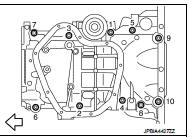
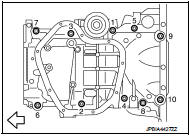
6. Remove oil pan (upper) with the following procedure: a. Loosen bolts in reverse order as shown in the figure.
 : Engine front
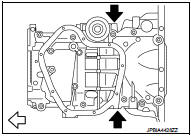
b. Insert a screwdriver shown by the arrow ( ) in the figure and open up a crack between oil pan (upper) and cylinder block.
: Engine front
CAUTION:
A more adhesive liquid gasket is applied compared to previous types when shipped, so it should not be forced off the position not specified.
c. Insert seal cutter [SST: KV10111100 (J-37228)] between oil pan (upper) and cylinder block, and slide it by tapping on the side of the tool with a hammer.
CAUTION:Be careful not to damage the mating surface.
7. Remove O-ring between cylinder block and oil pan (upper).
INSTALLATION
1. Install oil pan (upper) with the following procedure:
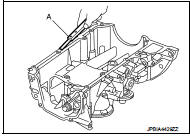
A. Use a scraper (a) to remove old liquid gasket from mating surfaces.
• Remove the old liquid gasket from mating surface of cylinder block.• Remove old liquid gasket from the bolt holes and threads.
Caution:never scratch or damage the mating surfaces when cleaning off old liquid gasket.
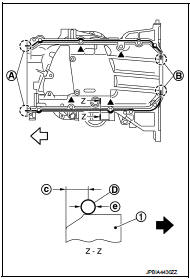
B. Apply a continuous bead of liquid gasket (d) with a tube presser (commercial service tool) as shown in the figure.
1 : Oil pan (upper)
a : 2 mm (0.08 In) protruded to outside b : 2 mm (0.08 In) protruded to rear oil seal mounting side c : 5.5 - 7.5 Mm (0.217 - 0.295 In) e : 4.0 - 5.0 Mm (0.157 - 0.197 In)  : engine front
 : engine outside
Use genuine liquid gasket or equivalent.
Caution:• apply liquid gasket to outside of bolt hole for the positions shown by
 marks.
• Attaching should be done within 5 minutes after liquid gasket application.
c. Install new O-ring at cylinder block side.
Caution:
install avoiding misalignment of o-ring.
D. Tighten bolts in numerical order as shown in the figure.
Install avoiding misalignment of O-ring.d. Tighten bolts in numerical order as shown in the figure.
: Engine front
2. Install rear oil seal with the following procedure.
Caution:• the installation of rear oil seal should be completed within 5 minutes after installing oil pan (upper). • Always replace rear oil seal with new one.
• Never touch oil seal lip.
A. Wipe off liquid gasket protruding to the rear oil seal mounting part of oil pan (upper) and cylinder block using a scraper.
B. Apply engine oil to entire outside area of rear oil seal.
C. Press-fit the rear oil seal using a suitable drift (a) with outer diameter 115 mm (4.53 In) and inner diameter 90 mm (3.54 In).
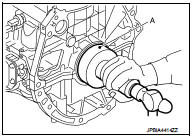
• Press-fit to the specified dimensions as shown in the figure.
1 : Rear oil seal
A : Cylinder block rear end surface
• Never touch the grease applied to the oil seal lip. • Be careful not to damage the rear oil seal mounting part of oil pan (upper) and cylinder block or the crankshaft.
• Press-fit straight, checking that rear oil seal does not curl or tilt.
NOTE:The standard surface of the dimension is the rear end surface of cylinder block.
3. Install in the reverse order of removal, for the rest of parts.

Inspection
INSPECTION AFTER REMOVAL
Clean oil strainer portion (part of the oil pump) if any object attached.