Rear door glass
Exploded View
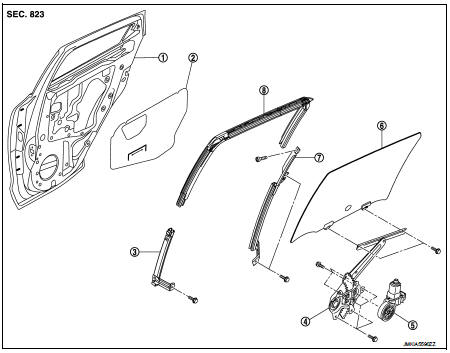
1. Rear door panel
2. Sealing screen
3. Lower sash (front)
4. Rear door regulator assembly 5. Power window motor
6. Rear door glass
7. Lower sash (rear)
8. Rear door glass run
Removal and Installation
REMOVAL
1. Fully open rear door glass. 2. Remove rear door finisher. Refer to INT-16, "Removal and Installation".3. Remove rear door speaker harness connector and the remove the sealing screen.
NOTE:
Cut the butyl-tape so that some parts of the butyl-tape do not remain on the sealing screen, if the sealing screen is reused.
8. Remove lower sash (rear) mounting bolts and TORX bolt with a screwdriver (A) as shown in the figure.
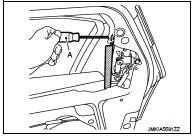
9. Remove lower sash (rear) from the rear door panel.
CAUTION:Avoid contact between lower sash (rear) and rear door glass when removing.
10. Remove rear door glass from the rear panel.
INSTALLATION
Install in the reverse order of removal.
Inspection and Adjustment
SYSTEM INITIALIZATION
Initialize the system if any of the following work is complete. Refer to PWC-14, "Description".
FITTING INSPECTION
• Check that the glass is fit securely into the sash groove.• Lower the glass slightly [approximately 10 to 20 mm (0.394 to 0.787 in)], and check that the clearance to the sash is parallel. Loosen the regulator mounting bolts, guide rail mounting bolts, and glass and guide rail mounting bolts to correct the glass position if the clearance between the glass and sash is not parallel.