Engine Cooling System HR16DE
Water pump
In this manual: Engine Cooling System HR16DE
~1min read
Exploded View
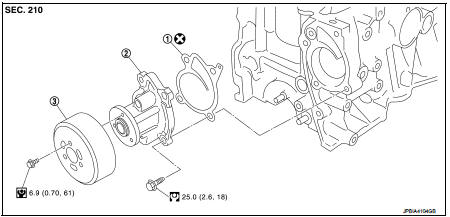
1. Gasket
2. Water pump
3. Water pump pulley
 : Always replace after every
disassembly.
 : N·m (kg-m, in-lb)
 : N·m (kg-m, ft-lb)
Removal and Installation
REMOVAL
1. Drain engine coolant from radiator. Refer to CO-37, "Draining".
CAUTION:• Perform this step when the engine is cold.
• Never spill engine coolant on drive belt.
2. Steer front wheel to the right. 3. Remove front fender protector (RH). Refer to EXT-22, "Removal and Installation". 4. Loosen mounting bolts of water pump pulley before loosening belt tension of drive belt. 5. Remove drive belt. Refer to EM-160, "Removal and Installation". 6. Remove water pump pulley.7. Remove water pump.
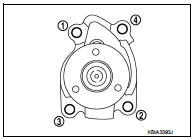
• Loosen mounting bolts in reverse order as shown in the figure.• Engine coolant will leak from cylinder block, so have a receptacle ready below.
CAUTION:• Handle water pump vane so that it does not contact any other parts.
• Water pump cannot be disassembled and should be replaced as a unit.
INSTALLATION
Install in the reverse order of removal.
Inspection
INSPECTION AFTER REMOVAL
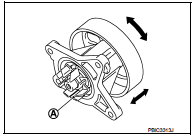
• Check visually that there is no significant dirt or rusting on water pump body and vane (A). • Check that there is no looseness in vane shaft, and that it turns smoothly when rotated by hand.• Replace water pump, if necessary.
INSPECTION AFTER INSTALLATION
• Check for leakage of engine coolant using the radiator cap tester adapter (commercial service tool) and the radiator cap tester (commercial service tool). Refer to CO-37, "Inspection".• Start and warm up the engine. Check visually that there is no leakage of engine coolant.
Was this page helpful?