4wd Control Ecu
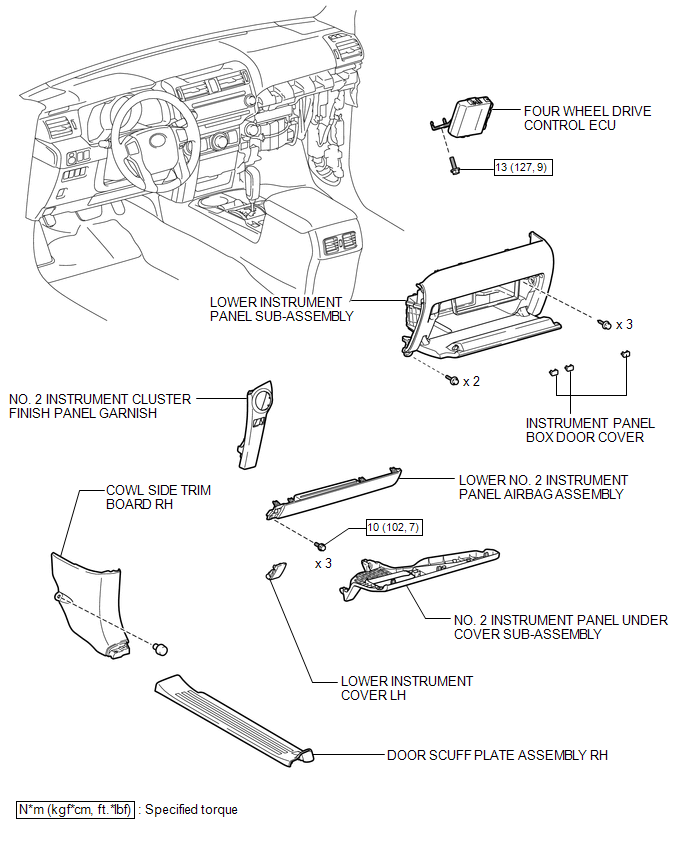
Removal REMOVAL PROCEDURE
1. REMOVE NO. 2 INSTRUMENT CLUSTER FINISH PANEL GARNISH

2. REMOVE DOOR SCUFF PLATE ASSEMBLY RH
3. REMOVE COWL SIDE TRIM BOARD RH
4. REMOVE NO. 2 INSTRUMENT PANEL UNDER COVER SUB-ASSEMBLY
5. REMOVE LOWER INSTRUMENT COVER LH
6. REMOVE LOWER NO. 2 INSTRUMENT PANEL AIRBAG ASSEMBLY
7. REMOVE INSTRUMENT PANEL BOX DOOR COVER
8. REMOVE LOWER INSTRUMENT PANEL SUB-ASSEMBLY
9. REMOVE 4 WHEEL DRIVE CONTROL ECU NO.2
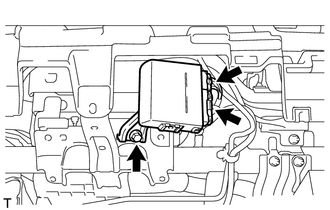
(a) Disconnect the 2 connectors.
(b) Remove the bolt and four wheel drive control ECU.
Installation INSTALLATION PROCEDURE1. INSTALL 4 WHEEL DRIVE CONTROL ECU NO.2
(a) Install the four wheel drive control ECU with the bolt.
Torque:
13 N·m {127 kgf·cm, 9 ft·lbf}
(b) Connect the 2 connectors.
2. INSTALL LOWER INSTRUMENT PANEL SUB-ASSEMBLY

3. INSTALL INSTRUMENT PANEL BOX DOOR COVER
4. INSTALL LOWER NO. 2 INSTRUMENT PANEL AIRBAG ASSEMBLY
5. INSTALL LOWER INSTRUMENT COVER LH
6. INSTALL NO. 2 INSTRUMENT PANEL UNDER COVER SUB-ASSEMBLY
7. INSTALL COWL SIDE TRIM BOARD RH
8. INSTALL DOOR SCUFF PLATE ASSEMBLY RH
9. INSTALL NO. 2 INSTRUMENT CLUSTER FINISH PANEL GARNISH
Test yourself
A quick Toyota 4Runner quiz: every answer comes with an explanation and a link to the manual page.