Adjustment
ADJUSTMENT
PRECAUTION / NOTICE / HINT
The required procedures (adjustment, calibration, and initialization or registration) must be performed only after the rear wheel alignment procedure is completed, as shown below.
Procedures Required After Completing the ProcedureReplaced Part or Performed Procedure | Required Procedure | Effect/Inoperative Function When Required Procedure Is Not Performed | Link |
|---|---|---|---|
Rear Wheel Alignment Adjustment |
|
|
 |
PROCEDURE
1. CHECK TIRES
Click here
2. MEASURE VEHICLE HEIGHT
Click here
3. CHECK CAMBER
NOTICE:
Perform the check with the vehicle unloaded.
(a) Install a camber, caster and kingpin inclination gauge. |
|
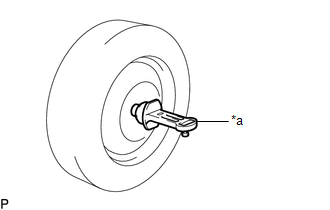
(b) Check the camber.
Camber (vehicle unloaded):
Vehicle Model | Camber Angle | Left/Right Difference |
|---|---|---|
ZGX10L-AHXEPX ZGX10L-AHXGPX ZGX10L-AHXNPX |
-0°43' +/- 0°45' (-0,72° +/- 0,75°) |
0°45' (0.75°) maximum |
ZGX10L-BHXNPA |
-0°51' +/- 0°45' (-0,85° +/- 0,75°) |
0°45' (0.75°) maximum |
HINT:
Camber is not adjustable. If the measurement is not within the specified range, inspect and replace any damaged and/or worn suspension components as necessary.
4. CHECK TOE
NOTICE:
Perform the check with the vehicle unloaded.
(a) Bounce the vehicle at each corner to stabilize the suspension.
(b) Release the parking brake and place the shift lever in N.
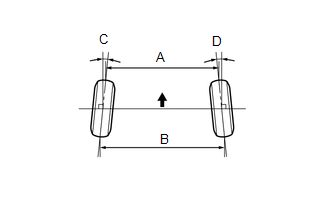
(c) Push the vehicle straight ahead approximately 5 m (16.4 ft). (Point A)
(d) Place center line markers on the points farthest from the rear wheels, and measure the distance between the markers (dimension B).
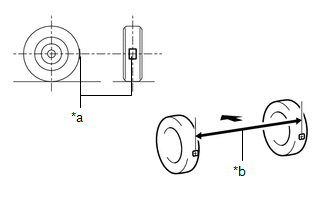
*a |
Center Line Marker |
*b |
Dimension B |
 |
Front of Vehicle |
(e) Slowly push the vehicle straight ahead to rotate the rear wheels 180°. Use a rear tire valve as the reference point.
HINT:
Do not allow the wheels to rotate more than 180°. If the wheels rotate more than 180°, repeat the procedure from step A.
(f) Measure the distance between the center line markers at the front of the rear wheels (dimension A).
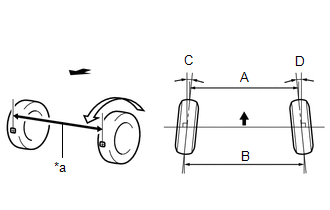
*a |
Dimension A |
|
Front of Vehicle |
Toe (vehicle unloaded):
Vehicle Model | Specified Condition |
|---|---|
ZGX10L-AHXEPX ZGX10L-AHXGPX ZGX10L-AHXNPX |
C + D: 0°10' +/- 0°10' (0,17° +/- 0,17°) |
B - A: 2.0 +/- 2.0 mm (0.0787 +/- 0.0787 in.) |
|
ZGX10L-BHXNPA |
C + D: 0°17' +/- 0°10' (0,28° +/- 0,17°) |
B - A: 3.0 +/- 2.0 mm (0.118 +/- 0.0787 in.) |
HINT:
Measure "B - A" only when it is not possible to measure "C + D".
If the toe is not within the specified range, adjust it using the rear suspension toe adjusting cam subassembly.
5. ADJUST TOE
(a) Loosen the nut of the No. 2 rear suspension arm assembly (on the rear suspension crossmember subassembly side). NOTICE: Hold the rear suspension toe adjusting cam subassembly while turning the nut. |
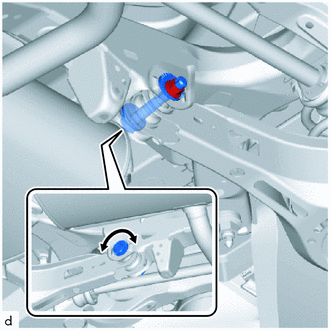 |
(b) Turn the rear suspension toe adjusting cam subassembly to adjust the toe.
Toe (vehicle unloaded):
Vehicle Model | Specified Condition |
|---|---|
ZGX10L-AHXEPX ZGX10L-AHXGPX ZGX10L-AHXNPX |
C + D: 0°10' +/- 0°05' (0,17° +/- 0,08°) |
B - A: 2.0 +/- 1.0 mm (0.0787 +/- 0.0394 in.) |
|
ZGX10L-BHXNPA |
C + D: 0°17' +/- 0°05' (0,28° +/- 0,08°) |
B - A: 3.0 +/- 1.0 mm (0.118 +/- 0.0394 in.) |
HINT:
- Turning the rear suspension toe adjusting cam subassembly by one notch changes the toe by approximately 2.9 mm (0.114 in.).
- Make adjustments so the value is as close as possible to the center of the specified range.
|
Front of Vehicle |
(c) Tighten the nut of the No. 2 rear suspension arm assembly (on the rear suspension crossmember subassembly side).
Torque:
100 N·m {1,020 kgf·cm, 74 ft·lbf}
NOTICE:
Hold the rear suspension toe adjusting cam subassembly while turning the nut.
6. ALIGN FRONT WHEELS STRAIGHT AHEAD
7. PERFORM YAW RATE AND ACCELERATION SENSOR CALIBRATION
Click here