Installation
INSTALLATION
COMPONENTS (INSTALLATION)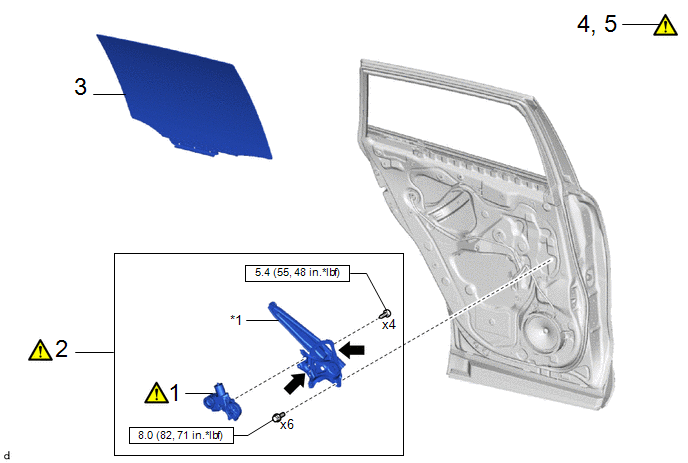
Procedure | Part Name Code |  |  |  |
|
|---|---|---|---|---|---|
1 |
POWER WINDOW REGULATOR MOTOR ASSEMBLY |
85710F |
 |
- |
- |
2 |
REAR DOOR WINDOW REGULATOR ASSEMBLY |
- |
|
- |
- |
3 |
REAR DOOR GLASS SUB-ASSEMBLY |
68104 |
- |
- |
- |
4 |
INITIALIZE POWER WINDOW CONTROL SYSTEM |
- |
|
- |
- |
5 |
INSPECT POWER WINDOW OPERATION |
- |
|
- |
- |
*1 |
REAR DOOR WINDOW REGULATOR SUB-ASSEMBLY |
- |
- |
 |
N*m (kgf*cm, ft.*lbf): Specified torque |
 |
MP grease |
HINT:
- Use the same procedure for the RH side and LH side.
- The following procedure is for the LH side.
PROCEDURE
1. INSTALL POWER WINDOW REGULATOR MOTOR ASSEMBLY
|
NOTICE: The regulator arm must be below the intermediate position when installing the power window regulator motor assembly. |
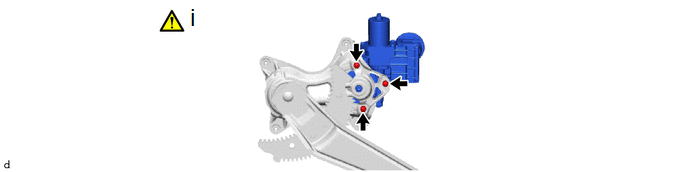
(1) Using a T25 "TORX" socket wrench, install the power window regulator motor assembly with the 3 screws to the rear door window regulator sub-assembly.
Torque:
5,4 N·m {55 kgf·cm, 48 in·lbf}
HINT:
When replacing a power window regulator motor assembly, a new power window regulator motor assembly uses self-tapping screws to thread new installation holes when the self-tapping screws are inserted.
2. INSTALL REAR DOOR WINDOW REGULATOR ASSEMBLY
|
Click here |
3. INSTALL REAR DOOR GLASS SUB-ASSEMBLY
Click here
4. INITIALIZE POWER WINDOW CONTROL SYSTEM
Click here
5. INSPECT POWER WINDOW OPERATION
Click here