LO-beam Headlight does not Illuminate
DESCRIPTION
The main body ECU (multiplex network body ECU) controls the low beam headlights.
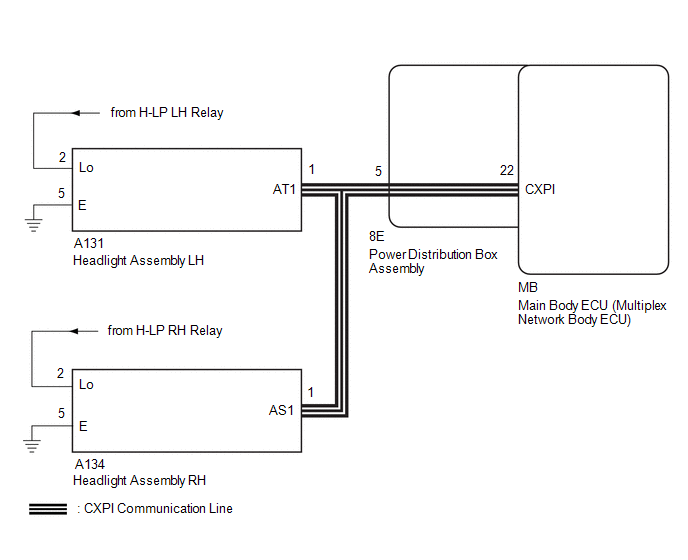
WIRING DIAGRAM
for LED Type Parking Light
for Bulb Type Parking Light
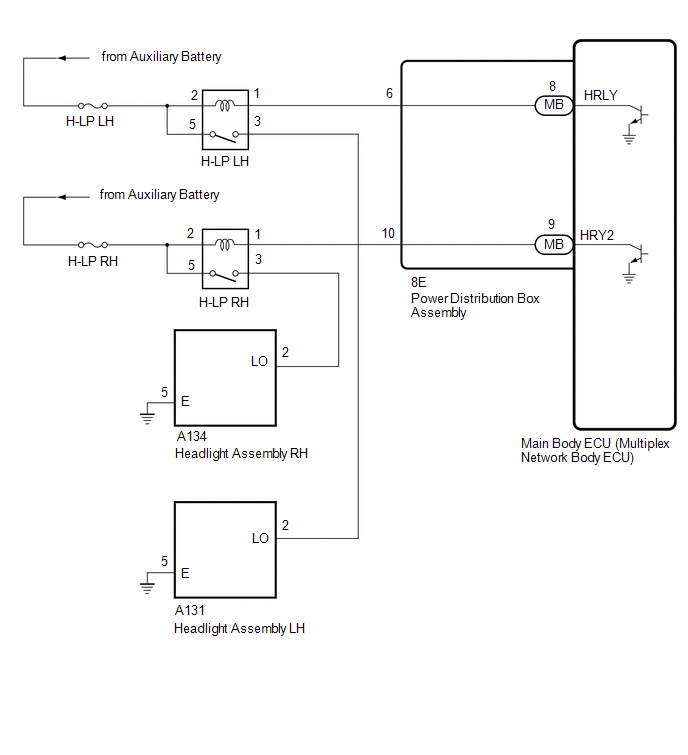
NOTICE:
- Before replacing the main body ECU (multiplex network body ECU), refer to Registration.*1
for HEV Model: Click here

for Gasoline Model: Click here
- First perform the communication function inspections in How to Proceed with Troubleshooting to confirm that there are no CXPI communication malfunctions before troubleshooting this symptom.
Click here
- First perform the communication function inspections in How to Proceed with Troubleshooting to confirm that there are no CAN communication malfunctions before troubleshooting this symptom.
Click here
- Inspect the fuses for circuits related to this system before performing the following procedure.
- *1: w/ Smart Key System
PROCEDURE
PERFORM ACTIVE TEST USING GTS
(a) Enter the following menus: Body Electrical / Main Body / Active Test.
(b) Perform the Active Test according to the display on the GTS.
Body Electrical > Main Body > Active TestTester Display | Measurement Item | Control Range | Diagnostic Note |
|---|---|---|---|
Headlight Relay / Light Power Supply Relay |
Headlights |
OFF or ON |
- |
Headlight Relay / Light Power Supply Relay
OK:
Low beam headlights illuminate.
Result | Proceed to |
|---|---|
OK |
A |
NG (LH side low beam light does not illuminate.) (for LED Type Parking Light) |
B |
NG (RH side low beam light does not illuminate.) (for LED Type Parking Light) |
C |
NG (LH side low beam light does not illuminate.) (for Bulb Type Parking Light) |
D |
NG (RH side low beam light does not illuminate.) (for Bulb Type Parking Light) |
E |
| A |  |
PROCEED TO NEXT SUSPECTED AREA SHOWN IN PROBLEM SYMPTOMS TABLE |
| C | |
GO TO STEP 4 |
| D | |
GO TO STEP 6 |
| E | |
GO TO STEP 13 |
|

INSPECT HEADLIGHT ASSEMBLY LH (LO TERMINAL VOLTAGE)
(a) Disconnect the A131 headlight assembly LH connector.
(b) Measure the voltage according to the value(s) in the table below.
Standard Voltage:
Tester Connection | Condition | Specified Condition |
|---|---|---|
A131-2 (LO) - Body ground |
Light control switch in head position |
11 to 14 V |
| NG | |
REPAIR OR REPLACE HARNESS OR CONNECTOR |
|
CHECK HARNESS AND CONNECTOR (HEADLIGHT ASSEMBLY LH - BODY GROUND)
(a) Measure the resistance according to the value(s) in the table below.
Standard Resistance:
Tester Connection | Condition | Specified Condition |
|---|---|---|
A131-5 (E) - Body ground |
Always |
Below 1 Ω |
| OK | |
REPLACE HEADLIGHT ASSEMBLY LH |
| NG | |
REPAIR OR REPLACE HARNESS OR CONNECTOR |
INSPECT HEADLIGHT ASSEMBLY RH (LO TERMINAL VOLTAGE)
(a) Disconnect the A134 headlight assembly RH connector.
(b) Measure the voltage according to the value(s) in the table below.
Standard Voltage:
Tester Connection | Condition | Specified Condition |
|---|---|---|
A134-2 (LO) - Body ground |
Light control switch in head position |
11 to 14 V |
| NG | |
REPAIR OR REPLACE HARNESS OR CONNECTOR |
|
CHECK HARNESS AND CONNECTOR (HEADLIGHT ASSEMBLY RH - BODY GROUND)
(a) Measure the resistance according to the value(s) in the table below.
Standard Resistance:
Tester Connection | Condition | Specified Condition |
|---|---|---|
A134-5 (E) - Body ground |
Always |
Below 1 Ω |
| OK | |
REPLACE HEADLIGHT ASSEMBLY RH |
| NG | |
REPAIR OR REPLACE HARNESS OR CONNECTOR |
INSPECT HEADLIGHT ASSEMBLY LH (LO TERMINAL VOLTAGE)
(a) Disconnect the A131 headlight assembly LH connector.
(b) Measure the voltage according to the value(s) in the table below.
Standard Voltage:
Tester Connection | Condition | Specified Condition |
|---|---|---|
A131-2 (LO) - Body ground |
Light control switch in head position |
11 to 14 V |
| NG | |
GO TO STEP 8 |
|
CHECK HARNESS AND CONNECTOR (HEADLIGHT ASSEMBLY LH - BODY GROUND)
(a) Measure the resistance according to the value(s) in the table below.
Standard Resistance:
Tester Connection | Condition | Specified Condition |
|---|---|---|
A131-5 (E) - Body ground |
Always |
Below 1 Ω |
| OK | |
REPLACE HEADLIGHT ASSEMBLY LH |
| NG | |
REPAIR OR REPLACE HARNESS OR CONNECTOR |
INSPECT H-LP LH RELAY
Click here
| NG | |
REPLACE H-LP LH RELAY |
|
CHECK HARNESS AND CONNECTOR (H-LP LH RELAY - HEADLIGHT UNIT ASSEMB LY LH)
(a) Measure the resistance according to the value(s) in the table below.
Standard Resistance:
Tester Connection | Condition | Specified Condition |
|---|---|---|
3 (H-LP LH relay) - A131-2 (LO) |
Always |
Below 1 Ω |
3 (H-LP LH relay) or A131-2 (LO) - Body ground |
Always |
10 kΩ or higher |
| NG | |
REPAIR OR REPLACE HARNESS OR CONNECTOR |
|
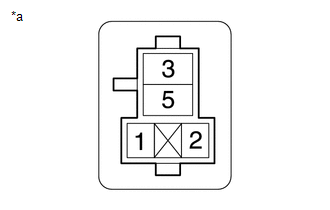
CHECK HARNESS AND CONNECTOR (H-LP LH RELAY - BATTERY)
(a) Measure the voltage according to the value(s) in the table below. Standard Voltage:
|
|
| NG | |
REPAIR OR REPLACE HARNESS OR CONNECTOR |
|
CHECK HARNESS AND CONNECTOR (H-LP LH RELAY - POWER DISTRIBUTION BOX ASSEMBLY)
(a) Disconnect the 8E power distribution box assembly connector.
(b) Measure the resistance according to the value(s) in the table below.
Standard Resistance:
Tester Connection | Condition | Specified Condition |
|---|---|---|
1 (H-LP LH relay) - 8E-6 |
Always |
Below 1 Ω |
1 (H-LP LH relay) or 8E-6 - Body ground |
Always |
10 kΩ or higher |
| NG | |
REPAIR OR REPLACE HARNESS OR CONNECTOR |
|
CHECK POWER DISTRIBUTION BOX ASSEMBLY
(a) Remove the power distribution box assembly.
Click here
(b) Remove the main body ECU (multiplex network body ECU) from the power distribution box assembly.
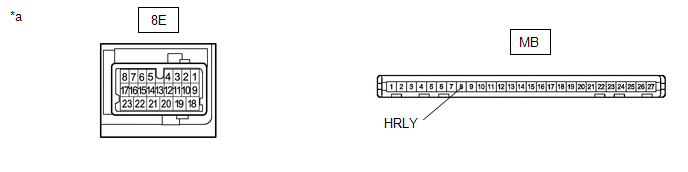
*a |
Component without harness connected (Power Distribution Box Assembly) |
- |
- |
(c) Measure the resistance according to the value(s) in the table below.
Standard Resistance:
Tester Connection | Condition | Specified Condition |
|---|---|---|
8E-6 - MB-6 (HRLY) |
Always |
Below 1 Ω |
| OK | |
REPLACE MAIN BODY ECU (MULTIPLEX NETWORK BODY ECU) |
| NG | |
REPLACE POWER DISTRIBUTION BOX ASSEMBLY |
INSPECT HEADLIGHT ASSEMBLY RH (LO TERMINAL VOLTAGE)
(a) Disconnect the A134 headlight assembly RH connector.
(b) Measure the voltage according to the value(s) in the table below.
Standard Voltage:
Tester Connection | Condition | Specified Condition |
|---|---|---|
A134-2 (LO) - Body ground |
Light control switch in head position |
Below 1 V |
| NG | |
GO TO STEP 15 |
|
CHECK HARNESS AND CONNECTOR (HEADLIGHT ASSEMBLY RH - BODY GROUND)
(a) Measure the resistance according to the value(s) in the table below.
Standard Resistance:
Tester Connection | Condition | Specified Condition |
|---|---|---|
A134-5 (E) - Body ground |
Always |
Below 1 Ω |
| OK | |
REPLACE HEADLIGHT ASSEMBLY RH |
| NG | |
REPAIR OR REPLACE HARNESS OR CONNECTOR |
INSPECT H-LP RH RELAY
Click here
| NG | |
REPLACE H-LP RH RELAY |
|
CHECK HARNESS AND CONNECTOR (H-LP RH RELAY - HEADLIGHT UNIT ASSEMBLY RH)
(a) Measure the resistance according to the value(s) in the table below.
Standard Resistance:
Tester Connection | Condition | Specified Condition |
|---|---|---|
3 (H-LP RH relay) - A134-2 (LO) |
Always |
Below 1 Ω |
3 (H-LP RH relay) or A134-2 (LO) - Body ground |
Always |
10 kΩ or higher |
| NG | |
REPAIR OR REPLACE HARNESS OR CONNECTOR |
|
CHECK HARNESS AND CONNECTOR (H-LP RH RELAY - BATTERY)
(a) Measure the voltage according to the value(s) in the table below. Standard Voltage:
|
|
| NG | |
REPAIR OR REPLACE HARNESS OR CONNECTOR |
|
CHECK HARNESS AND CONNECTOR (H-LP RH RELAY - POWER DISTRIBUTION BOX ASSEMBLY)
(a) Disconnect the 8E power distribution box assembly connector.
(b) Measure the resistance according to the value(s) in the table below.
Standard Resistance:
Tester Connection | Condition | Specified Condition |
|---|---|---|
1 (H-LP RH relay) - 8E-10 |
Always |
Below 1 Ω |
1 (H-LP RH relay) or 8E-10 - Body ground |
Always |
10 kΩ or higher |
| NG | |
REPAIR OR REPLACE HARNESS OR CONNECTOR |
|
CHECK POWER DISTRIBUTION BOX ASSEMBLY
(a) Remove the power distribution box assembly.
Click here
(b) Remove the main body ECU (multiplex network body ECU) from the power distribution box assembly.
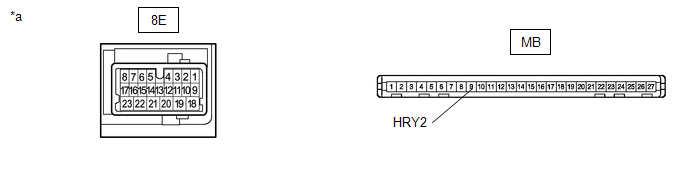
*a |
Component without harness connected (Power Distribution Box Assembly) |
- |
- |
(c) Measure the resistance according to the value(s) in the table below.
Standard Resistance:
Tester Connection | Condition | Specified Condition |
|---|---|---|
8E-10 - MB-9 (HRY2) |
Always |
Below 1 Ω |
| OK | |
REPLACE MAIN BODY ECU (MULTIPLEX NETWORK BODY ECU) |
| NG | |
REPLACE POWER DISTRIBUTION BOX ASSEMBLY |