Reassembly
REASSEMBLY
COMPONENTS (REASSEMBLY)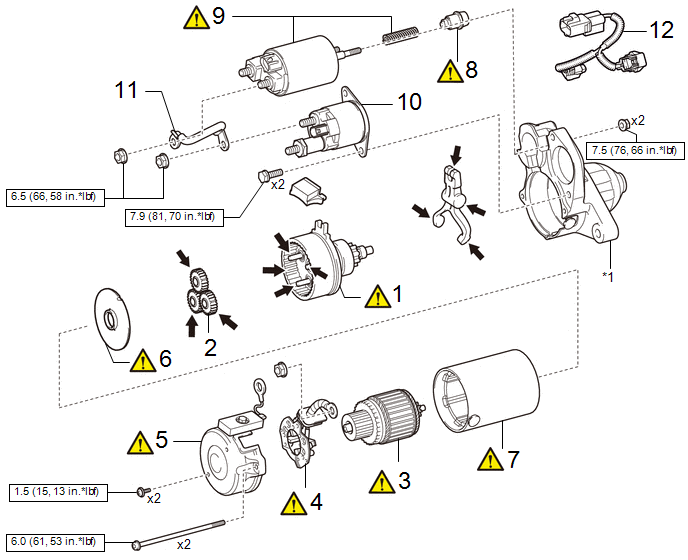
Procedure | Part Name Code |  |  |  |
|
|---|---|---|---|---|---|
1 |
STARTER CENTER BEARING CLUTCH SUB-ASSEMBLY |
28021 |
 |
- |
- |
2 |
PLANETARY GEAR |
- |
- |
- |
- |
3 |
STARTER ARMATURE ASSEMBLY |
28160 |
|
- |
- |
4 |
STARTER BRUSH HOLDER ASSEMBLY |
28140 |
|
- |
- |
5 |
STARTER COMMUTATOR END FRAME ASSEMBLY |
- |
|
- |
- |
6 |
STARTER ARMATURE PLATE |
- |
|
- |
- |
7 |
STARTER YOKE ASSEMBLY |
28120 |
|
- |
- |
8 |
PLUNGER |
- |
|
- |
- |
9 |
REPAIR SERVICE STARTER KIT |
28226B |
|
- |
- |
10 |
STARTER INRUSH CURRENT REDUCTION RELAY |
28249 |
- |
- |
- |
11 |
WIRE HARNESS |
- |
- |
- |
- |
12 |
HARNESS |
- |
- |
- |
- |
*1 |
STARTER DRIVE HOUSING ASSEMBLY |
- |
- |
 |
N*m (kgf*cm, ft.*lbf): Specified torque |
 |
High-temperature grease |
PROCEDURE
1. INSTALL STARTER CENTER BEARING CLUTCH SUB-ASSEMBLY

*1 |
Starter Center Bearing Clutch Sub-assembly |
*2 |
Pinion Drive Lever |
*3 |
Rubber Seal |
*4 |
Starter Drive Housing Assembly |
|
High-temperature Grease |
- |
- |
(1) Apply high-temperature grease to the pinion drive lever as shown in the illustration.
(2) Install the pinion drive lever and rubber seal to the starter center bearing clutch sub-assembly.
(3) Install the starter center bearing clutch sub-assembly together with pinion drive lever and rubber seal to the starter drive housing assembly.
2. INSTALL PLANETARY GEAR

|
High-temperature Grease |
- |
- |
3. INSTALL STARTER ARMATURE ASSEMBLY
|
NOTICE: The magnet of the starter yoke assembly may attract the starter armature assembly when the starter armature assembly is installed, causing the magnet to break. |

*1 |
Starter Yoke Assembly |
*2 |
Starter Armature Assembly |
4. INSTALL STARTER BRUSH HOLDER ASSEMBLY
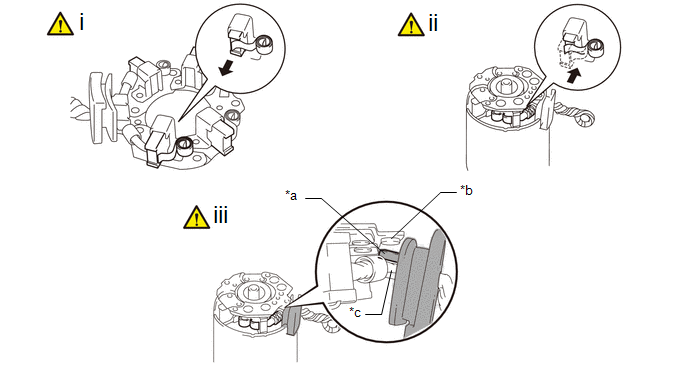
*a |
Grommet |
*b |
Negative (-) Brush Holder Plate |
*c |
Positive (+) Motor Lead Wire |
- |
- |
(1) Hold the brush spring back and set the 4 brushes as shown in the illustration.
(2) Install the starter brush holder assembly to the starter armature assembly and push in the 4 brushes as shown in the illustration.
(3) Fit the protrusion of the grommet between the negative (-) brush holder plate and positive (+) motor lead wire.
5. INSTALL STARTER COMMUTATOR END FRAME ASSEMBLY
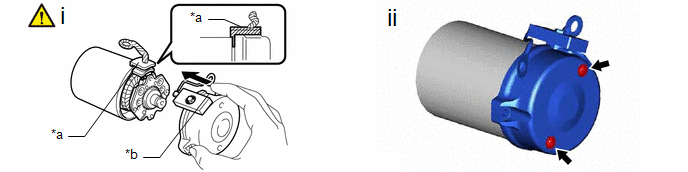
*a |
Lead Wire Rubber |
*b |
Cutout |
(1) Install the starter commutator end frame assembly to the starter yoke assembly.
NOTICE:
Align the lead wire rubber of the starter yoke assembly with the cutout of the starter commutator end frame assembly.
(2) Install the 2 screws.
Torque:
1,5 N·m {15 kgf·cm, 13 in·lbf}
6. INSTALL STARTER ARMATURE PLATE
|
NOTICE: Make sure the protrusion of the starter armature plate is inserted between the stoppers of the starter yoke assembly. |

*1 |
Starter Yoke Assembly |
- |
- |
*a |
Starter Armature Plate |
*b |
Stopper |
*c |
Protrusion |
- |
- |
(1) Align the starter armature plate so that the protrusion fits between the stoppers of the starter yoke assembly, and install the starter armature plate.
7. INSTALL STARTER YOKE ASSEMBLY

*1 |
Starter Yoke Assembly |
*2 |
Starter Drive Housing Assembly |
*a |
Cutout |
*b |
Protrusion |
(1) Align the cutout of the starter yoke assembly with the protrusion of the starter drive housing assembly.
(2) Using a T25 "TORX" socket wrench, install the 2 through bolts.
Torque:
6 N·m {61 kgf·cm, 53 in·lbf}
8. INSTALL PLUNGER

*a |
Area to be Careful of Pinching |
*b |
Protrusion of Plunger |
(1) Hang the hook of the plunger on the pinion drive lever and install the repair service starter kit.
NOTICE:
- Make sure the return spring is not resting on the protrusion of the plunger or pushed between the magnet switch and plunger.
- Install the plunger cover so that the ventilation hole is positioned as shown in the illustration.
9. INSTALL SERVICE STARTER KIT
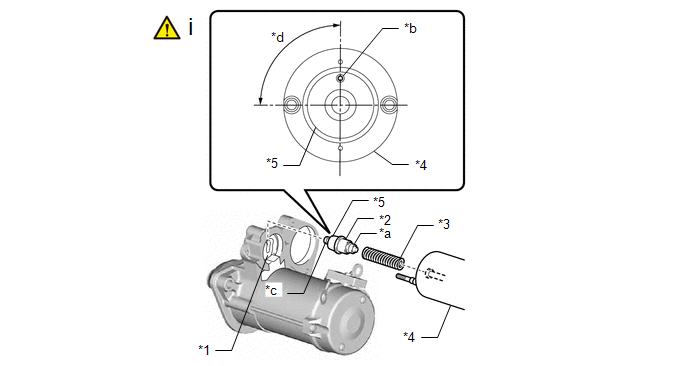
*1 |
Pinion Drive Lever |
*2 |
Plunger |
*3 |
Return Spring |
*4 |
Magnet Switch |
*5 |
Plunger Cover |
- |
- |
*a |
Protrusion |
*b |
Ventilation Hole |
*c |
Hook |
*d |
90° |
(1) Install the 2 nuts.
Torque:
7,5 N·m {76 kgf·cm, 66 in·lbf}
10. INSTALL STARTER INRUSH CURRENT REDUCTION RELAY

*a |
Lead Wire |
- |
- |
Torque:
Bolt :
7,9 N·m {81 kgf·cm, 70 in·lbf}
Nut :
9 N·m {92 kgf·cm, 80 in·lbf}
11. INSTALL WIRE HARNESS

*1 |
Wire Harness |
- |
- |
*a |
Nut |
*b |
Noise Filter Harness |
Torque:
6,5 N·m {66 kgf·cm, 58 in·lbf}
12. INSTALL HARNESS