Supplemental restraint system
Replacement
In this manual: Supplemental restraint system
~1min read
HINT:
- Use the same procedures for the RH side and LH side.
- The procedures listed below are for the LH side.
- Installation is in the reverse order of removal.
1. PRECAUTION (SEE PAGE 60-1 )
2. DISCONNECT BATTERY NEGATIVE TERMINAL (SEE PAGE 60-1 )
3. REMOVE ROOF HEADLINING ASSY (SEE PAGE 76-21 )
4. REMOVE CURTAIN SHIELD AIR BAG ASSY LH
(a) Disconnect the connector from the curtain shield airbag assy LH.
NOTICE: When handling the airbag connector, take care not to damage the airbag wire harness.
(b) Remove the 3 clips.(c) Remove the 9 bolts and the curtain shield airbag assy LH in the order shown in the illustration.
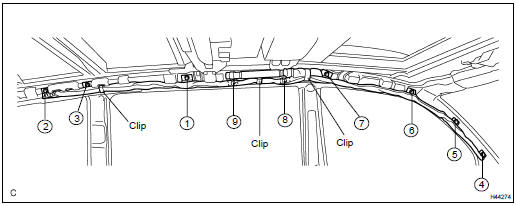
5. INSPECT CURTAIN SHIELD AIR BAG ASSY LH (SEE PAGE 60-1 1)
6. INSTALL CURTAIN SHIELD AIR BAG ASSY LH
(a) Install the curtain shield airbag assy LH with the 9 bolts in the order shown in the illustration.(b) Install the 3 clips.
Torque: 14 NVm (143 kgfVcm, 10 ftVlbf)
(c) Connect the connector to the curtain shield airbag assy LH.
NOTICE: When handling the airbag connector, take care not to damage the airbag wire harness.
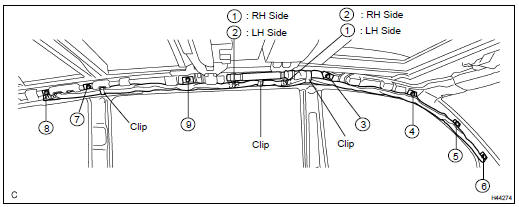
7. INSTALL ROOF HEADLINING ASSY (SEE PAGE 76-21 )
8. CONNECT BATTERY NEGATIVE TERMINAL
9. INSPECT SRS WARNING LIGHT (SEE PAGE 05-1207 )
Was this page helpful?