Interior
Removal
In this manual: Interior
48steps
~288min
4/5difficulty
Done 0 of 48
- Disconnect cable from negative battery terminal
- Remove front seat assembly lh
- Remove the front seat.
- Remove front seat assembly rh
- Remove the front seat.
- Remove rear no. 1 Seat assembly lh
- Remove the rear no. 1 Seat (see page se-45).
- Remove rear no. 1 Seat assembly rh
- Remove the rear no. 1 Seat (see page se-80).
- Remove no. 1 Console upper panel garnish (see page ip-17)
- Remove no. 2 Console upper panel garnish (see page ip-18)
- Remove upper console panel sub-assembly (see page ip-18)
- Remove switch base (see page ip-18)
- Remove console cup holder box (see page ip-18)
- Remove upper rear console panel subassembly (see page ip-19)
- Remove console rear end panel (see page ip- 19)
- Remove no. 1 Instrument panel bracket cover inner lh (see page ip-19)
- Remove no. 1 Instrument panel bracket cover inner rh (see page ip-19)
- Remove rear console box sub-assembly (see page ip-20)
- Remove front door scuff plate lh (see page ir-26)
- Remove front door scuff plate rh (see page ir-26)
- Remove cowl side trim board lh (see page ir- 26)
- Remove cowl side trim board rh (see page ir-26)
- Remove front door opening trim weatherstrip lh
- Remove front door opening trim weatherstrip rh
- Remove rear door scuff plate lh (see page ir-29)
- Remove rear door scuff plate rh (see page ir-29)
- Remove rear door opening trim weatherstrip lh
- Remove rear door opening trim weatherstrip rh
- Remove lower center pillar garnish lh (see page ir-29)
- Remove lower center pillar garnish rh (see page ir-30)
- Remove package tray trim pocket subassembly (w/o rear no. 2 Seat)
- Remove tonneau cover assembly (w/o rear no. 2 Seat)
- Remove rear floor no. 1 Board (w/o rear no.
- Remove the rear no. 2 Seat (see page se-109).
- Remove rear no. 2 Seat assembly rh (w/ rear no. 2 Seat)
- Remove the rear no. 2 Seat (see page se-109).
- Remove rear floor no. 3 Board
- Remove rear floor no. 2 Board
- Remove rear floor no. 1 Mat support side plate (see page ir-31)
- Remove back door weatherstrip
- Remove rear floor finish plate (see page ir- 31)
- Remove rear deck trim cover lh (w/ rear no.
- Partially remove the floor carpet.
It is not necessary to fully remove the floor carpet.
Partially remove it so that the lock control cable can be removed in a later step.
- Remove fuel lid lock control cable subassembly
- Remove the bolt and fuel lid lock open lever.
- Remove the tape and cable from the clamps as shown in the illustration.
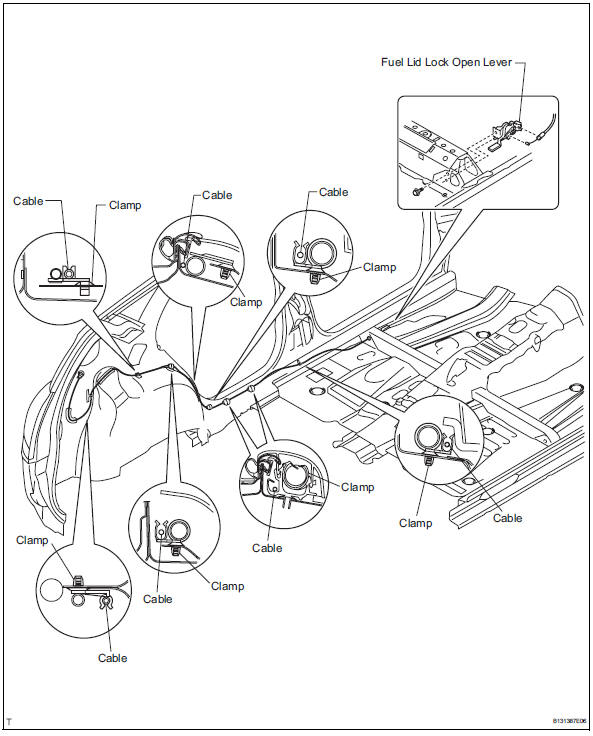
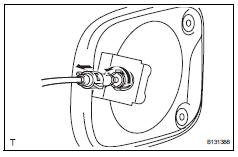
- Remove fuel lid lock control cable subassembly
- Remove fuel filler opening lid lock retainer
- Turn the lock retainer clockwise and remove the lock retainer as shown in the illustration.

Test yourself
A quick Toyota RAV4 quiz: every answer comes with an explanation and a link to the manual page.
Was this page helpful?