Seat
Disassembly
In this manual: Seat
15steps
~90min
4/5difficulty
Done 0 of 15
1. REMOVE OCCUPANT CLASSIFICATION ECU
2. REMOVE FRONT SEAT CUSHION SHIELD INNER RH
- Remove the screw.
- Using a screwdriver, disengage the claws and remove the cushion shield inner.
HINT: Tape the screwdriver tip before use.
3. REMOVE FRONT SEAT INNER BELT ASSEMBLY RH
- Disconnect the connectors.
- Remove the nut and inner belt assembly.
4. REMOVE RECLINING ADJUSTER RELEASE HANDLE RH
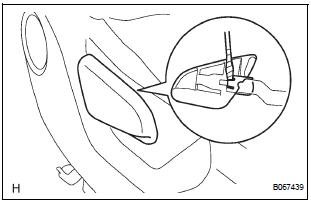
- Using a screwdriver, disengage the claws and remove the reclining adjuster release handle.
HINT: Tape the screwdriver tip before use.
5. REMOVE FRONT SEAT CUSHION SHIELD RH
- Remove the screw.
- Using a screwdriver disengage the claws and remove the cushion shield.
HINT: Tape the screwdriver tip before use.
6. REMOVE FRONT SEAT TRACK COVER RH FRONT INNER
- Remove the clip, 2 screws and seat track cover front inner.
7. REMOVE FRONT SEAT TRACK COVER RH FRONT OUTER
- Remove the clip, 2 screws and seat track cover front outer.
8. REMOVE FRONT SEAT INNER RH ARMREST ASSEMBLY
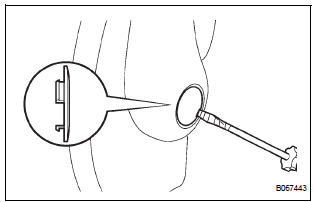
- Using a screwdriver, remove the armrest cap.
9. REMOVE FRONT SEATBACK SHIELD LH
- Using a screwdriver, disengage the claws and remove the reclining adjuster release handle.
10. REMOVE FRONT SEATBACK SHIELD RH
HINT: Use the same procedures for the RH side and LH side.
11. REMOVE FRONT SEATBACK BOARD RH
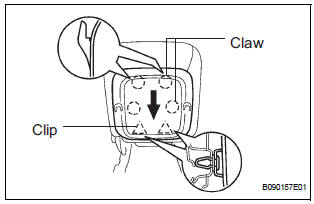
- Disengage the clips.
- Remove the seatback board by pulling it out in the arrow mark direction shown in the illustration.
12. REMOVE FRONT SEATBACK SPRING ASSEMBLY
- Remove the 4 bolts and seatback spring assembly together with the seatback cover.
13. REMOVE FRONT SEATBACK LOCK SUB-ASSEMBLY LH
- Remove the 2 bolts and seatback lock assembly.
14. REMOVE FRONT SEATBACK LOCK SUB-ASSEMBLY RH
- Remove the reclining connecting pipe.
- Remove the 2 bolts and seatback lock assembly.
15. REMOVE FRONT SEAT HINGE COVER LH
- Using a screwdriver, disengage the claws and remove the seat hinge cover.
HINT: Tape the screwdriver tip before use.
16. REMOVE FRONT SEAT HINGE COVER RH
HINT: Use the same procedures for the RH side and LH side.
17. REMOVE FRONT SEAT HEADREST SUPPORT
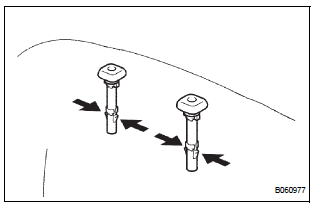
- Disengage the claws and remove the 2 headrest supports.
18. REMOVE FRONT SEATBACK COVER RH
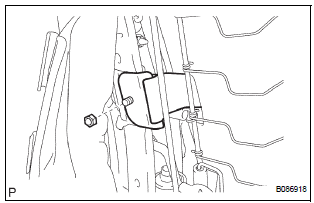
- with Side airbag: Remove the nut and disengage the separate type front seatback cover bracket.
- Remove the hog rings and seatback cover together with the pad.
- Remove the hog rings and seatback cover.
19. REMOVE SEPARATE TYPE FRONT SEAT CUSHION COVER
- Disengage the hook and remove the seat cushion cover together with the pad.
- Remove the hog rings and seat cushion cover.
20. REMOVE RECLINING ADJUSTER INSIDE COVER LH
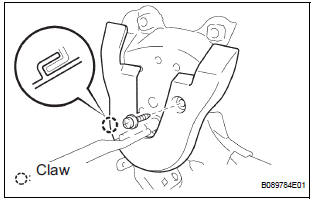
- Remove the screw and the reclining adjuster inside cover LH (lower).
21. REMOVE RECLINING ADJUSTER INSIDE COVER RH
HINT: Use the same procedures for the RH side and LH side.
22. REMOVE RECLINING ADJUSTER INSIDE COVER LH
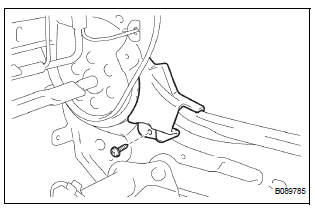
- Remove the screw and the reclining adjuster inside cover LH (upper).
23. REMOVE RECLINING ADJUSTER INSIDE COVER RH
HINT: Use the same procedures for the RH side and LH side.
24. REMOVE FRONT SEAT CUSHION SHIELD LOWER LH
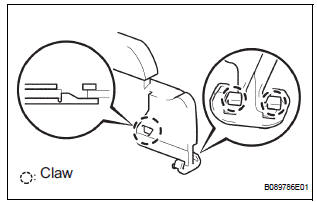
- Using a screwdriver, disengage the claws and remove the front seat cushion shield lower LH.
HINT: Tape the screwdriver tip before use.
25. REMOVE FRONT SEAT CUSHION SHIELD LOWER RH
HINT: Use the same procedures for the RH side and LH side.
Test yourself
A quick Toyota Sienna quiz: every answer comes with an explanation and a link to the manual page.
Was this page helpful?