Disassembly
HINT: On the RH side, use the same procedures as on the LH side.
1. REMOVE FRONT DOOR LOWER FRAME BRACKET GARNISH LH
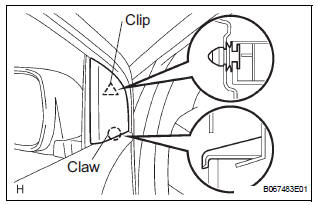
- Using a screwdriver, disengage the clip and claw, and remove the garnish.
HINT: Tape the screwdriver tip before use.
2. REMOVE FRONT DOOR INSIDE HANDLE BEZEL PLUG LH

- Using a screwdriver, disengage the 3 claws and remove the bezel.
HINT: Tape the screwdriver tip before use
3. REMOVE POWER WINDOW REGULATOR MASTER SWITCH ASSEMBLY
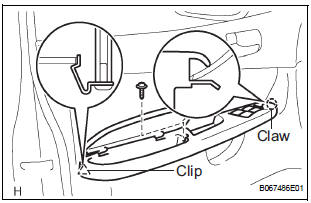
- Remove the screw.
- Using a screwdriver, disengage the clip and claw, and remove the armrest base panel upper together with the switch.
HINT: Tape the screwdriver tip before use.
- Disconnect the connector.
- Remove the 3 screws and switch from the armrest base panel upper.
- Using pliers, remove the 2 pins and armrest.
4. REMOVE FRONT DOOR TRIM BOARD SUBASSEMBLY LH
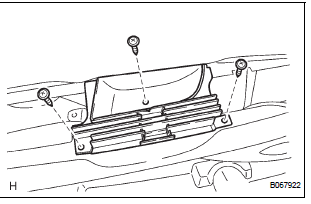
- Remove the 3 screws and back frame plate.
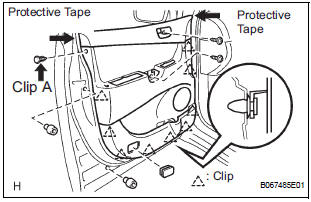
- Remove the 2 cushion rubbers.
- Remove the 2 screws and the clip A.
- Using a screwdriver, disengage the other 9 clips.
HINT: Tape the screwdriver tip before use.
- Remove the trim board upward.
HINT: In order to prevent the door panel from being damaged, cover the areas indicated by arrow marks in the illustration with protective tape.
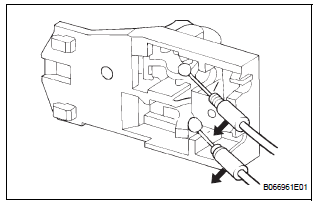
- Disconnect the 2 cables from the inside handle, as shown in the illustration.
- Using a screwdriver, disengage the 10 hooks and remove the weatherstrip inner.
HINT: Tape the screwdriver tip before use.
- Remove the 2 screws and inside handle.
5. REMOVE FRONT DOOR SERVICE HOLE COVER LH

- Remove the screw and reinforcement No. 1.
- Remove the service hole cover.
NOTICE: Remove the tape remaining on the door side.
6. REMOVE OUTER REAR VIEW MIRROR ASSEMBLY LH
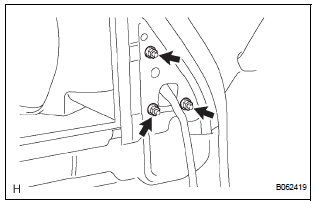
- Disconnect the connector.
- Remove the 3 nuts and mirror.
NOTICE: When the nuts are removed, the mirror assembly may fall and become deformed.
7. REMOVE FRONT NO.1 SPEAKER ASSEMBLY (See page AV-206)
8. REMOVE FRONT DOOR WINDOW FRAME MOULDING REAR LH (See page ET-30)
9. REMOVE FRONT DOOR GLASS WEATHERSTRIP ASSEMBLY OUTER LH (See page ET-21)
10. REMOVE FRONT DOOR GLASS SUB-ASSEMBLY LH
HINT: Insert a shop rag inside the door panel to prevent the door glass from being scratched.

- Open the door glass until the bolts appear in the service holes.
- Remove the 2 bolts holding the door glass to the window regulator.

- Remove the door glass in the direction indicated by the arrow mark in the illustration.
NOTICE:
- Do not damage the door glass.
- When the bolts are removed, the door glass may fall and become deformed.
- Remove the glass run.
11. REMOVE FRONT DOOR WINDOW REGULATOR SUB-ASSEMBLY LH
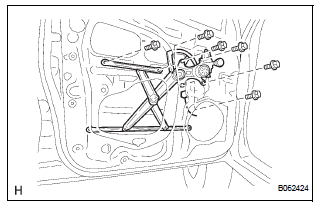
- Disconnect the window regulator connector.
- Remove the 6 bolts and window regulator.
NOTICE: When the bolts are removed, the window regulator sub-assembly may fall and become deformed.
HINT: Remove the window regulator through the service hole.
12. REMOVE POWER WINDOW REGULATOR MOTOR ASSEMBLY LH
- Using a torx driver (T25), remove the 3 screws and window regulator motor.
13. REMOVE FRONT DOOR FRAME SUB-ASSEMBLY REAR LOWER LH

- Remove the bolt and frame.
14. REMOVE FRONT DOOR OUTSIDE HANDLE COVER
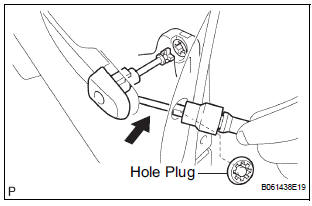
- Remove the hole plug.
- Using a torx socket wrench (T30), loosen the screw and remove the outside handle cover with the door lock key cylinder installed.
15. REMOVE FRONT DOOR WITH MOTOR LOCK ASSEMBLY LH
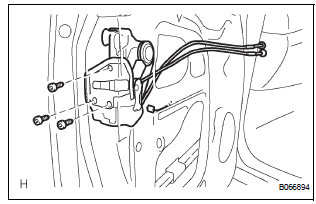
- Disconnect the door lock connector.
- Using a torx socket wrench (T30), remove the 3 screws and lock.
HINT: Remove the door lock through the service hole.
16. REMOVE FRONT DOOR HANDLE ASSEMBLY OUTSIDE LH

- Pushing and pulling the outside handle in the direction indicated by the arrow mark in the illustration, remove the outside handle.
- Remove the outside handle pads front and rear.
17. REMOVE FRONT DOOR OUTSIDE HANDLE FRAME SUB-ASSEMBLY LH
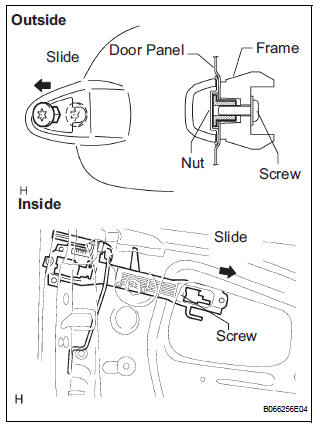
- Using a torx socket wrench (T30), loosen the screw.
- Slide the outside handle frame in the direction indicated by the arrow mark in the illustration, and remove it.
HINT: Remove the outside handle frame through the service hole.
- Remove the open rod from the outside handle frame.
18. REMOVE FRONT DOOR CHECK ASSEMBLY LH
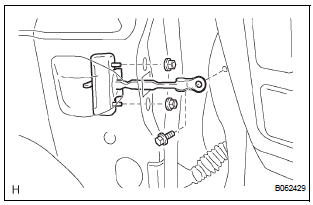
- Remove the 2 nuts, bolt and door check.
19. REMOVE FRONT DOOR WEATHERSTRIP LH
- Using a clip remover, disengage the clips and remove the weatherstrip.
HINT: If the clips are damaged, replace them with new ones.
20. REMOVE FRONT DOOR WIRE LH
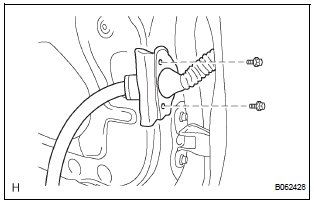
- Disconnect the wire clips.
- Remove the 2 bolts and wire.
Test yourself
A quick Toyota Sienna quiz: every answer comes with an explanation and a link to the manual page.