Installation
1. INSTALL FRONT SHOCK ABSORBER WITH COIL SPRING
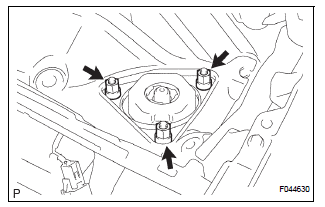
(a) Install the front shock absorber with coil spring as shown in the illustration.
(b) Install the 3 nuts to the upper side of the front shock absorber with coil spring.
Torque: 80 N*m (816 kgf*cm, 59 ft.*lbf)

(c) Install the 2 bolts and 2 nuts to the lower side of the front shock absorber with coil spring.
Torque: 210 N*m (2,140 kgf*cm, 155 ft.*lbf)
NOTICE: When installing the bolt, hold the nut not to rotate.
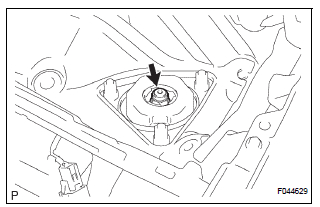
(d) Fully tighten the lock nut.
Torque: 49 N*m (500 kgf*cm, 36 ft.*lbf)

(e) Install the front flexible hose No.1 and speed sensor front LH with the bolt.
Torque: 19 N*m (189 kgf*cm, 14 ft.*lbf)
2. INSTALL FRONT STABILIZER LINK ASSEMBLY LH
(a) Install the front stabilizer link assembly LH with the nut.
Torque: 74 N*m (755 kgf*cm, 55 ft.*lbf)
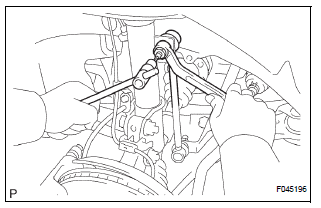
HINT: If the ball joint turns together with the nut, use a hexagon (6 mm) wrench to hold the stud.
3. INSTALL COWL TOP PANEL SUB-ASSEMBLY OUTER FRONT
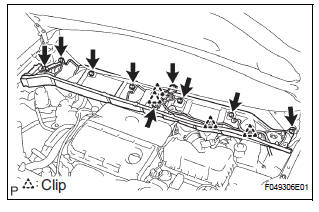
(a) Install the cowl top brace and cowl top panel subassembly outer front with the 9 bolts.
Torque: 7.5 N*m (76 kgf*cm, 66 in.*lbf) (b) Connect the wire harness to the cowl top panel subassembly outer front.
4. INSTALL WINDSHIELD WIPER MOTOR & LINK ASSEMBLY
HINT: (See page WW-3)
5. INSTALL FR WIPER ARM LH
HINT: (See page WW-3)
6. INSTALL FR WIPER ARM RH
HINT: (See page WW-3)
7. INSTALL FRONT WHEEL Torque: 103 N*m (1,050 kgf*cm, 76 ft.*lbf)
8. INSPECT AND ADJUST FRONT WHEEL ALIGNMENT
HINT: (See page SP-4)
Test yourself
A quick Toyota Sienna quiz: every answer comes with an explanation and a link to the manual page.