Brake control
Installation
In this manual: Brake control
~1min read
1special tools
HINT: Install the RH side by the same procedure as the LH side.
1. INSTALL REAR SPEED SENSOR
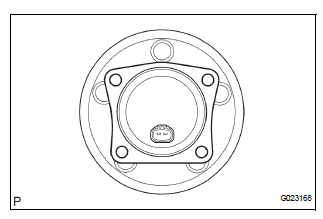
(a) Clean the contacting surface of the axle hub and a new skid control sensor.
NOTICE: Keep the sensor rotor clean.
(b) Place the speed sensor on the axle hub so that the connector is positioned as shown in the illustration.
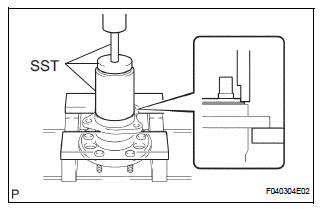
(c) Using SST and a press, install the skid control sensor to the axle hub.
SST 09214-76011
NOTICE:
- Do not tap the skid control sensor with a hammer directly.
- Check that there is no foreign matter on the skid control sensor detection portion.
- Press in the skid control sensor straight and slowly.
2. INSTALL REAR AXLE HUB & BEARING ASSEMBLY LH (See page AH-17)
3. INSTALL REAR BRAKE DRUM SUB-ASSEMBLY (for Drum Type)
(a) Aligning the matchmarks, install the rear brake drum sub-assembly.
4. INSTALL REAR DISC (for Disc Type)
(a) Aligning the matchmarks, install the rear disc.
5. INSTALL REAR DISC BRAKE CALIPER ASSEMBLY LH (for Disc Type)
(a) Install the rear disc brake caliper assembly LH with the 2 bolts.
6. SKID CONTROL SENSOR WIRE
(a) Connect the connector to the skid control sensor connector.
7. INSTALL REAR WHEEL
8. INSPECT AND ADJUST REAR WHEEL ALIGNMENT
HINT: See page SP-9.
9. CHECK ABS SPEED SENSOR SIGNAL
HINT: See page BC-10.
Test yourself
A quick Toyota Sienna quiz: every answer comes with an explanation and a link to the manual page.
Was this page helpful?