Installation
1. INSTALL COOLER CONDENSER CORE
(a) Install the cooler condenser core with the 2 screws.
Torque: 3.9 N*m (40 kgf*cm, 35 in.*lbf)
HINT: If the condenser is replaced with a new one, add compressor oil to the new condenser.
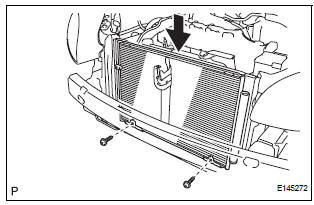
Capacity: 40 cc (1.4 fl.oz.) Compressor oil: ND-OIL 8 or equivalent
2. INSTALL NO. 1 RADIATOR SUPPORT (See page CO- 40)
3. INSTALL RADIATOR SUPPORT CUSHION (See page CO-41)
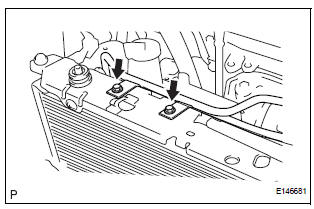
4. CONNECT NO. 2 OIL COOLER OUTLET TUBE SUBASSEMBLY
(a) Install the No. 2 oil cooler outlet tube sub-assembly with the 2 bolts.
Torque: 6.0 N*m (61 kgf*cm, 53 in.*lbf)
5. INSTALL UPPER RADIATOR SUPPORT SUBASSEMBLY (See page CO-42)
6. CONNECT COOLING FAN ECU (See page CO-42)
7. INSTALL HOOD LOCK SUPPORT SUB-ASSEMBLY (See page CO-43)
8. INSTALL HOOD LOCK ASSEMBLY (See page CO-43)
9. INSTALL HOOD LOCK RELEASE LEVER PROTECTOR (See page CO-44)
10. INSTALL NO. 1 AIR CLEANER INLET (See page EM- 59)
11. INSTALL COOLER REFRIGERANT LIQUID PIPE A
(a) Remove the attached vinyl tape from the pipe and the connecting part of the cooler condenser core.
(b) Sufficiently apply compressor oil to a new O-ring and the fitting surface of the pipe joint.
Compressor oil: ND-OIL 8 or equivalent
(c) Install the O-ring on the cooler refrigerant liquid pipe A.
(d) Install the cooler refrigerant liquid pipe A on the cooler condenser core with the bolt.
Torque: 5.4 N*m (55 kgf*cm, 47 in.*lbf)
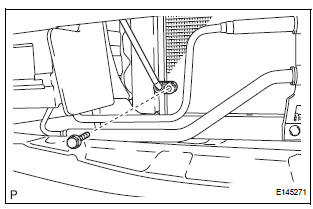
12. INSTALL DISCHARGE HOSE SUB-ASSEMBLY
(a) Remove the attached vinyl tape from the tube and the connecting part of the cooler condenser core.
(b) Sufficiently apply compressor oil to a new O-ring and the fitting surface of the hose joint.
Compressor oil: ND-OIL 8 or equivalent
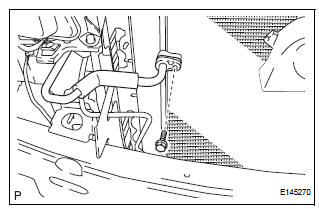
(c) Install the O-ring on the discharge hose subassembly.
(d) Install the discharge hose sub-assembly on the cooler condenser core with the bolt.
Torque: 5.4 N*m (55 kgf*cm, 47 in.*lbf)
13. INSTALL FRONT BUMPER ASSEMBLY (See page ET- 9)
14. INSTALL NO. 2 AIR CLEANER INLET (See page EM- 60)
15. CHARGE WITH REFRIGERANT (See page AC-173)
16. WARM UP ENGINE
17. INSPECT FOR REFRIGERANT LEAK (See page AC- 173)
18. VEHICLE PREPARATION FOR FOG LIGHT AIMING (w/ Fog Light) (See page LI-82)
19. PREPARATION FOR FOG LIGHT AIMING (w/ Fog Light) (See page LI-83)
20. FOG LIGHT AIMING INSPECTION (w/ Fog Light) (See page LI-84)
21. FOG LIGHT AIMING ADJUSTMENT (w/ Fog Light) (See page LI-85)
Test yourself
A quick Toyota Sienna quiz: every answer comes with an explanation and a link to the manual page.