Disassembly
HINT:
- Use the same procedure for the RH side and the LH side.
- The procedure listed below is for the LH side.
1. REMOVE REAR WHEEL
2. REMOVE REAR AXLE SHAFT NUT (for AWD)
NOTICE:
Perform this procedure only when the No. 1 parking brake shoe hold down spring pin is replaced.
HINT:
See page  .
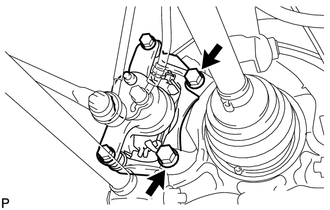
3. SEPARATE REAR DISC BRAKE CALIPER ASSEMBLY
(a) Remove the 2 bolts and rear disc brake caliper assembly. NOTICE:
|
 |
4. REMOVE REAR DISC
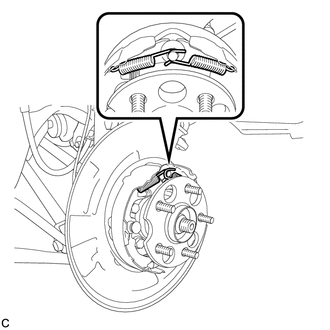
5. REMOVE NO. 1 PARKING BRAKE SHOE RETURN TENSION SPRING
(a) Remove the 2 No. 1 parking brake shoe return tension springs. |
 |
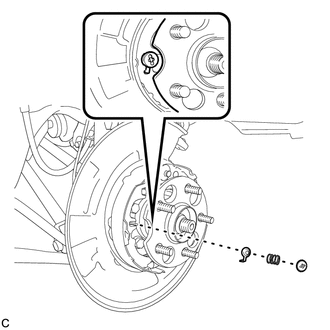
6. SEPARATE NO. 1 PARKING BRAKE SHOE ASSEMBLY
(a) Remove the No. 1 parking brake shoe hold down spring cup, parking brake shoe hold down spring and No. 2 parking brake shoe hold down spring cup, and separate the No. 1 parking brake shoe assembly from the backing plate. |
 |
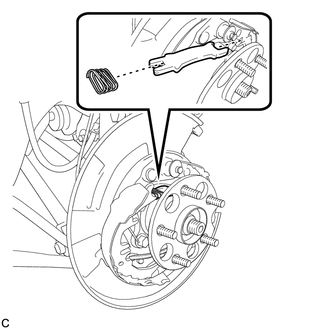
7. REMOVE PARKING BRAKE SHOE STRUT
(a) Remove the parking brake shoe strut and the parking brake shoe strut compression spring. |
 |
8. SEPARATE NO. 2 PARKING BRAKE SHOE ASSEMBLY
(a) Remove the No. 1 parking brake shoe hold down spring cup, parking brake shoe hold down spring and No. 2 parking brake shoe hold down spring cup, and separate the No. 2 parking brake shoe assembly from the backing plate. |
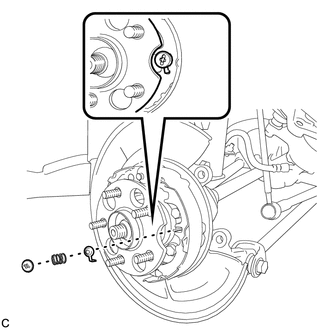 |
9. REMOVE PARKING BRAKE SHOE ADJUSTING SCREW SET
(a) Remove the parking brake shoe adjusting screw set. |
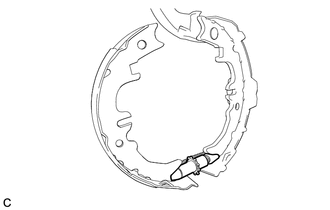 |
10. REMOVE NO. 1 PARKING BRAKE SHOE ASSEMBLY
(a) Separate the No. 2 parking brake shoe return tension spring and remove the No. 1 parking brake shoe assembly. |
 |
11. REMOVE NO. 2 PARKING BRAKE SHOE RETURN TENSION SPRING
(a) Remove the No. 2 parking brake shoe return tension spring from the No. 2 parking brake shoe assembly. |
 |
12. REMOVE NO. 2 PARKING BRAKE SHOE ASSEMBLY WITH PARKING BRAKE SHOE LEVER
(a) Using needle-nose pliers, separate the No. 3 parking brake cable assembly from the parking brake shoe lever as shown in the illustration. NOTICE: Be careful not to damage the No. 3 parking brake cable assembly. |
 |
13. REMOVE PARKING BRAKE SHOE LEVER
(a) Remove the C-washer, shim and the parking brake shoe lever from the No. 2 parking brake shoe assembly. HINT: The shim is installed only when a clearance adjustment between the parking brake lever and parking brake shoe C-washer is necessary. Therefore, some models may have no shim. |
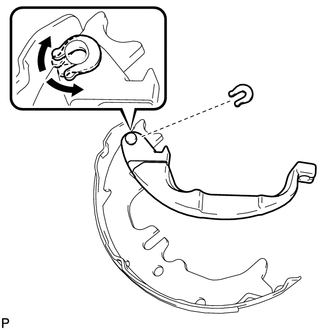 |
14. REMOVE PARKING BRAKE SHOE GUIDE PLATE SET BOLT
(a) Remove the parking brake shoe guide plate set bolt and the parking brake shoe guide plate. |
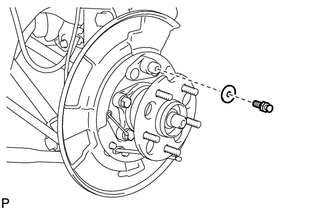 |
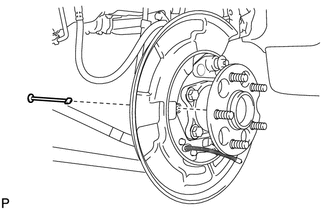
15. REMOVE NO. 1 PARKING BRAKE SHOE HOLD DOWN SPRING PIN (for 2WD)
(a) Remove the No. 1 parking brake shoe hold down spring pin. |
 |
16. REMOVE NO. 2 PARKING BRAKE SHOE HOLD DOWN SPRING PIN (for AWD)
(a) Remove the No. 2 parking brake shoe hold down spring pin. |
 |
17. REMOVE REAR AXLE HUB AND BEARING ASSEMBLY (for 2WD)
NOTICE:
Perform this procedure only when the No. 2 parking brake shoe hold down spring pin is replaced.
HINT:
See page .
18. REMOVE REAR AXLE HUB AND BEARING ASSEMBLY (for AWD)
NOTICE:
Perform this procedure only when the No. 1 parking brake shoe hold down spring pin is replaced.
HINT:
See page .
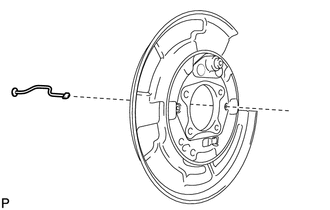
19. REMOVE NO. 2 PARKING BRAKE SHOE HOLD DOWN SPRING PIN (for 2WD)
(a) Remove the No. 2 parking brake shoe hold down spring pin. |
 |
20. REMOVE NO. 1 PARKING BRAKE SHOE HOLD DOWN SPRING PIN (for AWD)
(a) Remove the No. 1 parking brake shoe hold down spring pin. |
 |
Test yourself
A quick Toyota Venza quiz: every answer comes with an explanation and a link to the manual page.