Installation
HINT:
When installing the mouldings, heat the vehicle body and mouldings using a heat light.
Heating TemperatureItem | Temperature |
|---|---|
Vehicle Body |
40 to 60 °C |
Emblem, Name Plate |
20 to 30 °C |
NOTICE:
Do not heat the vehicle body or mouldings excessively.
PROCEDURE1. INSTALL REAR ROCKER PANEL MOULDING END COVER
(a) Clean the vehicle body surface.
(1) Using a heat light, heat the vehicle body surface.
(2) Remove the double-sided tape from the vehicle body.
(3) Wipe off any tape adhesive residue with cleaner.
(b) Clean the rear rocker panel moulding end cover.
(1) Using a heat light, heat the rear rocker panel moulding end cover. (2) Remove the double-sided tape from the rear rocker panel moulding end cover. (3) Wipe off any tape adhesive residue with cleaner. (4) Apply new double-sided tape to the rear rocker panel moulding end cover. |
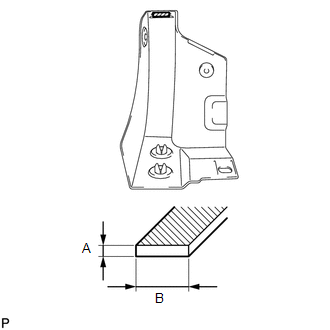 |
(c) Install the 2 grommets to the rear rocker panel moulding end cover.
(d) Install the rear rocker panel moulding end cover. (1) Using a heat light, heat the vehicle body and rear rocker panel moulding end cover. (2) Remove the release paper from the rear rocker panel moulding end cover. HINT: After removing the release paper, keep the exposed adhesive free from foreign matter. (3) Install the rear rocker panel moulding end cover with the 2 screws and clip. |
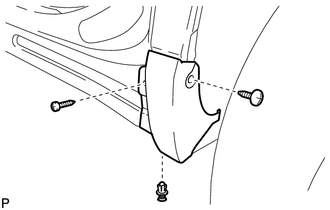 |
2. INSTALL NO. 2 ROCKER PANEL MOULDING PROTECTOR

3. INSTALL REAR DOOR OUTSIDE MOULDING
(a) Clean the vehicle body surface.
(1) Using a heat light, heat the vehicle body surface.
(2) Remove the double-sided tape from the vehicle body.
(3) Wipe off any tape adhesive residue with cleaner.
(b) Clean the rear door outside moulding.
(1) Using a heat light, heat the rear door outside moulding. (2) Remove the double-sided tape from the rear door outside moulding. (3) Wipe off any tape adhesive residue with cleaner. (4) Apply new double-sided tape to the rear door outside moulding. |
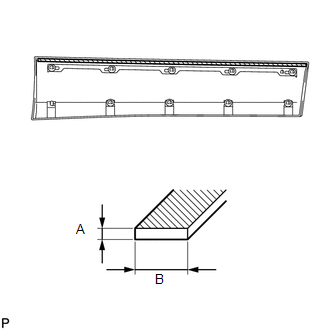 |
(c) Install 9 new clips (No. 1 outside moulding clip) to the rear door outside moulding.
(d) Install the outside moulding retainer to the rear door outside moulding.
(e) Install the rear door outside moulding. (1) Using a heat light, heat the vehicle body and rear door outside moulding. (2) Remove the release paper from the rear door outside moulding. HINT: After removing the release paper, keep the exposed adhesive free from foreign matter. (3) Engage the 9 clips and install the rear door outside moulding. |
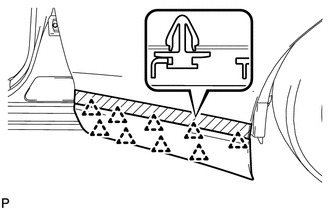 |
(f) Install the nut and hole plug. |
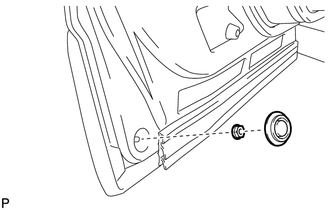 |
4. INSTALL FRONT DOOR OUTSIDE MOULDING
(a) Clean the vehicle body surface.
(1) Using a heat light, heat the vehicle body surface.
(2) Remove the double-sided tape from the vehicle body.
(3) Wipe off any tape adhesive residue with cleaner.
(b) Clean the front door outside moulding.
(1) Using a heat light, heat the front door outside moulding. (2) Remove the double-sided tape from the front door outside moulding. (3) Wipe off any tape adhesive residue with cleaner. (4) Apply new double-sided tape to the front door outside moulding. |
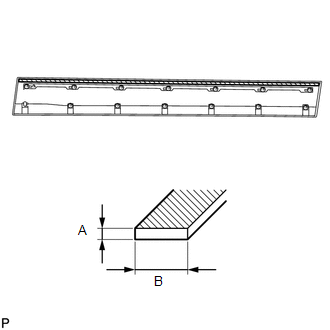 |
(c) Install 13 new clips (No. 1 outside moulding clip) to the front door outside moulding.
(d) Install the outside moulding retainer to the front door outside moulding.
(e) Install the front door outside moulding. (1) Using a heat light, heat the vehicle body and front door outside moulding. (2) Remove the release paper from the front door outside moulding. HINT: After removing the release paper, keep the exposed adhesive free from foreign matter. (3) Engage the 13 clips and install the front door outside moulding. |
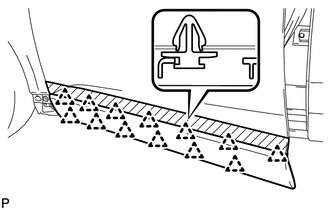 |
(f) Install the nut and hole plug. |
 |
5. INSTALL FRONT FENDER OUTSIDE MOULDING
(a) Clean the vehicle body surface.
(1) Using a heat light, heat the vehicle body surface.
(2) Remove the double-sided tape from the vehicle body.
(3) Wipe off any tape adhesive residue with cleaner.
(b) Clean the front fender outside moulding.
(1) Using a heat light, heat the front fender outside moulding. (2) Remove the double-sided tape from the front fender outside moulding. (3) Wipe off any tape adhesive residue with cleaner. (4) Apply new double-sided tape to the front fender outside moulding. |
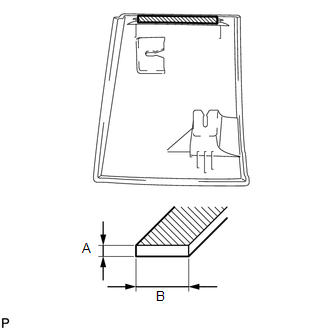 |
(c) Install 2 new clips (No. 1 outside moulding clip) to the front fender outside moulding.
(d) Install the front fender outside moulding. (1) Using a heat light, heat the vehicle body and front fender outside moulding. (2) Remove the release paper from the front fender outside moulding. HINT: After removing the release paper, keep the exposed adhesive free from foreign matter. (3) Engage the 2 clips and install the front fender outside moulding. |
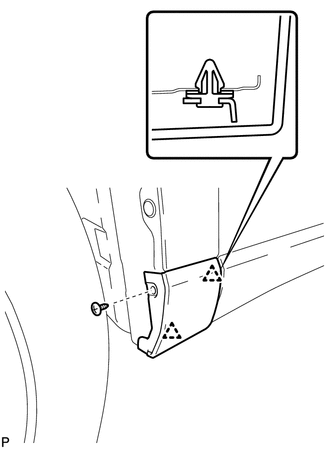 |
(e) Install the screw.
Test yourself
A quick Toyota Venza quiz: every answer comes with an explanation and a link to the manual page.