Removal
1. DISCONNECT CABLE FROM NEGATIVE BATTERY TERMINAL
CAUTION:
Wait at least 90 seconds after disconnecting the cable from the negative (-) battery terminal to disable the SRS system.
NOTICE:
When disconnecting the cable, some systems need to be initialized after the cable is reconnected (See page  ).
2. REMOVE FRONT DOOR INSIDE HANDLE BEZEL PLUG
3. REMOVE POWER WINDOW REGULATOR MASTER SWITCH ASSEMBLY WITH FRONT DOOR ARMREST BASE PANEL (for Driver Side)
4. REMOVE POWER WINDOW REGULATOR SWITCH ASSEMBLY WITH FRONT DOOR ARMREST BASE PANEL (for Front Passenger Side)
5. REMOVE COURTESY LIGHT ASSEMBLY
6. REMOVE FRONT DOOR TRIM BOARD SUB-ASSEMBLY
7. REMOVE FRONT DOOR INSIDE HANDLE SUB-ASSEMBLY
8. REMOVE DOOR SIDE AIRBAG SENSOR
9. REMOVE FRONT NO. 1 SPEAKER ASSEMBLY
10. REMOVE FRONT DOOR SERVICE HOLE COVER
11. REMOVE FRONT DOOR GLASS SUB-ASSEMBLY
12. REMOVE FRONT DOOR GLASS RUN
13. REMOVE FRONT DOOR BELT MOULDING
14. DISCONNECT FRONT DOOR WEATHERSTRIP
(a) Using a clip remover, disengage the 2 clips and remove the upper part of the front door weatherstrip to the extent that allows removal of the front door window frame moulding. |
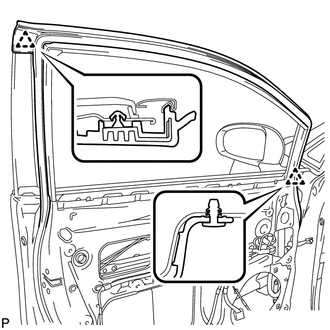 |
15. REMOVE FRONT DOOR REAR WINDOW FRAME MOULDING
HINT:
When removing the front door rear window frame moulding, heat the vehicle body and front door rear window frame moulding using a heat light.
Heating TemperatureItem | Temperature |
|---|---|
Vehicle Body |
40 to 60 °C |
Moulding |
20 to 30 °C |
NOTICE:
Do not heat the vehicle body or moulding excessively.
(a) Using a heat light, heat the front door rear window frame moulding.
(b) Using a moulding remover, remove the clip and front door rear window frame moulding. Text in Illustration
|
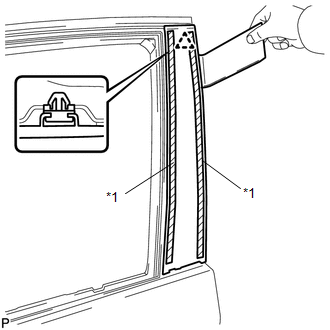 |
16. REMOVE FRONT DOOR SCUFF PLATE
17. REMOVE COWL SIDE TRIM SUB-ASSEMBLY
18. REMOVE FRONT DOOR PANEL SUB-ASSEMBLY
(a) Disconnect each connector.
(b) Remove the bolt <A> and disengage the front door check assembly. |
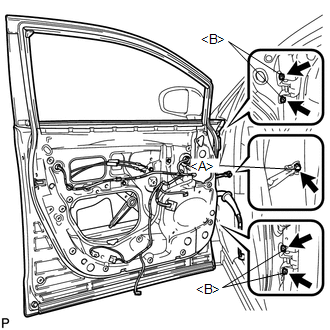 |
(c) Remove the 4 bolts <B> and front door panel sub-assembly.
NOTICE:
To prevent damage, when removing the front door panel sub-assembly, make sure that there are enough people available to hold it securely.
19. REMOVE FRONT DOOR UPPER WINDOW FRAME MOULDING
(a) Insert a 4.0 mm (0.157 in.) drill bit into a drill.
(b) Tape the 4.0 mm (0.157 in.) drill bit 5.0 mm (0.197 in.) from the tip as shown in the illustration.
NOTICE: Tape the 4.0 mm (0.157 in.) drill bit to prevent the drill bit from going too deep. |
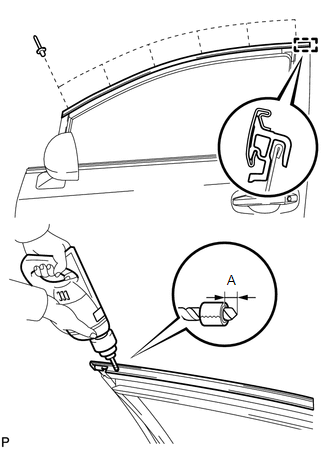 |
(c) Lightly press the drill against the rivets to drill off the rivet flanges, and remove the 6 rivets.
NOTICE:
- Pressing the drill too firmly will cause the rivet to turn and result in the rivet not being drilled through.
- Prying the rivets with the drill may damage the rivet installation holes or drill bit.
- Be careful of the drilled rivets, as they may be hot.
(d) Using a vacuum cleaner, remove the rivet fragments and shavings from the drilled areas.
(e) Disengage the guide and remove the front door upper window frame moulding from the door frame.
20. REMOVE FRONT DOOR FRONT WINDOW FRAME MOULDING
(a) Insert a 4.0 mm (0.157 in.) drill bit into a drill.
(b) Tape the 4.0 mm (0.157 in.) drill bit 5.0 mm (0.197 in.) from the tip as shown in the illustration.
NOTICE: Tape the 4.0 mm (0.157 in.) drill bit to prevent the drill bit from going too deep. |
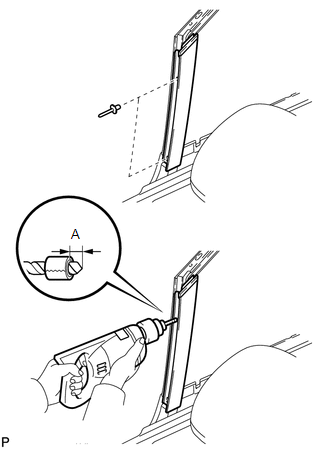 |
(c) Lightly press the drill against the rivets to drill off the rivet flanges, and remove the 2 rivets.
NOTICE:
- Pressing the drill too firmly will cause the rivet to turn and result in the rivet not being drilled through.
- Prying the rivets with the drill may damage the rivet installation holes or drill bit.
- Be careful of the drilled rivets, as they may be hot.
(d) Using a vacuum cleaner, remove the rivet fragments and shavings from the drilled areas.
(e) Disengage the guide and remove the front door front window frame moulding from the door frame.
Test yourself
A quick Toyota Venza quiz: every answer comes with an explanation and a link to the manual page.