Hood
Tools
Special tools and workshop equipment required
- Torque Wrench 1331 5-50Nm -VAG1331-
- Pry Lever -80 - 200-
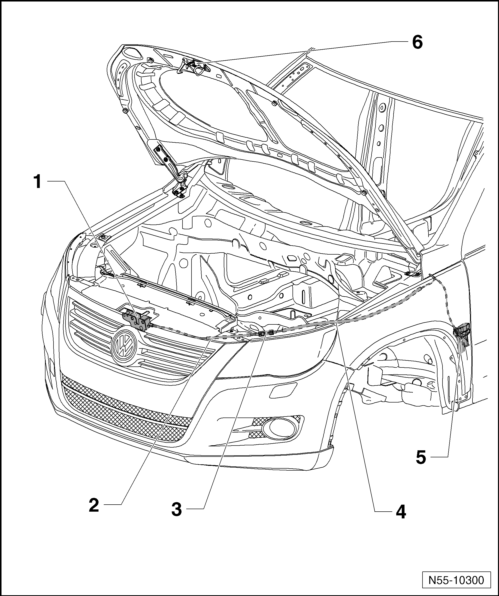
Overview - Hood
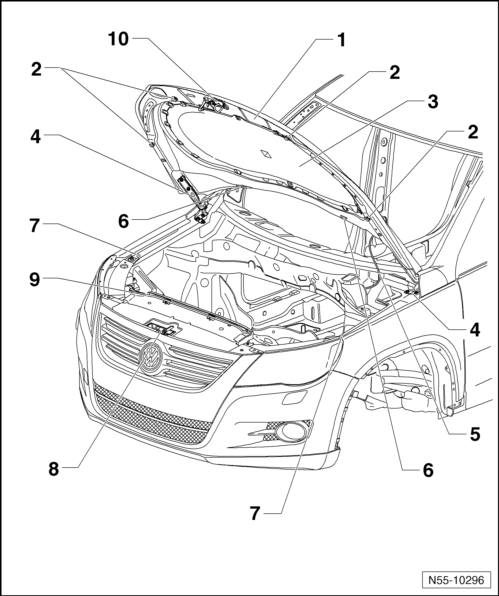
- Hood
- Removing and installing.
- Adjusting.
- Adjusting Buffer
- Left and right, each 2 pieces
- Insulation
- Removing and installing.
- Hinge
- Removing and installing.
- Adjusting.
- Hose
- To the spray nozzles
- Spray Nozzles
- Removing and installing.
- Anti-friction Film
- Anti-Friction Film - 7D0 827 471-
- Hood Latch
- Removing and installing.
- Adjusting.
- Hood Support
- Hook
- Removing and installing
Hood, Removing and Installing
Removing
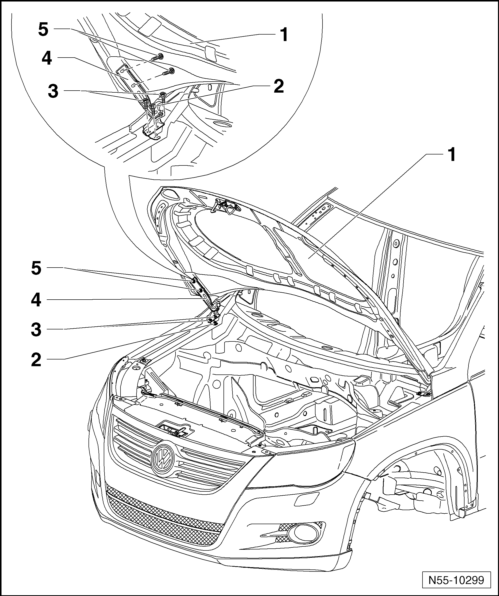
- Remove the spray nozzles.
- Remove the hose out of the opening in the hood -1-.
- Loosen the left and right bolts -5- (do not remove completely).
A second technician is required for the rest of the removal procedure.
- Remove the support rod.
- Remove the bolts -5- and only now and lift the hood -1- out of its hinges -4-.
Installing
Install the hood in the same manner in reverse order of removal.
- Tightening specification for the bolts: 21 N·m.
- Adjust the hood.
Hood Hinge, Removing and Installing
Removing
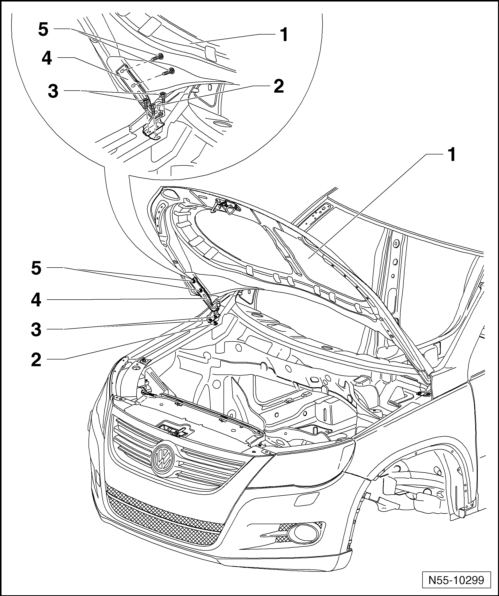
- Hood -1-
- Remove the plenum chamber cover.
- Remove the bolts -3-.
- Loosen bolt -2-.
- Remove the hinge -4-.
Installing
Install in reverse order of removal.
- Tightening specification for the bolts: 21 N·m.
- Hood, Installing
Note
The following describes the removal and installation of the right hinge. Removing and installing the left hinge is identical.
Insulation, Removing and Installing
Removing
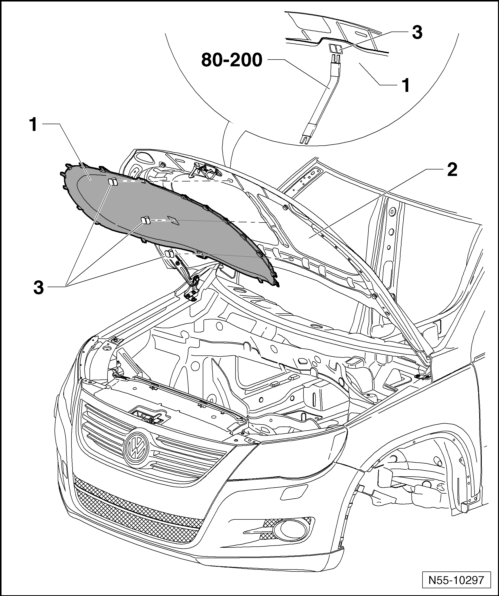
- Pry the clips -3- out of the insulation -1- using the Pry Lever - 80-200-.
- Remove the insulation -1- from the longitudinal holes in the hood -2-.
Installing
- Slide the insulation back into the longitudinal holes in the hood.
- Engage the mounting clips in the insulation.
Overview - Hood Locking and Unlocking Components
- Hood Latch
- Removing and installing.
- Adjusting.
- Release Cable
- From the hood lock to the cable coupling
- Clipped inside the hood lock
- Release Cable Coupling
- Disconnecting.
- Release Cable
- Clipped into mounting bracket
- Release Lever
- Removing and installing.
- Hook
- Removing and installing.
Catch, Removing and Installing
Removing
Note
To adjust the catch -1- just loosen the bolts -2- and slide the catch into the elongated holes -arrows-.
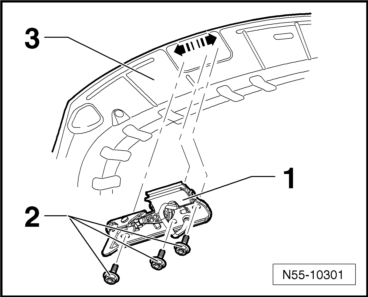
- Remove the bolts -2-.
- Remove the lock -1- from the hood -3-.
Installing
Install in reverse order of removal.
- Tightening specification for bolts -2-: 10 N·m.
Hood Latch, Removing and Installing
Removing
- Open the hood.
- Remove the radiator grille.
- Disconnect the release cable.
- Disconnect the hood contact switch electrical connector.
The electrical connector is attached above the headlamp on the driver side.
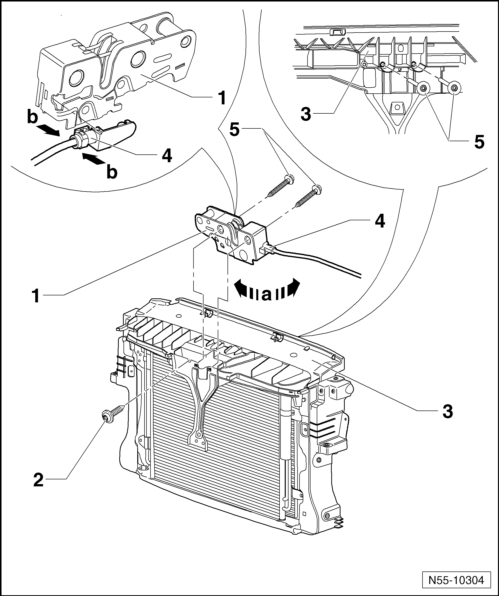
- Remove the bolts -5- on the lock carrier -3 - from the rear.
- Remove the bolt -2- on the lock carrier -3 - from the front.
- Remove the lock -1- upward -arrow a-.
- To unclip the release cable -4-, press the tabs on the release together -arrows b-.
- The locking mechanism is released and release -4- can be removed from lid lock -1-.
Note
Engine hood contact switch, removing and installing at hood latch.
Installing
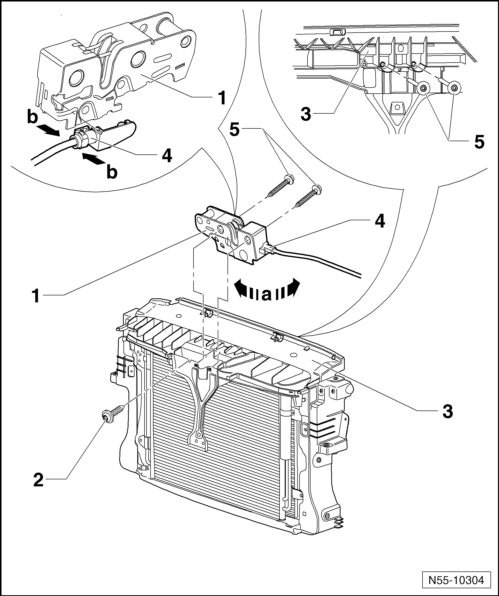
- Install the release cable -4- into the lock -1--arrows b-.
- Install the lock -1- into the lock carrier -3-.
- Install the bolts -5- from the rear into the lock carrier.
- Tightening specifications for bolts -5-: 12 N·m.
- Install the bolt -2- from the front into the lock carrier.
- Tightening specifications for bolt -2-: 12 N·m.
- Connect the connector for the hood contact switch.
- Install the release cable -4-.
- Adjust the lid latch.
Before closing the hood, test the release lever and the release cable.
Note
Insert the bolts -5- through the lock -1- and attach them with the tension strut.
Release Cable, Disconnecting
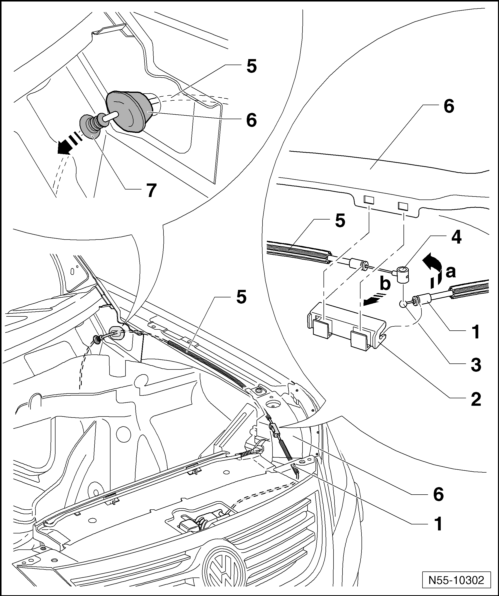
- Open the hood.
The release -2- is located on the lock carrier -6- above the headlamp on the driver side.
- Remove the cable coupling -2- from the lock carrier -6- in the direction of -arrow b-.
- Remove the cables -1 and 5- from the cable coupling.
- Rotate the cable -1- in direction of -arrow a-.
- Remove the cable ball -3--1- from the cable -5- mount-4-.
Note
- When installing, make sure that cable sleeves are inserted correctly and coupling is locked correctly on the lock carrier
- Make sure the grommets -6 and 7- are properly seated.
Before closing the hood, test the release lever and the release cable.
Hood, Adjusting
Note
- The vehicle must be standing on the ground when adjusting the hood.
- The left and right adjusting buffers -2- are not meant for adjusting. Their function is to stabilize and to cushion the hood -5-.
- The hood is properly adjusted when there is an overall even gap dimension when closed, it is not too far inward or outward and contours align.
- The hood must latch into the lid latch without using much force.
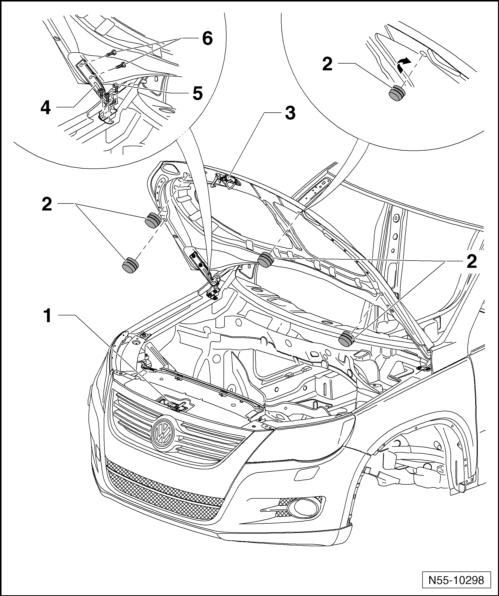
- Remove the catch -3-.
- To align the hood, just loosen the left and right bolts -5- on the hinge; do not remove them.
- To adjust the height at the rear of the hood, just loosen the left and right bolts -6- on the hinge; do not remove them.
- Turn the adjusting buffer -2- in or out to adjust the position of the hood.
- Make sure that the gap dimensions are even.
- After adjusting, apply corrosion protection to the hinge -4- and the bolts -5 and 6-.
- After adjusting the hood, reinstall the catch -3- and adjust it.
- The height of the hood can be adjusted in the front area using the hood latch -1-.
Hood Latch, Adjusting
Note
The hood remains installed. In the illustration, the hood is removed.
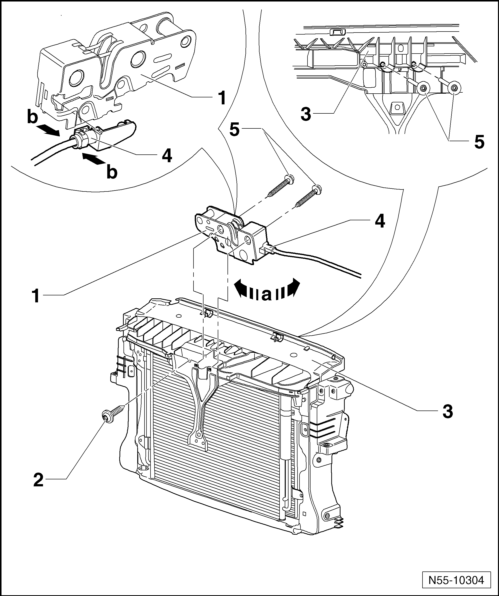
- Remove the radiator grille.
- Loosen the front bolt -2- and the rear bolts -5- to adjust the hood panel gap dimension.
- Tightening specifications for bolts -2 and 5-: 12 N·m.
- Adjust the catch.
Overview - Release Lever
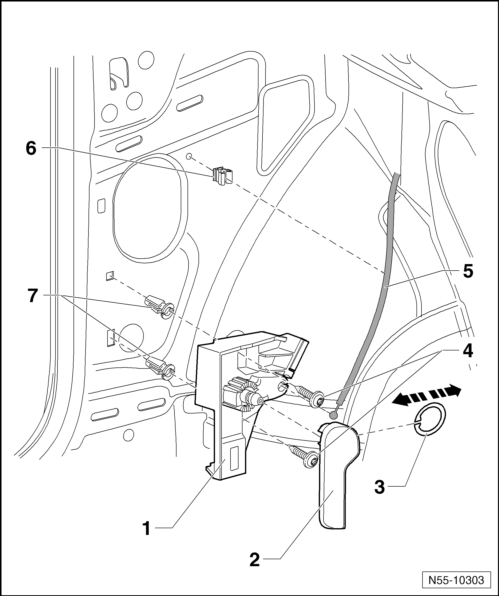
- Bracket
- Release Lever
- Removing and installing.
- Clip
- Bolt
- Quantity: 2
- Tightening specification 1,5 N·m.
- Release Cable
- Clipped into mounting bracket
- Bracket
- Speed Nut
- Quantity: 2
Release Lever, Removing and Installing
Removing
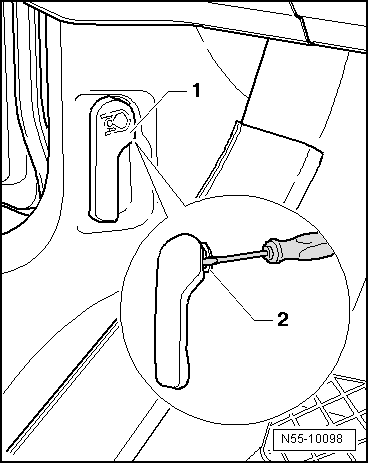
- Pull the operating lever -1- and unlock the hood.
- Insert a small screwdriver into the gap between the operating lever -1- and the clip -2-.
- Remove clip -3- from operating lever -1- and pull operating lever off.
Installing
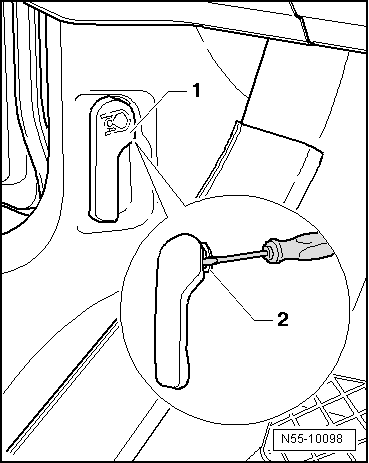
- Slide the clip -2- completely into the release lever -1-.
- Then push the release lever -1- onto mount in mounting bracket and engage the release lever.
Before closing the hood, test the release lever and the release cable.
Test yourself
A quick Volkswagen Tiguan quiz: every answer comes with an explanation and a link to the manual page.