Body Interior
Passenger Seat with Pass-Through
In this manual: Body Interior
~4min read
Sill-Side Trim Panel, Removing and Installing
Removing
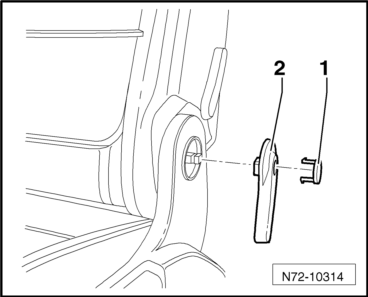
- Remove the cover -1- and remove the release lever -2-.
- Pull the height adjustment handle -1- upward.
- Using a small screwdriver, push the metal tab on the clamp -2- located on the inside of the height adjustment handle, toward the sill and pull the handle off the adjusting lever -3-.
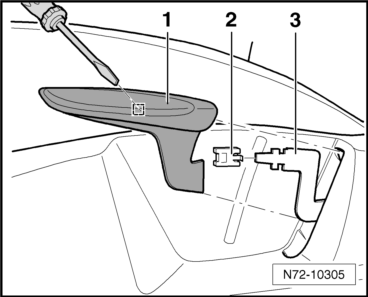
Note
For the sake of illustration, the clip is depicted as removed in the illustration.
- Remove the clip -1- from the adjusting lever -3-.
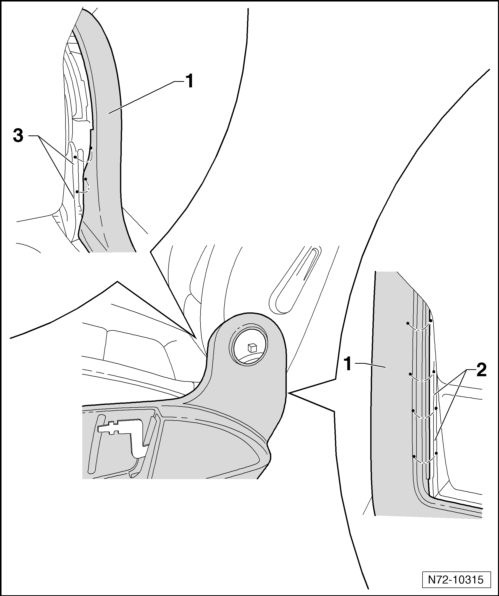
- Remove the trim panel -1-, in the rear area of the backrest adjuster, from the mount -2-.
- Remove the trim panel -1-, in the front area of the backrest adjuster, from the mount -3-.
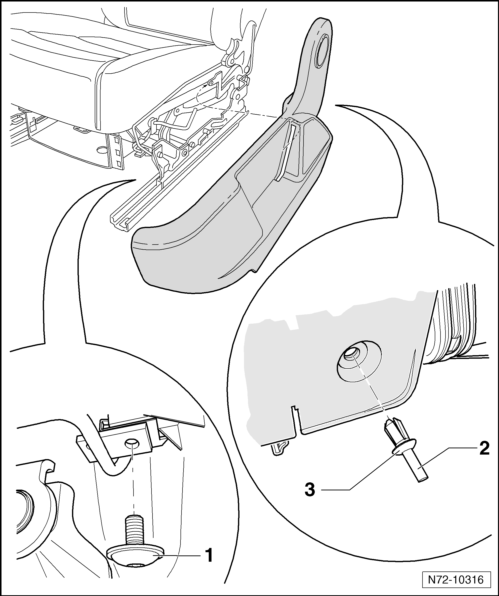
- Remove the bolt -1- (2 N·m).
- Press the clamping pin -2- inward and remove it from the expanding clip -3-.
- Remove the expanding clip.
- Remove the trim -4- in direction of travel out of mounts in the seat frame.
Installing
- Install in reverse order of removal.
Sill-Side Trim Panel Bracket, Removing and Installing
Note
The following describes the removing and installing on the left side of the vehicle. Removing and installing on the right side is identical.
Removing
- Remove the sill-side trim panel.
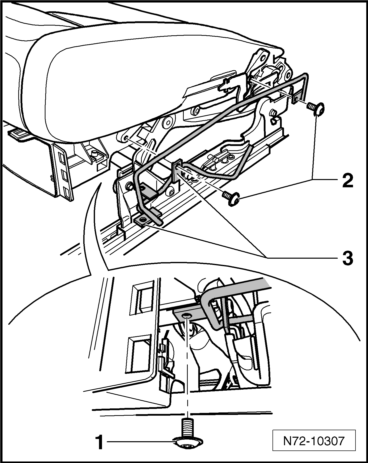
- Remove the bolt -1- (2 N·m).
- Remove the two bolts -2- (8 N·m).
- Remove the bracket -3- from seat frame.
Installing
- Install in reverse order of removal.
Height Adjustment Lever, Removing and Installing
Note
The following describes the removing and installing on the left side of the vehicle. Removing and installing on the right side is identical.
Removing
- Remove the sill-side trim panel.
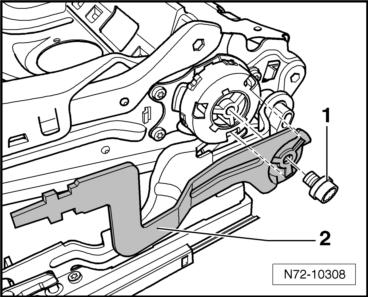
- Remove the bolt -1- (19,5 N·m).
- Remove the lever -2- from the height adjuster.
Installing
- Install in reverse order of removal.
Height Adjustment Element, Removing and Installing
Note
The following describes the removing and installing on the left side of the vehicle. Removing and installing on the right side is identical.
Removing
- Move the seat all the way forward.
- Move the seat to the highest position, and then lower the lever in one stroke.
- Remove the sill-side trim panel.
- Remove the height adjustment lever.
- Remove the three bolts -arrows- (6 + 2 N·m).
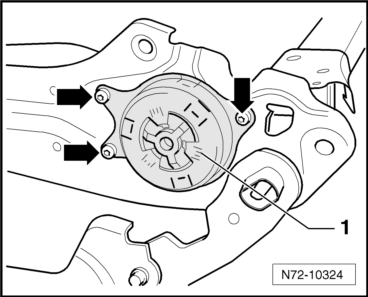
- Remove the height adjustment element -1- from the seat frame.
Installing
- Install in reverse order of removal.
When installing the height adjustment element in the seat frame, it is necessary that a second technician push down on the seat via the backrest.
Two-Way Manual Lumbar Support, Removing and Installing
Removing
- Mount the Engine/Transmission Holder - Seat Repair Fixture -VAS6136- on the Engine and Gearbox Bracket -VAS6095A-.
- Remove the front seat.
- Secure the seat to the Engine/Transmission Holder - Seat Repair Fixture -VAS6136-.
- Press the release button if equipped and pull the headrest out of the backrest.
- Remove the headrest.
- Remove the front seat belt latch.
- Remove the tunnel-side trim panel.
- Remove the sill-side trim panel.
- Remove the backrest.
- Remove the lumbar adjustment lever.
- Remove the backrest folding table.
- Remove the cover and cushion from the front seat backrest.
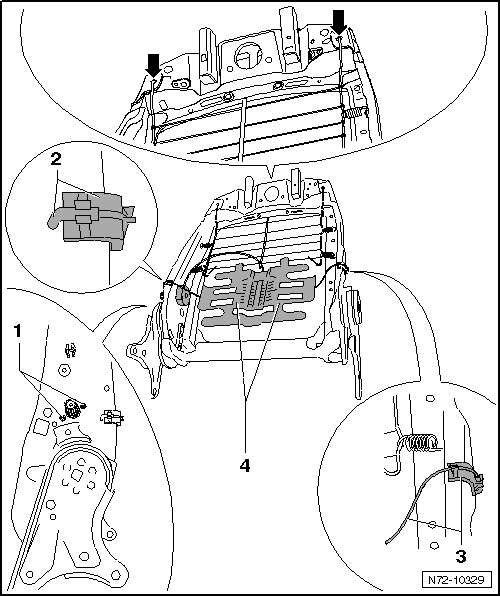
- Remove the two bolts -1- from the actuator (1.5 +- 1 N·m).
- Remove the side retainers -2- and -3- from the backrest frame.
- Remove the side springs.
- Remove the lumbar support -4- from the upper mounts -arrows- in the backrest frame.
Installing
- Install in reverse order of removal.
Backrest Unlocking Element, Removing and Installing
Removing
- Mount the Engine/Transmission Holder - Seat Repair Fixture -VAS6136- on the Engine and Gearbox Bracket -VAS6095A-.
- Remove the front seat.
- Secure the seat to the Engine/Transmission Holder - Seat Repair Fixture -VAS6136-.
- Press the release button if equipped and pull the headrest out of the backrest.
- Remove the headrest.
- Remove the front seat belt latch.
- Remove the tunnel-side trim panel.
- Remove the sill-side trim panel.
- Remove the backrest.
- Remove the lumbar adjustment lever.
- Remove the backrest folding table.
- Remove the cover and cushion from the front seat backrest.
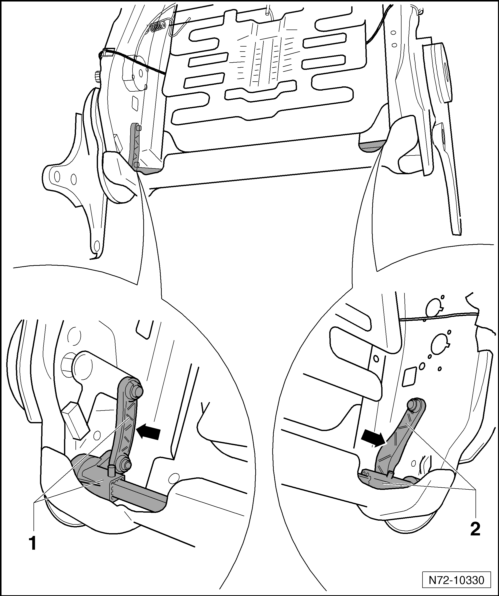
- Cut the right and left lever arms -arrows- of the unlocking element using, for example, a diagonal cutter.
- Remove the rest of the unlocking element -1- and -2- from the backrest frame.
Installing
- Install the unlocking element into the mounts in the backrest frame.
Test yourself
A quick Volkswagen Tiguan quiz: every answer comes with an explanation and a link to the manual page.
Was this page helpful?