Rear Bumper Cover
Tools
Special tools and workshop equipment required
- Torque Wrench 1783 - 2-10Nm -VAG1783-
- Torque Wrench 1331 5-50Nm -VAG1331-
Rear Bumper Cover, Servicing
Note
If the rear bumper cover is damaged, first determine if it is possible to repair the plastic before installing a new cover.
Overview - Rear Bumper Cover
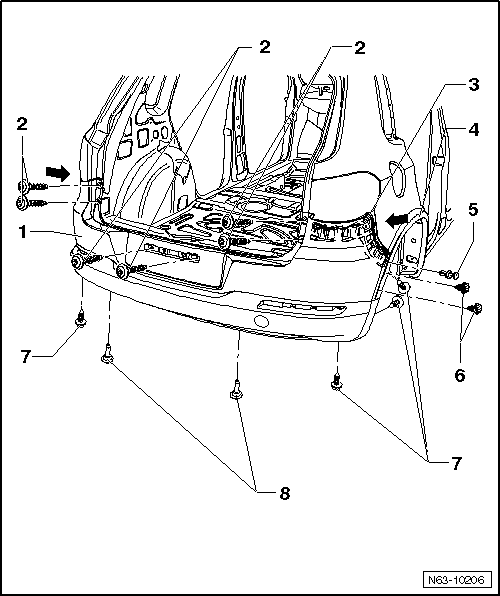
- Rear Bumper Cover
- PP/EPDM material
- Removing and installing.
- Removing and installing.
- Screw
- Tightening specification: 3,5 N·m.
- Quantity: 6
- Guide
- the bumper is engaged with the guide profile
- Wheel Cover
- Removing and installing.
- "R Line", Removing and installing.
- Expanding Rivet
- Left and right
- Hooks
- To the wheel cover
- Must be loosened in order to remove the bumper
- Screw
- Tightening specification: 2 N·m
- For the wheel housing liner
- Bolt
- Tightening specification: 6 N·m
- Quantity: 2
Rear Bumper Cover, Removing and Installing
Note
Slight differences may have to be made to removal and installation procedures of rear bumper cover, depending upon equipment installed in vehicle.
Removing
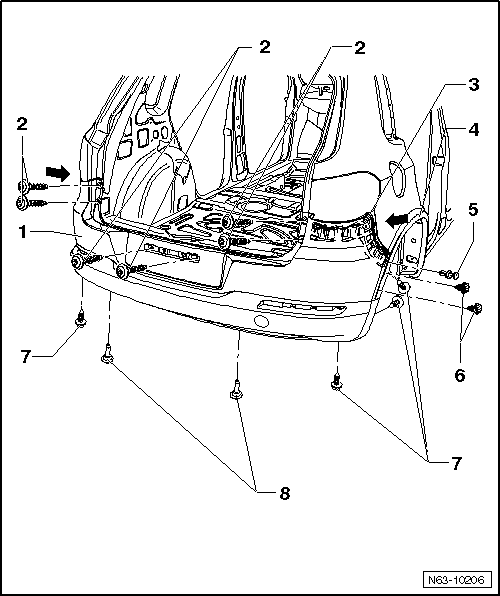
- Remove the left and right wheel housing liner bolts -7-.
- In vehicles with Volkswagen R GmbH "R-Line" optional equipment, remove the wheel covers -4-.
- Remove the hooks -6- for the wheel cover -4- from the inside out of the bumper.
- Remove the left and right expanding rivets -5- with a screwdriver.
- Remove the bolts -8- from below.
- Remove the left and right bolts -2- under the license plate or the license plate holder.
A second technician is required for the rest of the removal procedure.
- Remove the rear bumper cover -1- from the retainer in the guide -3--arrows-.
- Disconnect the connectors from any electrical components.
Information and procedures regarding the parking aid.
Installing
Install in reverse order of removal.
- Pay close attention to the parallel alignment and the gap dimensions.
Rear Bumper Cover with Trailer Hitch, Removing and Installing
Note
Slight differences may have to be made to removal and installation procedures of rear bumper cover, depending upon equipment installed in vehicle.
Removing
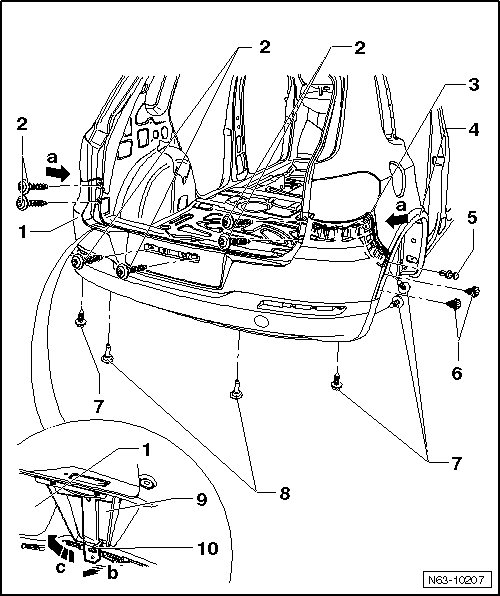
- Remove the left and right wheel housing liner bolts -7-.
- In vehicles with Volkswagen R GmbH "R-Line" optional equipment, remove the wheel covers -4-.
- Remove the hooks -6- for the wheel cover -4- from the inside out of the bumper.
- Remove the left and right expanding rivets -5- with a screwdriver.
- Remove the bolts -8- from below.
- Remove the left and right bolts -2- under the license plate or the license plate holder.
A second technician is required for the rest of the removal procedure.
- Remove the rear bumper cover -1- from the retainer in the guide -3--arrows a-.
- Disconnect the connectors from any electrical components.
Information and procedures regarding the parking aid.
- Remove the knob bracket -9- from the retainer -9- for the bumper cover -1--arrow b-.
- Remove the mount downward -arrow c-.
Installing
Install in reverse order of removal.
- Pay close attention to the parallel alignment and the gap dimensions.
Rear Bumper Cover Attachments
Note
Different versions depending on the model. Allocation. Refer to Parts Catalog.
Overview - Attachments
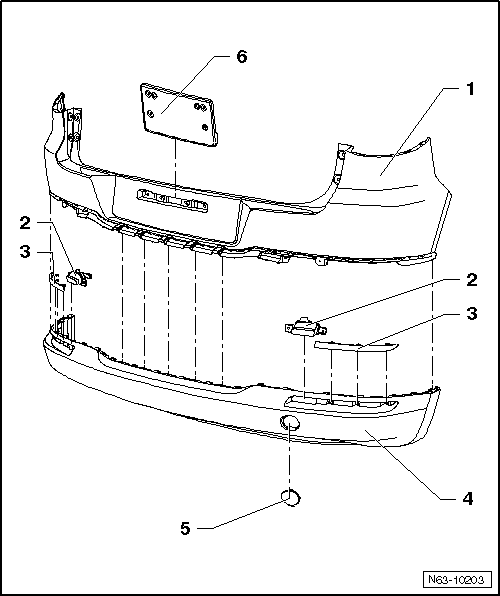
- Rear Bumper Cover
- PP/EPDM material
- Removing and installing.
- Removing and Installing with Trailer Hitch.
- Back-up Lights
- Remove only when bumper cover -1- has been removed.
- Removing.
- Rear Reflector
- Remove only when bumper cover -1- has been removed.
- Bolted in the rear bumper cover -1- from the inside.
- Spoiler
- PC/ABS material
- Engaged in rear bumper cover -1-.
- Remove only when bumper cover -1- has been removed.
- Towing Eye Cap
- Engaged in rear bumper cover -1-.
- License Plate Holder
- Not for all countries
- Bolted together with the bumper cover
Overview - "R-Line" Attachments
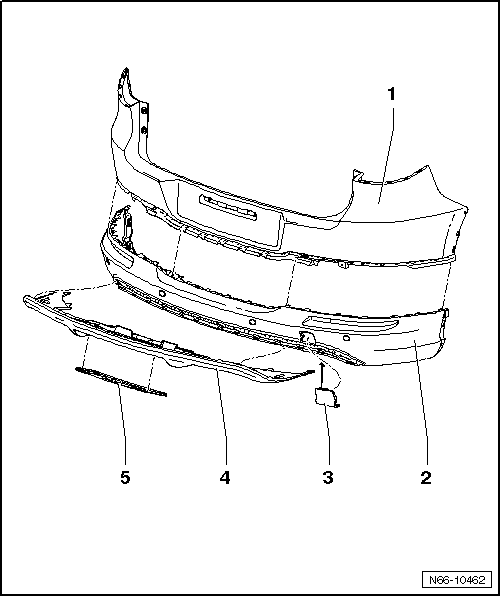
- Rear Bumper Cover
- PP/EPDM material
- Removing and installing
- Removing and Installing with Trailer Hitch.
- Spoiler
- PC/ABS material
- Engaged in rear bumper cover -1-.
- Remove only when bumper cover -1- has been removed.
- Towing Eye Cap
- Engaged in rear bumper cover -1-.
- Diffuser
- In textured paint black
- Engaged in rear bumper cover -1-.
- Remove only when bumper cover -1- has been removed.
- Cap
- For the trailer hitch
Rear Bumper Cover Substructure
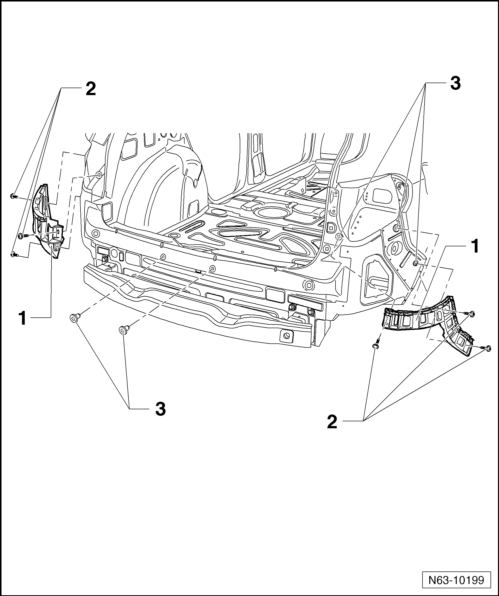
- Guide
- Left and right
- Screws
- Tightening specification: 3,5 N·m.
- Quantity: 3 on each side
- Expanding Nut
- Quantity: 8
Rear Bumper Carrier
Overview - Rear Bumper Carrier
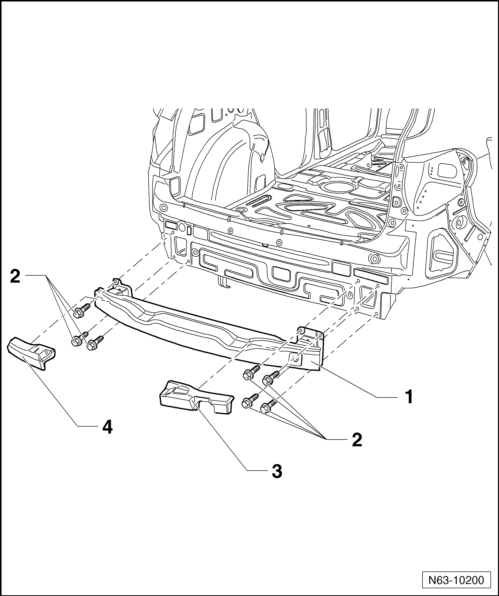
- Rear Bumper Carrier
- Bolt
- Tightening specification: 20 N·m
- Quantity: 3 on the left side
- Quantity: 4 on the right side
- Right Foam Piece
- Secured to bumper carrier with double-sided adhesive tape.
- Left Foam Piece
- Secured to bumper carrier with double-sided adhesive tape.
Overview - Rear Bumper Carrier (USA)
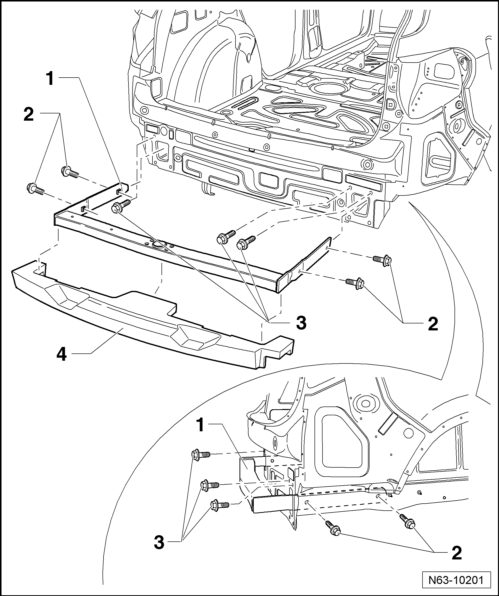
- Rear Bumper Carrier
- Bolt
- Tightening specification: 20 N·m
- Quantity: 2 on each side
- Bolt
- Tightening specification: 20 N·m
- Sealing threaded connections
- Quantity: 1 on the left
- Quantity: 2 on the right
DANGER!
Bolts -3- are sealing threaded connections and seal the interior from exhaust gases and must be installed in any case.
- Bolt
- Tightening specification: 20 N·m
- Quantity: 1 on the left
- Quantity: 2 on the right
- Foam Piece
- Secured to bumper carrier with double-sided adhesive tape.
Test yourself
A quick Volkswagen Tiguan quiz: every answer comes with an explanation and a link to the manual page.