Sun Shade Motor, Removing and Installing
Removing
- Remove the headliner.
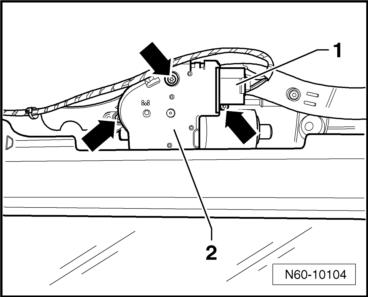
- Disconnect the electrical connector -1- on the sun shade motor -2-.
- Remove the bolts -arrow- from the sun shade motor -2-.
- Remove the sun shade motor -2-.
Installing
Install in reverse order of removal.
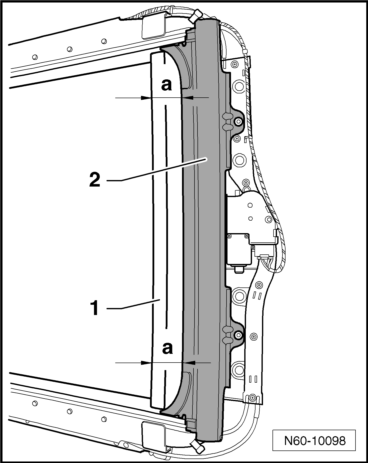
- Prior to installing the motor, make sure the sun shade is parallel by measuring -dimension a- between the shade arch -1- and the shade cartridge -2- .
Tightening Specification
Bolts 3,5 N·m
- After completing all the work, perform a sun shade motor adaptation.
Sun Shade, Removing and Installing
Removing
- Move the sun shade all the way into the open position.
Note
Using a commercially available hex socket head wrench, rotate shade motor into open direction to removal position if the electrical system malfunctions.
- Remove the headliner.
- Remove the rear glass panel.
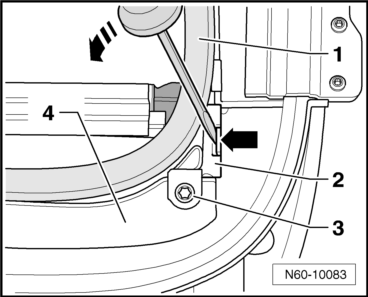
- Remove the screws -3- from the cap -2- (2 N·m).
- Unclip the cap retainer in direction of -arrow--2- from the rear lid using a screw driver -4- and fold the cap -2- up.
Do not remove the inner seal -1- .

- Carefully lift the shade arch -2- together with the sun shade slide -1- .
Note
Be sure not to damage the shade material -3-
- Pull the sun shade slide -1- to the side in the direction of the -arrow- out of the sun shade arch -2- .
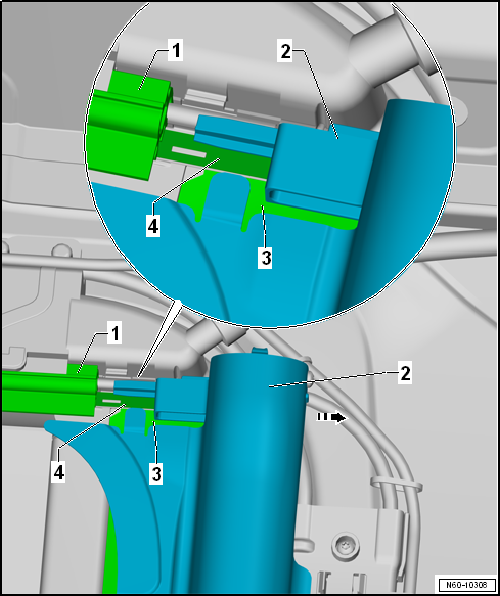
- Remove the screws for the shade cartridge -2- (3,5 N·m).
The following steps are to be performed with a second technician.
- Pull the sun shade cartridge -2- evenly in the direction of the arrow slightly downward so that it can get past the sun shade motor -3-.
Note
Be sure not to damage the shade material -3- .
- Remove the sun shade cartridge -2- and the sun shade steel band -4- parallel in the direction of the -arrow- from the sun shade rail -1- .
Remove the Sun Shade to Replace the Sun Shade Arch.

- Carefully remove the sun shade arch -1- in the direction of the -arrow- from the weather strip -3- of the sun shade material -2- .
- Press the new sun shade arch -1- carefully on the weather strip -3-.
Note
Be sure not to damage the shade material -2-
Installing
Note
- The replacement part is delivered in the sun shade cartridge.
- Do not lubricate the sun shade slide and cables.
- The following steps are to be performed with a second technician.
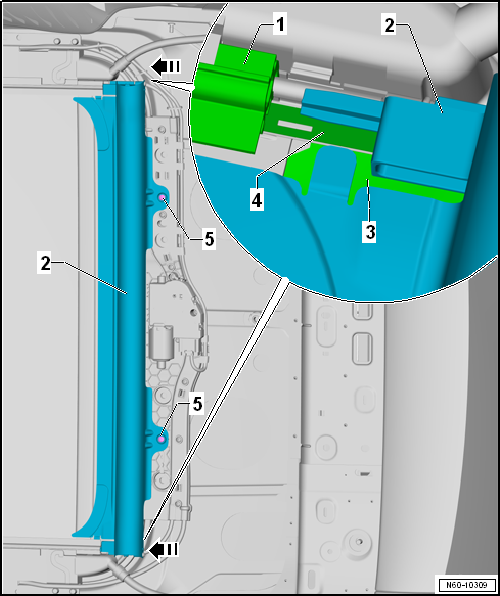
- Push the sun shade cartridge -2- and the sun shade steel band -4- parallel in the direction of the -arrow- into the sun shade rail -1- .
Slide the sun shade cartridge tab -2- under the sun shade rail -1-.
Note
- Be sure not to damage the shade material -3- .
- Tightening Specifications
- Sun shade cartridge screw -5-: 3,5 N·m
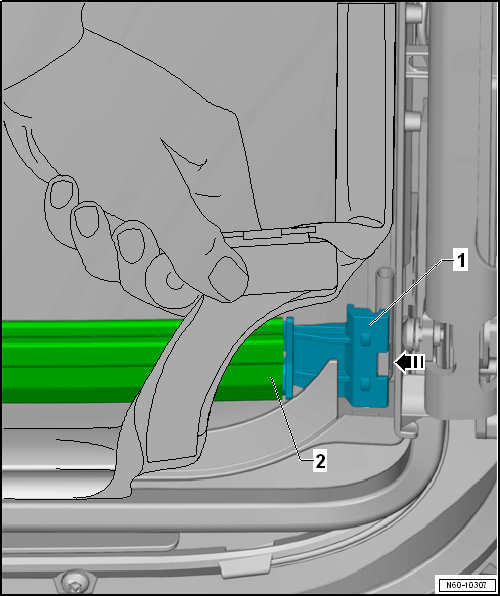
- Press the sun shade slide -1- in the direction of the -arrow- into sun shade arch -2-.
Note
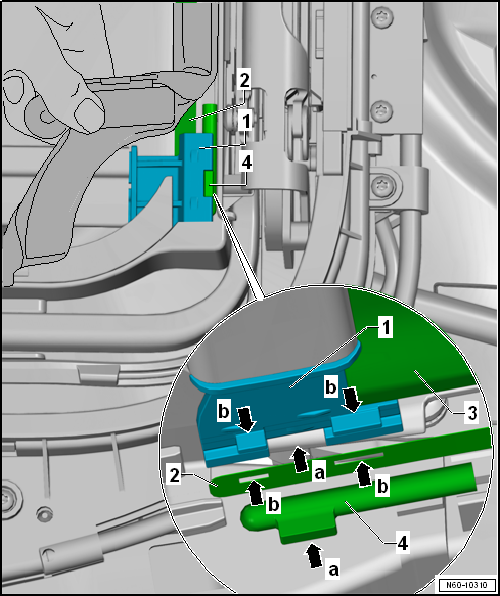
The following steps are performed on one side first and then held together. Then a second technician assembles the other side.
- The opening -arrow a- in the sun shade glide -1- is aligned with the guide -arrow a- on the cable -4-.
- The steel band -2- is positioned so that the openings -b arrows- align with the guides -b arrows- in the sun shade glide -1-.
Tightening Specifications
Screw cap 2 N·m
Note
- Check the sun shade for ease of movement after installing. Using a commercially available hex wrench, manually move the sun shade drive on the motor and make sure there are not creases or folds in the sun shade material.
- Guide the sun shade all the way back by hand. The adaptation procedure begins at the rear position.
Installation is performed in reverse order of the removal.
- Install the headliner.
- Install the rear glass sunroof panel.
- After completing all the work, perform a sun shade motor adaptation.
Overview - Frame
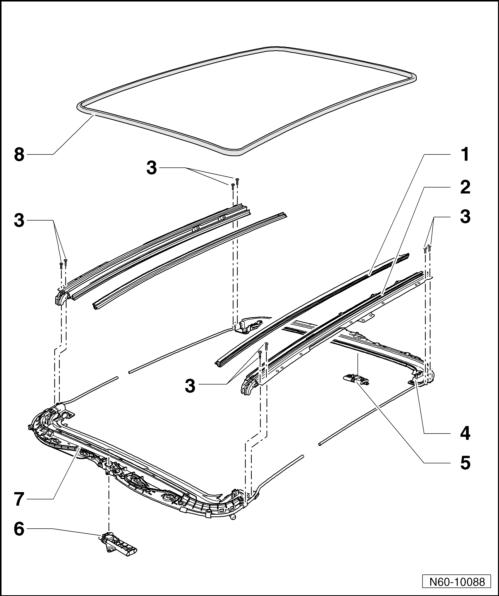
- Sun Shade Rail
- cannot be changed individually
- Guide Rail
- cannot be changed individually
- connected with the front part
- Bolt
- 2 N·m
- Rear Lid Part
- Removing and installing.
- Rear Motor Support
- Removing and installing.
- Front Motor Support
- Removing and installing.
- Front Section
- Cannot be changed individually
- Connected to the guide rail
- Inner Seal
- Replacing.
Test yourself
A quick Volkswagen Tiguan quiz: every answer comes with an explanation and a link to the manual page.