Детали однократного применения

Заднее сиденье

44шагов
~264мин
4/5сложность
0102030405031.423Н·мlb·ft
Момент затяжки, найден в тексте страницы
Выполнено 0 из 44

Содержание:

Снятие и установка заднего сиденья в сборе

Снятие

Подушка заднего сиденья в сборе
  1. Отсоедините отрицательную клемму (-) аккумуляторной батареи.
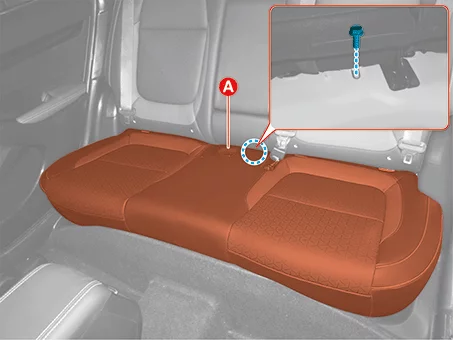
  2. Отверните болт (A) подушки заднего сиденья.

    Момент затяжки: 21,6 - 31 Н·м
    Body (Interior and Exterior) — Rear Seat / Rear Seat Assembly / Removal and Installation / Removal illustration
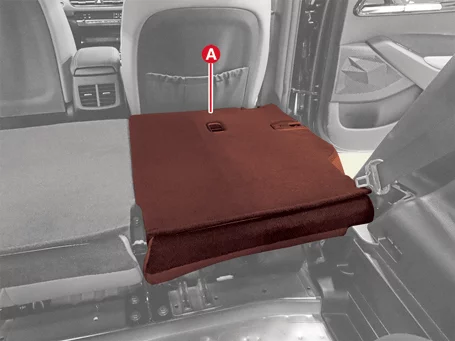
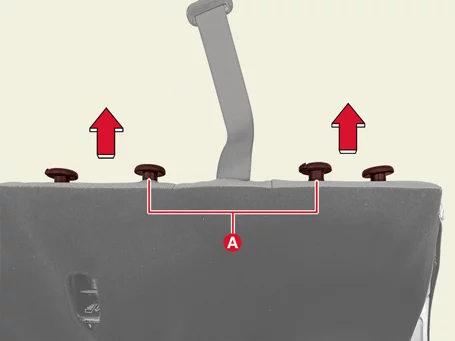
  3. Поднимите подушку заднего сиденья в направлении стрелки и извлеките втулку (A) из крепления.
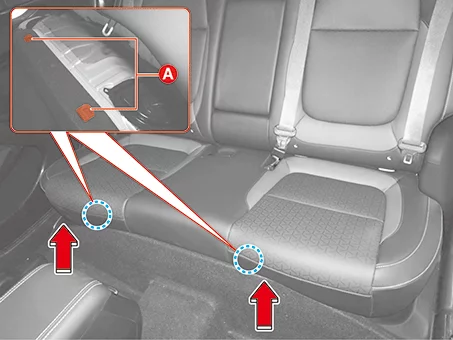
    Body (Interior and Exterior) — Rear Seat / Rear Seat Assembly / Removal and Installation / Removal illustration
  4. Отсоедините разъем нагревательного элемента подушки заднего сиденья (A). [Вариант комплектации]
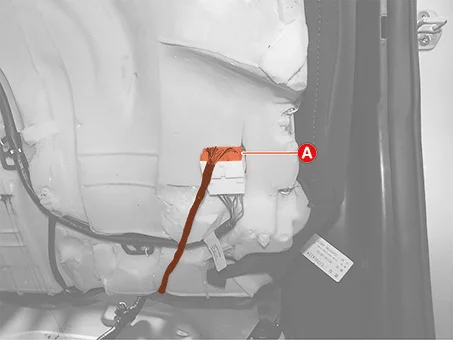
    Body (Interior and Exterior) — Rear Seat / Rear Seat Assembly / Removal and Installation / Removal illustration
  5. Сложите узел спинки заднего сиденья (A) в направлении стрелки.
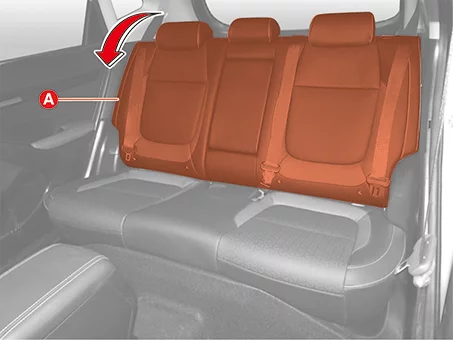
    Body (Interior and Exterior) — Rear Seat / Rear Seat Assembly / Removal and Installation / Removal illustration
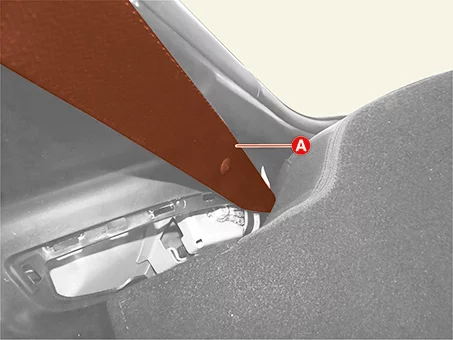
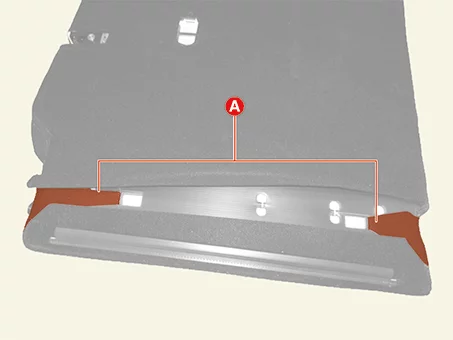
  6. Снимите боковые накладки багажника (A).
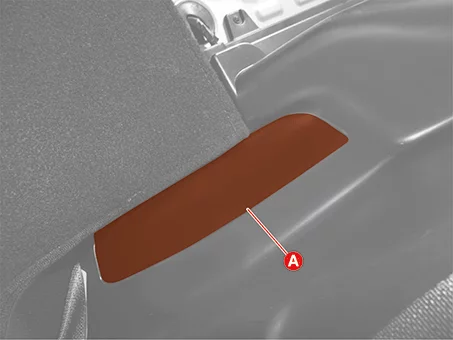
    Body (Interior and Exterior) — Rear Seat / Rear Seat Assembly / Removal and Installation / Removal illustration
    Body (Interior and Exterior) — Rear Seat / Rear Seat Assembly / Removal and Installation / Removal illustration
  7. Выверните болт центрального кронштейна спинки заднего сиденья (A).

    Момент затяжки: 21,6 - 31 Н·м
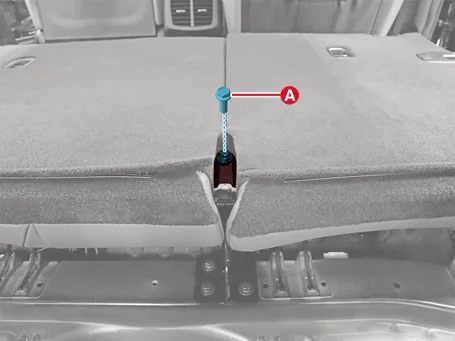
    Body (Interior and Exterior) — Rear Seat / Rear Seat Assembly / Removal and Installation / Removal illustration
  8. Снимите спинку заднего сиденья в сборе (A).
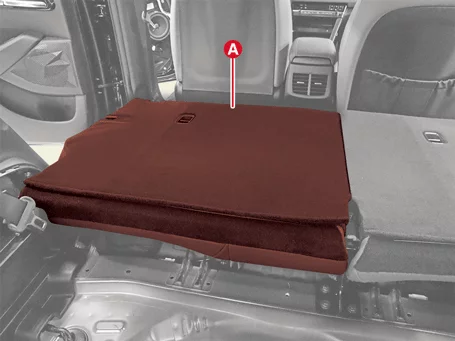
    Body (Interior and Exterior) — Rear Seat / Rear Seat Assembly / Removal and Installation / Removal illustration
    Body (Interior and Exterior) — Rear Seat / Rear Seat Assembly / Removal and Installation / Removal illustration
    Note
    Снятие спинки заднего сиденья
    1. После выведения центрального шарнирного пальца спинки заднего сиденья из центрального кронштейна отведите спинку к двери.
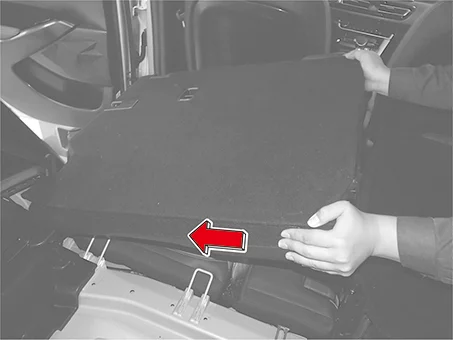
      Body (Interior and Exterior) — Rear Seat / Rear Seat Assembly / Removal and Installation / Removal illustration
    2. После отведения бокового шарнирного пальца спинки заднего сиденья наружу приподнимите спинку и снимите её.
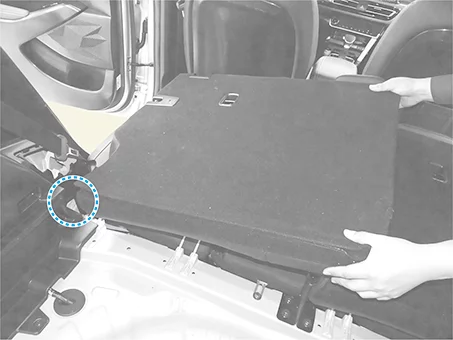
      Body (Interior and Exterior) — Rear Seat / Rear Seat Assembly / Removal and Installation / Removal illustration
Узел спинки заднего сиденья

Установка

  1. Установка производится в порядке, обратном демонтажу.
    Note
    Установка спинки заднего сиденья в сборе
    1. Вставьте боковой шарнирный палец спинки заднего сиденья в отверстие бокового кронштейна.
      Body (Interior and Exterior) — Rear Seat / Rear Seat Assembly / Removal and Installation / Installation illustration
    2. Потяните спинку заднего сиденья внутрь и вставьте центральный шарнирный палец в центральный кронштейн.
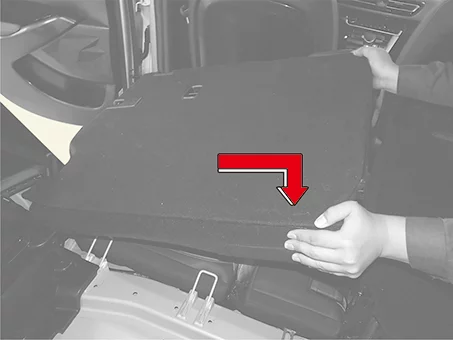
      Body (Interior and Exterior) — Rear Seat / Rear Seat Assembly / Removal and Installation / Installation illustration
      Note
      Боковой шарнирный палец (A) должен полностью войти в боковой кронштейн.
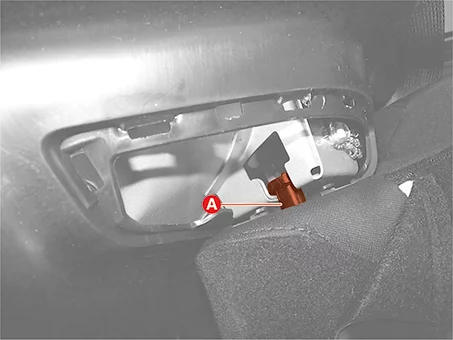
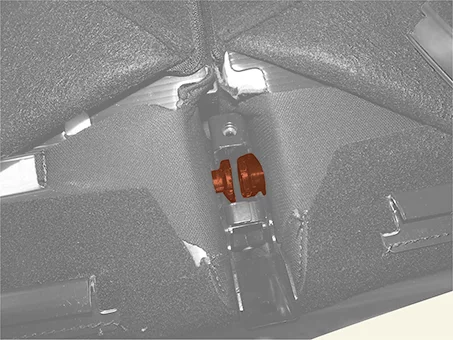
      Body (Interior and Exterior) — Rear Seat / Rear Seat Assembly / Removal and Installation / Installation illustration
      Центральный шарнирный палец должен полностью войти в центральный кронштейн.
      Body (Interior and Exterior) — Rear Seat / Rear Seat Assembly / Removal and Installation / Installation illustration
      Ремень заднего сиденья (A) должен располагаться в сторону водительского сиденья, а не у боковых шарнирных пальцев.
      Body (Interior and Exterior) — Rear Seat / Rear Seat Assembly / Removal and Installation / Installation illustration

Снятие и установка чехла подушки заднего сиденья

Снятие

  1. Снимите узел подушки заднего сиденья. (См. Заднее сиденье – «Узел заднего сиденья».)
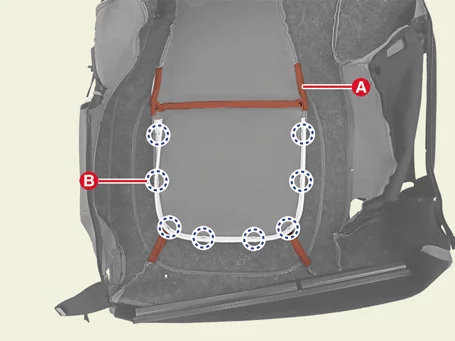
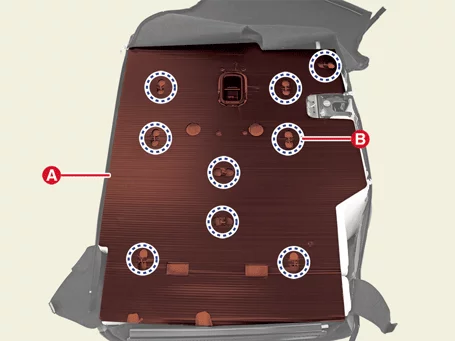
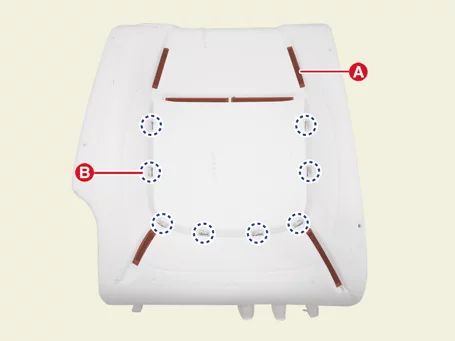
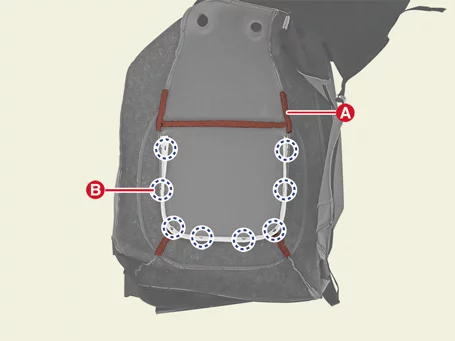
  2. Снимите липучки (A) и пружинные клипсы (B).
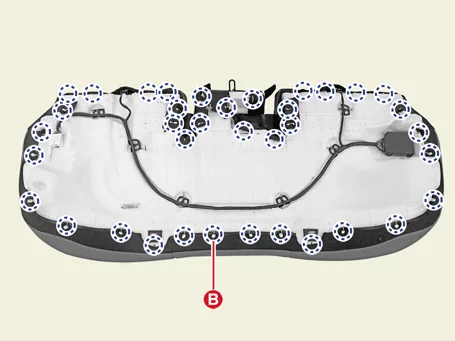
    Body (Interior and Exterior) — Rear Seat / Rear Seat Cushion Cover / Removal and Installation / Removal illustration
    Body (Interior and Exterior) — Rear Seat / Rear Seat Cushion Cover / Removal and Installation / Removal illustration
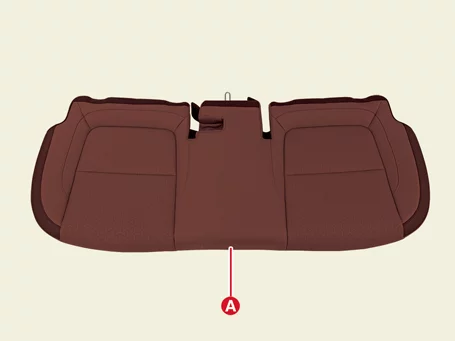
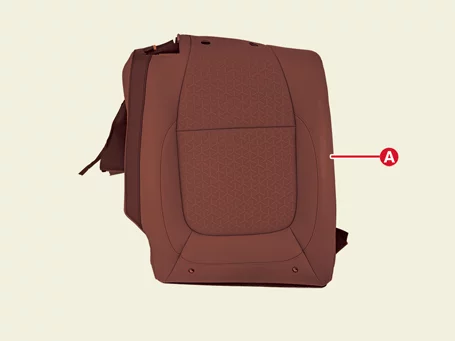
  3. Снимите чехол подушки заднего сиденья (A).
    Body (Interior and Exterior) — Rear Seat / Rear Seat Cushion Cover / Removal and Installation / Removal illustration

Установка

  1. Установка производится в порядке, обратном демонтажу.
    Note
    Перед установкой фиксаторов-крючков (hog ring) равномерно натяните чехол, чтобы не образовались мелкие складки.

Снятие и установка чехла спинки заднего сиденья

Снятие

Чехол спинки заднего сиденья [Со стороны водителя]
  1. Снимите спинку заднего сиденья в сборе [со стороны водителя]. (См. Заднее сиденье - «Заднее сиденье в сборе»)
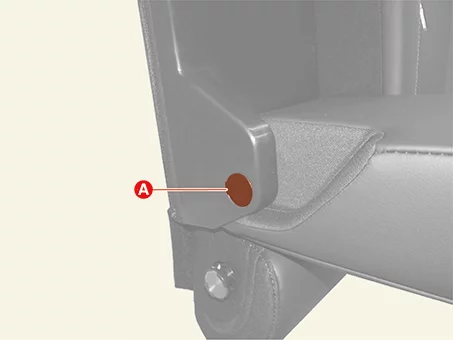
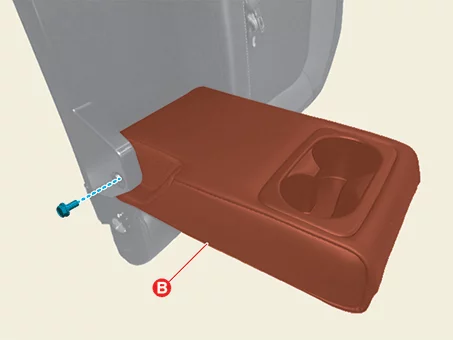
  2. После снятия колпачка (A) отверните болт и снимите подлокотник спинки заднего сиденья (B).
    Body (Interior and Exterior) — Rear Seat / Rear Seat Back Cover / Removal and Installation / Removal illustration
    Body (Interior and Exterior) — Rear Seat / Rear Seat Back Cover / Removal and Installation / Removal illustration
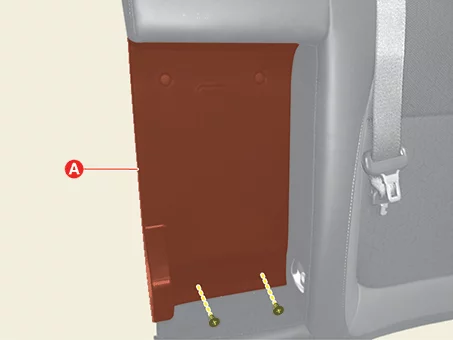
  3. После выворачивания винтов снимите крышку подлокотника спинки заднего сиденья (A).
    Body (Interior and Exterior) — Rear Seat / Rear Seat Back Cover / Removal and Installation / Removal illustration
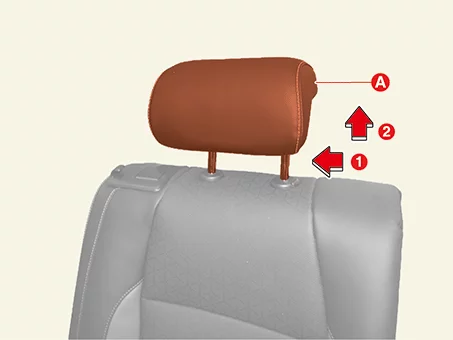
  4. Снимите подголовник (A) в направлении стрелки.
    Body (Interior and Exterior) — Rear Seat / Rear Seat Back Cover / Removal and Installation / Removal illustration
  5. Снимите направляющую ремня (A).
    Body (Interior and Exterior) — Rear Seat / Rear Seat Back Cover / Removal and Installation / Removal illustration
  6. После снятия колпачка (A) выверните винт и снимите облицовку складывания заднего сиденья (B).
    Body (Interior and Exterior) — Rear Seat / Rear Seat Back Cover / Removal and Installation / Removal illustration
    Body (Interior and Exterior) — Rear Seat / Rear Seat Back Cover / Removal and Installation / Removal illustration
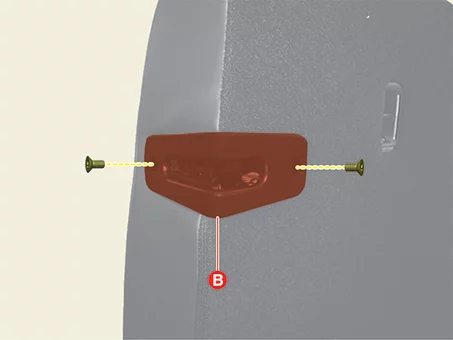
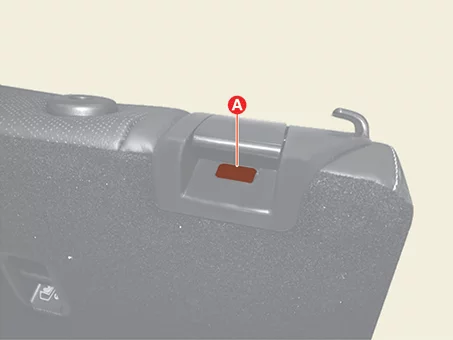
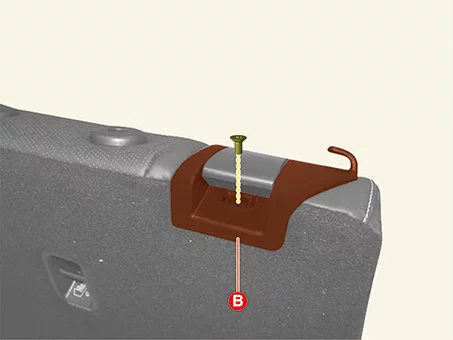
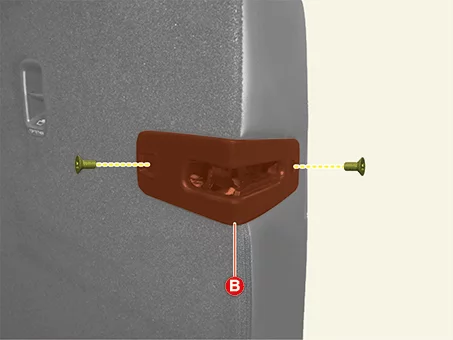
  7. После снятия колпачка (A) выверните винты и снимите крышку замка спинки заднего сиденья (B).
    Body (Interior and Exterior) — Rear Seat / Rear Seat Back Cover / Removal and Installation / Removal illustration
    Body (Interior and Exterior) — Rear Seat / Rear Seat Back Cover / Removal and Installation / Removal illustration
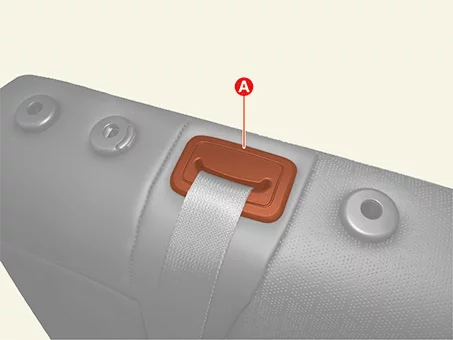
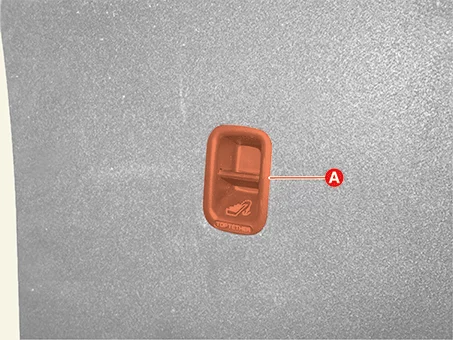
  8. Снимите крышку анкерного крепления детского кресла (A).
    Body (Interior and Exterior) — Rear Seat / Rear Seat Back Cover / Removal and Installation / Removal illustration
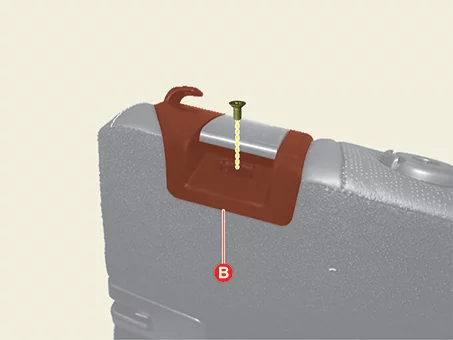
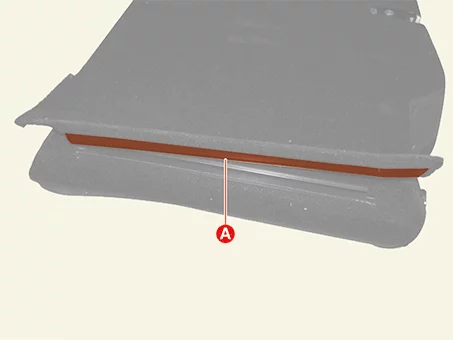
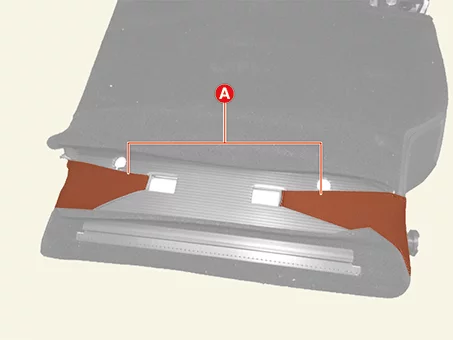
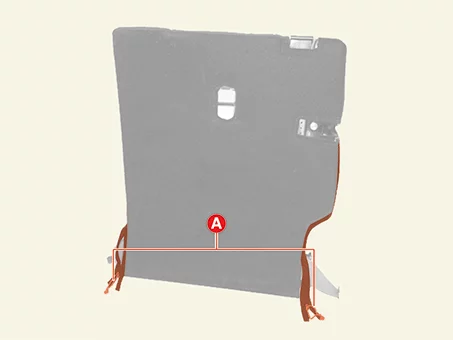
  9. Снимите защитные накладки спинки заднего сиденья (A).
    Body (Interior and Exterior) — Rear Seat / Rear Seat Back Cover / Removal and Installation / Removal illustration
    Body (Interior and Exterior) — Rear Seat / Rear Seat Back Cover / Removal and Installation / Removal illustration
  10. Откройте молнию чехла спинки заднего сиденья (A).
    Body (Interior and Exterior) — Rear Seat / Rear Seat Back Cover / Removal and Installation / Removal illustration
  11. Снимите заднюю панель (A), предварительно сняв фиксаторы-крючки (B).
    Body (Interior and Exterior) — Rear Seat / Rear Seat Back Cover / Removal and Installation / Removal illustration
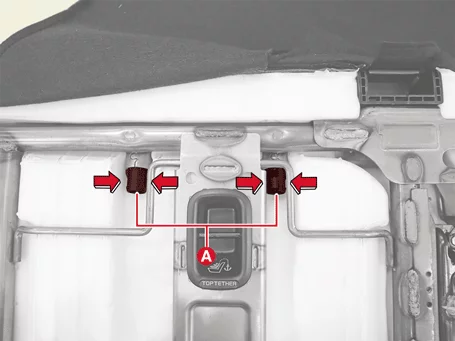
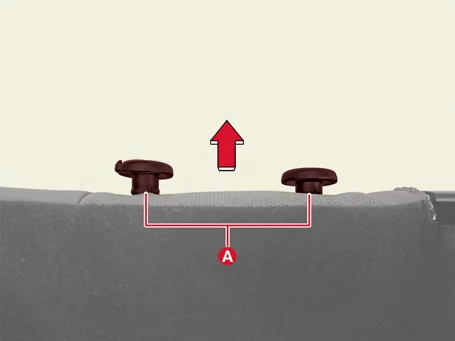
  12. Нажмите фиксирующий штифт и снимите направляющую подголовника (A) в направлении стрелки.
    Body (Interior and Exterior) — Rear Seat / Rear Seat Back Cover / Removal and Installation / Removal illustration
    Body (Interior and Exterior) — Rear Seat / Rear Seat Back Cover / Removal and Installation / Removal illustration
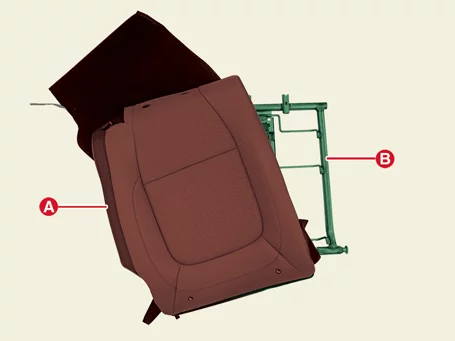
  13. Снимите узел спинки заднего сиденья (A) с каркаса спинки заднего сиденья (B).
    Body (Interior and Exterior) — Rear Seat / Rear Seat Back Cover / Removal and Installation / Removal illustration
  14. Снимите липучки (A) и пружинные клипсы (B).
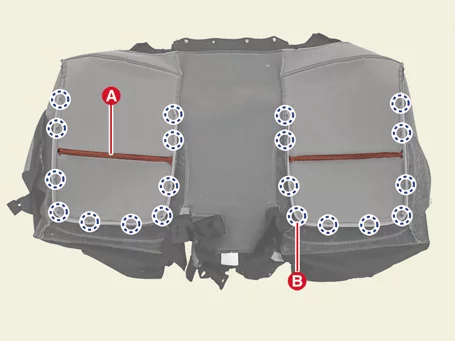
    Body (Interior and Exterior) — Rear Seat / Rear Seat Back Cover / Removal and Installation / Removal illustration
    Body (Interior and Exterior) — Rear Seat / Rear Seat Back Cover / Removal and Installation / Removal illustration
  15. Снимите чехол спинки заднего сиденья (A) с поролоновой подушки спинки.
    Body (Interior and Exterior) — Rear Seat / Rear Seat Back Cover / Removal and Installation / Removal illustration
  16. Снимите спинку заднего сиденья в сборе [со стороны пассажира]. (См. Заднее сиденье - «Заднее сиденье в сборе»)
  17. Снимите подголовник (A) в направлении стрелки.
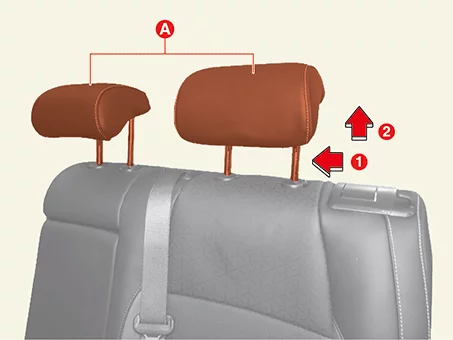
    Body (Interior and Exterior) — Rear Seat / Rear Seat Back Cover / Removal and Installation / Removal illustration
  18. После снятия колпачка (A) выверните винт и снимите облицовку складывания заднего сиденья (B).
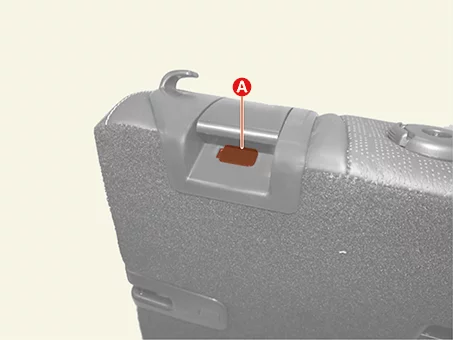
    Body (Interior and Exterior) — Rear Seat / Rear Seat Back Cover / Removal and Installation / Removal illustration
    Body (Interior and Exterior) — Rear Seat / Rear Seat Back Cover / Removal and Installation / Removal illustration
  19. После снятия колпачка (A) выверните винты и снимите крышку замка спинки заднего сиденья (B).
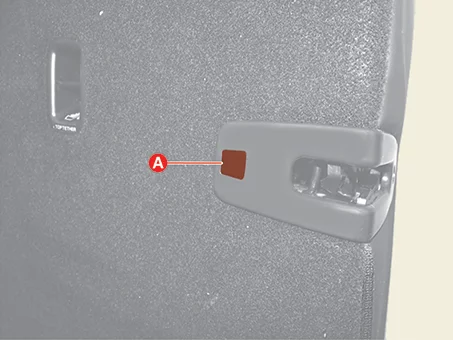
    Body (Interior and Exterior) — Rear Seat / Rear Seat Back Cover / Removal and Installation / Removal illustration
    Body (Interior and Exterior) — Rear Seat / Rear Seat Back Cover / Removal and Installation / Removal illustration
  20. Снимите крышку анкерного крепления детского кресла (A).
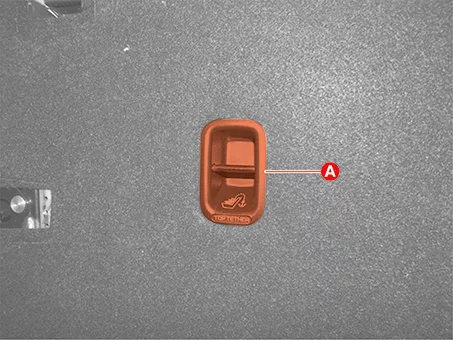
    Body (Interior and Exterior) — Rear Seat / Rear Seat Back Cover / Removal and Installation / Removal illustration
  21. Снимите защитные накладки спинки заднего сиденья (A).
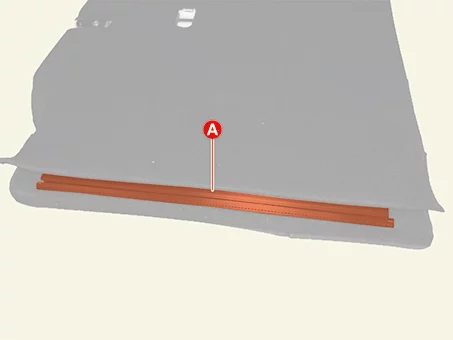
    Body (Interior and Exterior) — Rear Seat / Rear Seat Back Cover / Removal and Installation / Removal illustration
    Body (Interior and Exterior) — Rear Seat / Rear Seat Back Cover / Removal and Installation / Removal illustration
  22. Откройте молнию чехла спинки заднего сиденья (A).
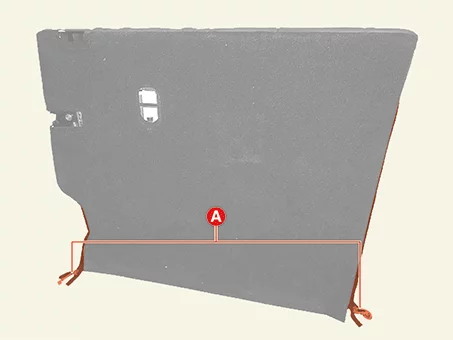
    Body (Interior and Exterior) — Rear Seat / Rear Seat Back Cover / Removal and Installation / Removal illustration
  23. Снимите заднюю панель (A), предварительно сняв фиксаторы-крючки (B).
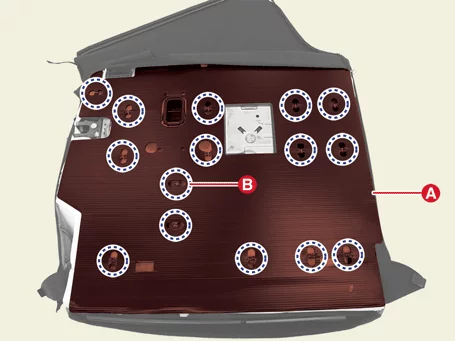
    Body (Interior and Exterior) — Rear Seat / Rear Seat Back Cover / Removal and Installation / Removal illustration
  24. Нажмите фиксирующий штифт и снимите направляющую подголовника (A) в направлении стрелки.
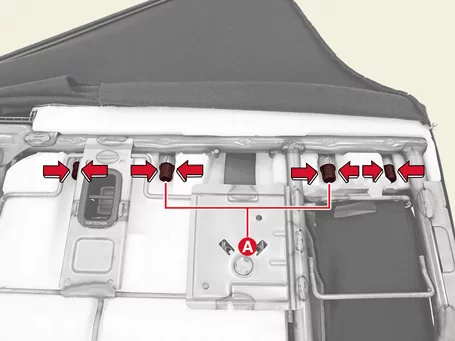
    Body (Interior and Exterior) — Rear Seat / Rear Seat Back Cover / Removal and Installation / Removal illustration
    Body (Interior and Exterior) — Rear Seat / Rear Seat Back Cover / Removal and Installation / Removal illustration
  25. Снимите узел спинки заднего сиденья (A) с каркаса спинки заднего сиденья (B).
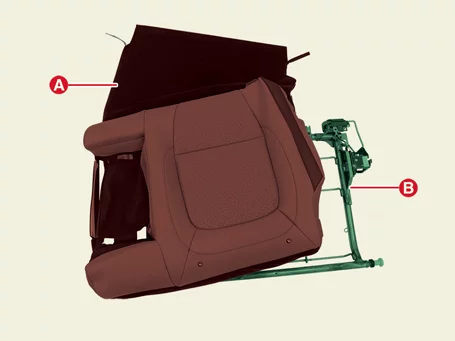
    Body (Interior and Exterior) — Rear Seat / Rear Seat Back Cover / Removal and Installation / Removal illustration
  26. Снимите липучки (A) и пружинные клипсы (B).
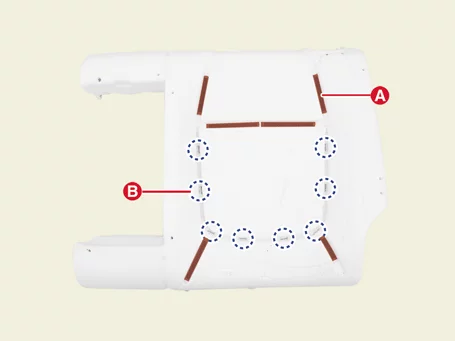
    Body (Interior and Exterior) — Rear Seat / Rear Seat Back Cover / Removal and Installation / Removal illustration
    Body (Interior and Exterior) — Rear Seat / Rear Seat Back Cover / Removal and Installation / Removal illustration
  27. Снимите чехол спинки заднего сиденья (A) с поролоновой подушки спинки.
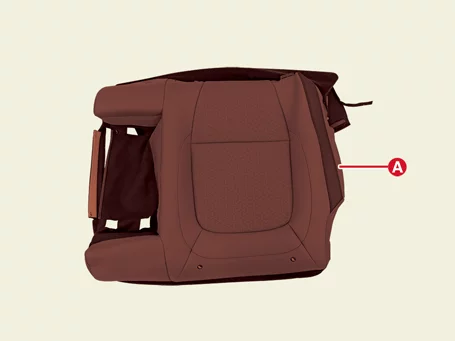
    Body (Interior and Exterior) — Rear Seat / Rear Seat Back Cover / Removal and Installation / Removal illustration
Чехол спинки заднего сиденья [Со стороны пассажира]

Установка

  1. Установка производится в порядке, обратном демонтажу.

Снятие и установка замка заднего сиденья

Снятие

Фиксатор спинки заднего сиденья [Со стороны водителя]
  1. Снимите чехол спинки заднего сиденья. (См. Заднее сиденье - «Чехол спинки заднего сиденья»)
  2. После отсоединения троса (A) отверните винт и снимите рычаг складывания заднего сиденья (B).
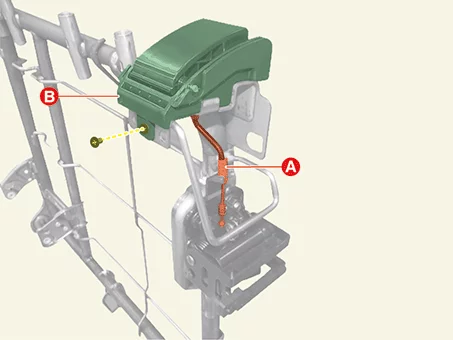
    Body (Interior and Exterior) — Rear Seat / Rear Seat Latch / Removal and Installation / Removal illustration
  3. Отверните гайки и снимите замок заднего сиденья (A).

    Момент затяжки: 49 - 64 Н·м
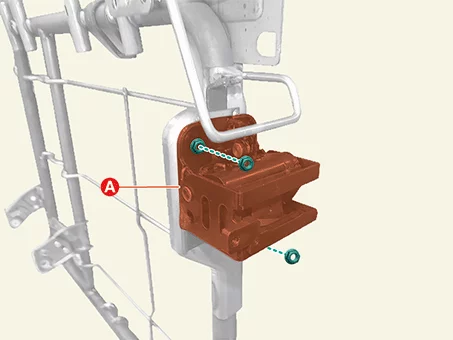
    Body (Interior and Exterior) — Rear Seat / Rear Seat Latch / Removal and Installation / Removal illustration
  4. Снимите чехол спинки заднего сиденья. (См. Заднее сиденье - «Чехол спинки заднего сиденья»)
  5. После отсоединения троса (A) отверните винт и снимите рычаг складывания заднего сиденья (B).
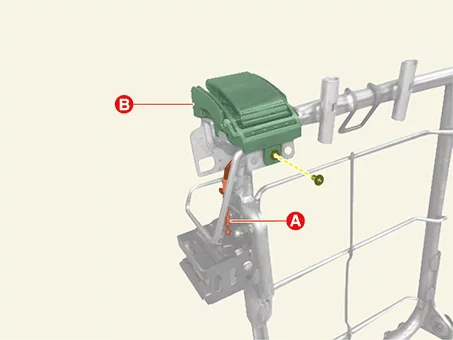
    Body (Interior and Exterior) — Rear Seat / Rear Seat Latch / Removal and Installation / Removal illustration
  6. Отверните гайки и снимите замок заднего сиденья (A).

    Момент затяжки: 49 - 64 Н·м
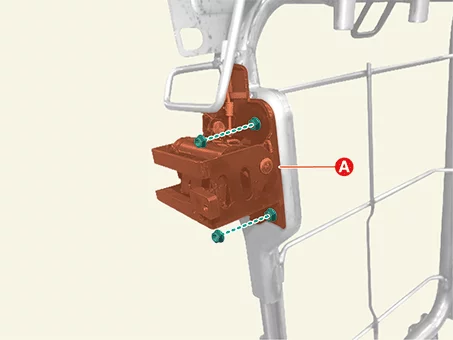
    Body (Interior and Exterior) — Rear Seat / Rear Seat Latch / Removal and Installation / Removal illustration
Фиксатор спинки заднего сиденья [Со стороны пассажира]

Установка

  1. Установка производится в порядке, обратном демонтажу.