Removing and Installing the Shock Absorber and Spring
GENERAL INFORMATION
Front-wheel drive vehicles REMOVAL
PROCEDURE
1. Mark the position of the respective rear wheel relative to the hub with paint. This allows the balanced wheel to be installed in its original position during assembly. Loosen the wheel bolts while the vehicle is standing on the ground. Raise the rear of the vehicle, place it on stands and remove the rear wheel.
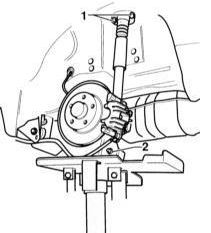
2. Place a garage lift from the side as a support under the rear wheel at the location where the wheel is removed. Do not raise the rear suspension. The illustration shows the V.A.G. lift.
3. If only the spring is to be removed, unscrew bolt -2- securing the shock absorber to the axle beam. Fully relieve the spring and remove it. To do this, lower the lift. If necessary, ask an assistant to pull the suspension down.
4. If the shock absorber also needs to be removed, unscrew the shock absorber mounting bolts -1- from the body and remove the shock absorber. INSTALLATION
PROCEDURE
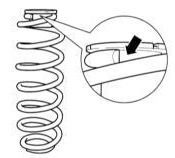
1. Install the spring so that the end of the spring (arrow in illustration) rests against the stop of the upper spring seat. The upper spring seat must be correctly seated in the body.
2. The end of the lower spring coil must point toward the center of the vehicle.
3. Insert the shock absorber and secure it at the bottom with a new bolt and a new nut. Tighten to 55 N·m.
4. Secure the shock absorber to the body with new bolts. Tighten to 75 N·m.
Test yourself
A quick Audi A3 quiz: every answer comes with an explanation and a link to the manual page.