Backrest Adjuster, Removing and Installing
Special tools and workshop equipment required
- Pop Rivet Pliers -VAG1753B-
- Drill
- Protective eyewear
- For the correct locking compound. Refer to the Parts Catalog.
Removing
 WARNING
- Follow all Safety Precautions when working with pyrotechnic components. Refer to → Chapter "Pyrotechnic Components Safety Precautions".
- Before handling airbag units (for example, disconnecting electrical connector), the person handling it must "discharge static electricity". This can be done by touching the door striker, for example.
- Remove the front seat. Refer to → Chapter "Front Seat, Removing and Installing".
- Fasten the front seat on the Engine/Transmission Holder - Seat Repair Fixture -VAS6136-. Refer to → Chapter "Front Seat, Mounting on Fixture for Seat Repair".
- Remove the trim on the tunnel side. Refer to → Chapter "Seat Side Trim on the Tunnel Side, Removing and Installing".
- Remove the sill-side trim:
- For the standard seat/sport seat/power sport seat. Refer to → Chapter "Seat Side Trim on Sill Panel Side, Removing and Installing, Front Seat (Power)".
- For a Multi-contour seat. Refer to → Chapter "Seat Side Trim on Sill Panel Side/Front Seat Trim, Removing and Installing, Multi-contour Seat".
- Remove the backrest cover. Refer to → Chapter "Front Backrest, Removing and Installing".
- Mark the angle adjustment of the left and right backrest mounting brackets on the front seat as follows:
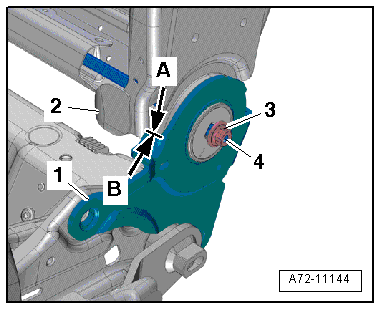
- Apply mark -arrow B- to the backrest frame with a waterproof marker -2- directly at the front edge -arrow A- of the hinge -1-.
- Remove nut -3- on the shaft -4-.
- Remove the cover from the backrest near the backrest hinge. Refer to → Chapter "Backrest Cover and Cushion, Removing and Installing".
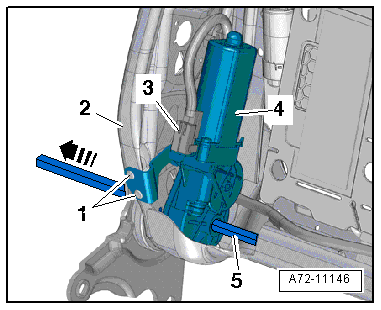
- Remove shaft -5- from the backrest frame -2--arrow-.
- Disconnect harness connector -3- at the backrest adjustment motor.
 Note
Lay plastic film between the seat cover and the backrest frame to protect against metal shavings.
WARNING
Danger of eye injury.
Wear protective eyewear.
- Drill out rivets -1-, remove backrest adjustment motor -4- with bracket.
Installing
- Check the position of the backrest frame -2- and the anchor -1- on the left and right side.
- The left and right backrest frames must be in the position marked before removal -A and B arrows-.
- If the left and right backrest frames are not in the position marked before removal, correct their position accordingly.
- Set backrest adjustment motor -3- with bracket in place.
- It must still be possible to move the backrest adjustment motor.
- First slide the shaft through the hinge (tunnel side) as far as the mount -4- in the backrest adjustment motor.
- Check whether the profile of the inserted shaft and mount in the backrest adjustment motor align.
- If the shaft profile and the mount in the backrest adjustment motor do not align, connect an external 12-volt power source to the backrest adjustment motor -3- and turn mount until the profiles of shaft and mount are aligned
- Slide shaft -5- through the mount in the backrest adjustment motor as far as the stop (sill side) -arrow-.

- Install the new nut -3- on the shaft -4- and tighten it.
- Rivet bracket with motor to the backrest frame -2--1-.
Installation is performed in reverse order of removal, while noting the following:
WARNING
- Follow all Safety Precautions when working with pyrotechnic components. Refer to → Chapter "Pyrotechnic Components Safety Precautions".
- Before handling pyrotechnic components (for example, connecting the connector), the person handling it must "discharge static electricity". This can be done by touching the door striker, for example.
- Observe all measures when installing the front seat. Refer to → Chapter "Front Seat, Removing and Installing".
Installation notes, for example tightening specifications, replacing components. Refer to → Chapter "Overview - Front Backrest, Backrest Adjustment Motor".