Parallel parking
Applies to: vehicles with rearview camera
This view may be used when parallel parking along the side of a street.
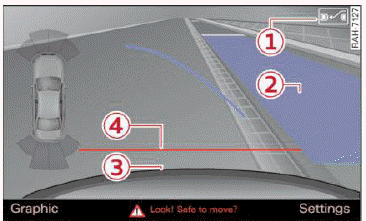
Fig. 124 Infotainment: blue surfaces aligned in the parking space
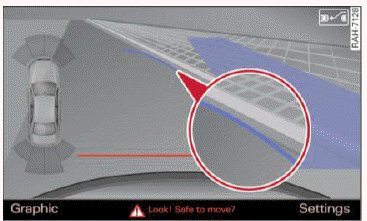
Fig. 125 Infotainment: contact of the blue curved line with the curb
Parking on the right is described here. It is identical when parking on the left.
If there is an obstacle next to the parking space (such as a wall), refer to "Information for parking next to obstacles".
- Activate the turn signal.
- Position your vehicle next to a parked vehicle in front of the desired parking space. The distance to this vehicle should be approximately 3 ft. (1 m).
- Turn the Infotainment system on and shift into reverse gear. The parking system is turned on and the Cross parking view is displayed.
- Press the control button on the Infotainment unit 1
 fig. 124. The Parallel parking view is displayed.
- Back up and align your vehicle so the blue area (2) borders on the rear end of the vehicle behind you or on the parking space line. The blue area represents an extension of the vehicle's outline by approximately 16 ft (5 meters) to the rear.
The long side of the blue area should be on the curb. The entire blue area must fit into the parking space.
- With the vehicle stopped, turn the steering wheel to the right as far as it will go.
- Back up into the parking spot. When the blue curve fig. 125 is near the curb
 in General information, stop the vehicle in General information.
- With the vehicle stopped, turn the steering wheel to the left as far as it will go.
- Continue to back into the parking space until the vehicle is parked parallel to the curb in General information. 3 represents the rear bumper. At the very latest, stop the vehicle when the red orientation line 4 borders an object. Keep an eye on the front of your vehicle while doing this.
Parking next to obstacles
If there is an obstacle (such as a wall) next to the parking space, position the vehicle so there is more space on that side. Position the long side of the blue surface so that there is sufficient space from the obstacle. The surface must not be touching. You will also need to start turning the steering wheel earlier. The blue curve fig. 125 must not touch the obstacle, but rather there should be enough distance.
Note
Keep enough distance from the curb to reduce the risk of damage to the rims.
Tips
The left or right orientation lines and surfaces will be displayed, depending on the turn signal being used.