Tire Changing
Removing the Spare Tire and Tools
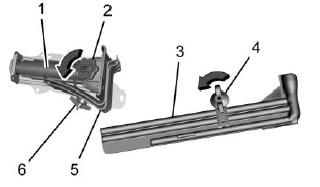
- Jack
- Jack Knob
- Tool Kit
- Wing Nut Retaining Tool Kit
- Wheel Blocks
- Wing Nut Retaining Wheel Blocks
The equipment is under the second row seats, if equipped, or behind the front row seats on regular cab models.
- Turn the knob on the jack counterclockwise to lower the jack head to release the jack from its holder.
- Turn the wing nut counterclockwise to remove the wheel blocks and the wheel block retainer.
- Turn the wing nut used to retain the storage bag and tools counterclockwise to remove it.
Use the jack handle extensions and the wheel wrench to remove the underbody-mounted spare tire.
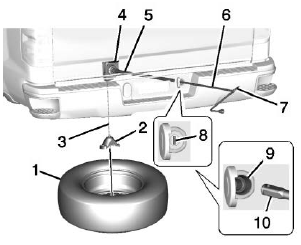
- Spare Tire (Valve Stem Pointed Down)
- Tire/Wheel Retainer
- Hoist Cable
- Hoist Assembly
- Hoist Shaft
- Jack Handle Extensions
- Wheel Wrench
- Spare Tire Lock (If Equipped)
- Hoist Shaft Access Hole
- Hoist End of Extension Tool
- Open the spare tire lock cover on the bumper and use the ignition key to remove the spare tire lock (8). To remove the spare tire lock, insert the ignition key, turn, and pull straight out.
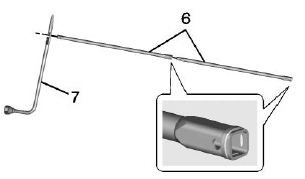
- Assemble the wheel wrench (7) and the two jack handle extensions (6), as shown.
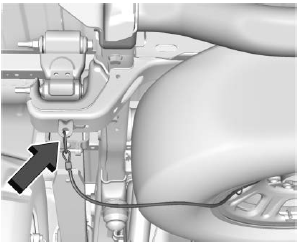
Spare Tire Cable (If Equipped)
- If the vehicle is equipped with a spare tire cable disconnect the cable from the attachment on the frame by unclipping it from the frame attachment bracket.
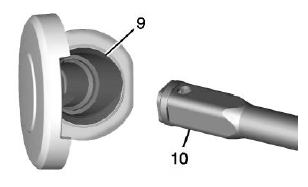
- Insert the hoist end (open end) (10) of the extension through the hole (9) in the rear bumper.
Do not use the chiseled end of the wheel wrench.
Be sure the hoist end of the extension (10) connects to the hoist shaft. The ribbed square end of the extension is used to lower the spare tire.
- Turn the wheel wrench counterclockwise to lower the spare tire to the ground. Continue to turn the wheel wrench until the spare tire can be pulled out from under the vehicle.
- Pull the spare tire out from under the vehicle.
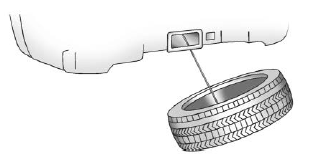
- Tilt the tire toward the vehicle with some slack in the cable to access the tire/wheel retainer.
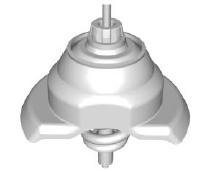
1500 Models
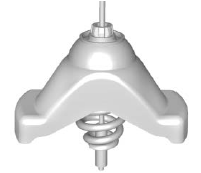
All Other Models
Tilt the retainer and pull it through the center of the wheel along with the cable and spring.
- Put the spare tire near the flat tire.
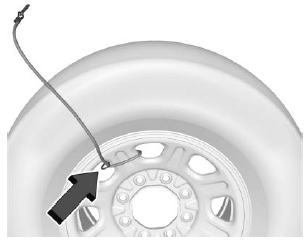
- If equipped with a spare tire cable remove the cable from the spare tire by passing the clip through the looped end of the cable.
Removing the Flat Tire and Installing the Spare Tire
Use the following pictures and instructions to remove the flat tire and raise the vehicle.
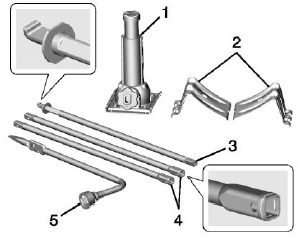
- Jack
- Wheel Blocks
- Jack Handle
- Jack Handle Extensions
- Wheel Wrench
The tools you will be using include the jack (1), the wheel blocks (2), the jack handle (3), the jack handle extensions (4), and the wheel wrench (5).
- Do a safety check before proceeding. See If a Tire Goes Flat.
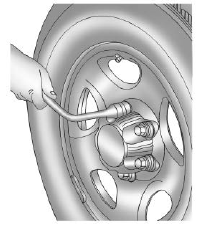
- If the vehicle has wheel nut caps, loosen them by turning the wheel wrench counterclockwise.
If the vehicle has a center cap with wheel nut caps, the wheel nut caps are designed to stay with the center cap after they are loosened. Remove the entire center cap.
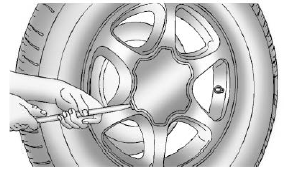
If the wheel has a smooth center cap, concealing access to the wheel nuts, place the chisel end of the wheel wrench in the slot on the wheel, and gently pry it out.
If the wheel’s center cap does not conceal the wheel nuts, the center cap may remain during wheel removal. If the removed wheel is to be stowed in the hoist, the cap needs to be detached from the wheel. Access the wheel from the back side, and use a jack handle extension to push out the center cap.
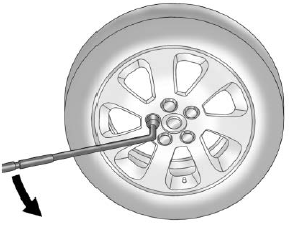
- Use the wheel wrench and turn it counterclockwise to loosen the wheel nuts. Do not remove the wheel nuts yet.
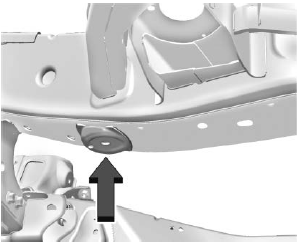
Front Position — 1500 Models
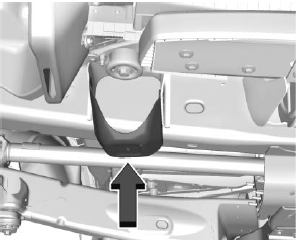
Front Position — All Other Models
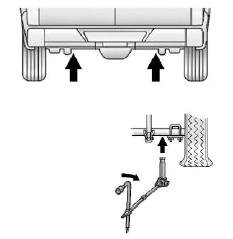
- If the flat tire is on the front of the vehicle, position the jack under the bracket attached to the vehicle's frame, behind the flat tire, as shown.
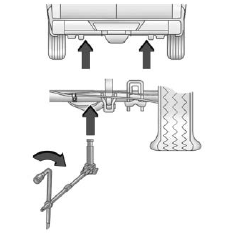
Rear Position — 1500 Models
- If the flat tire is on the rear, position the jack under the rear axle about 5 cm (2 in) inboard of the shock absorber bracket.
Rear Position All Other Models
For all other models, position the jack under the rear axle between the spring anchor and the shock absorber bracket.
If a snow plow has been added to the front of the vehicle, lower the snow plow fully before raising the vehicle.
Make sure that the jack head is positioned so that the rear axle is resting securely between the grooves that are on the jack head.
- Turn the wheel wrench clockwise to raise the vehicle. Raise the vehicle far enough off the ground so there is enough room for the spare tire to fit under the wheel well.

- Remove all the wheel nuts and take off the flat tire.
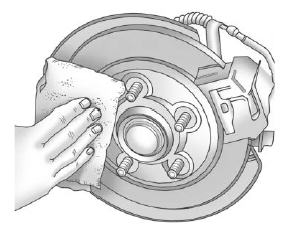
- Remove any rust or dirt from the wheel bolts, mounting surfaces, and spare wheel.
- Install the spare tire.
- Put the wheel nuts back on with the rounded end of the nuts toward the wheel.
- Tighten each wheel nut by hand. Then use the wheel wrench to tighten the nuts until the wheel is held against the hub.
- Turn the wheel wrench counterclockwise to lower the vehicle. Lower the jack completely.
Improperly tightened wheel nuts can lead to brake pulsation and rotor damage. To avoid expensive brake repairs, evenly tighten the wheel nuts in the proper sequence and to the proper torque specification. See Capacities and Specifications for the wheel nut torque specification.
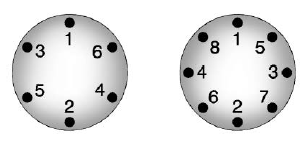
- Tighten the nuts firmly in a crisscross sequence, as shown, by turning the wheel wrench clockwise.
For vehicles with dual wheels, have a technician check the wheel nut tightness of all wheels with a torque wrench after the first 160, 1 600 and 10 000 km (100, 1,000 and 6,000 mi). Repeat this service whenever you have a tire removed or serviced. See Capacities and Specifications.
When reinstalling the regular wheel and tire, also reinstall either the center cap, or bolt-on hub cap, depending on what the vehicle is equipped with. For center caps, place the cap on the wheel and tap it into place until it seats flush with the wheel. The cap only goes on one way. Be sure to line up the tab on the center cap with the indentation on the wheel. For bolt-on hub caps, align the plastic nut caps with the wheel nuts and then tighten by hand. Then use the wheel wrench to tighten.
Storing a Flat or Spare Tire and Tools
Store the tire under the rear of the vehicle in the spare tire carrier.
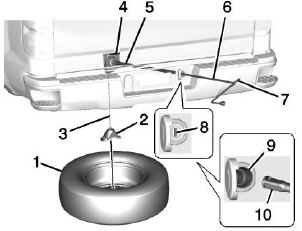
- Spare Tire (Valve Stem Pointed Down)
- Tire/Wheel Retainer
- Hoist Cable
- Hoist Assembly
- Hoist Shaft
- Jack Handle Extensions
- Wheel Wrench
- Spare Tire Lock (If Equipped)
- Hoist Shaft Access Hole
- Hoist End of Extension Tool
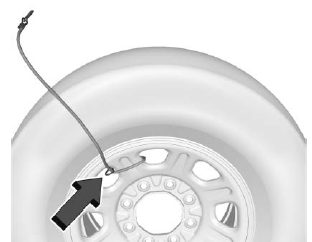
- Spare Tire Cable (If Equipped)
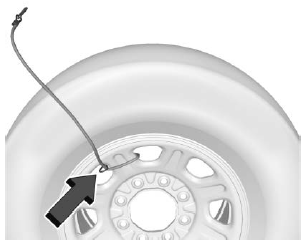
- If equipped with a spare tire cable, reinstall the cable to the spare wheel by looping the cable around a wheel vent window then pass the clip end of the cable through the looped end. The excess cable wire should be on the valve stem side of the spare tire.
- Put the tire on the ground at the rear of the vehicle with the valve stem pointed down, and to the rear.
- Pull the cable and spring through the center of the wheel. Tilt the wheel retainer plate down and through the center wheel.
Make sure the retainer is fully seated across the underside of the wheel.
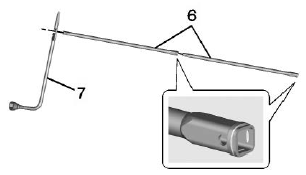
- Attach the wheel wrench (7) and extensions (6) together, as shown.
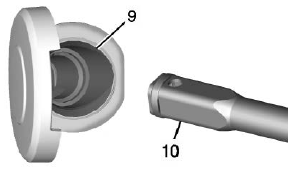
- Insert the hoist end (10) through the hole (9) in the rear bumper and onto the hoist shaft.
Do not use the chiseled end of the wheel wrench.
- Raise the tire part way upward. Make sure the retainer is seated in the wheel opening.

- If equipped with a spare tire cable, orient the cable by rotating the spare tire so that the cable is by the frame attachment location.
- Raise the tire fully against the underside of the vehicle by turning the wheel wrench clockwise until you hear two clicks or feel it skip twice. You cannot overtighten the cable.
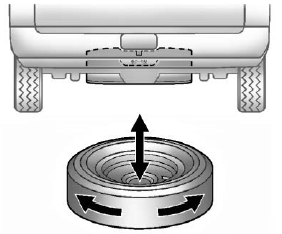
- Make sure the tire is stored securely. Push, pull, and then try to turn the tire. If the tire moves, use the wheel wrench to tighten the cable.
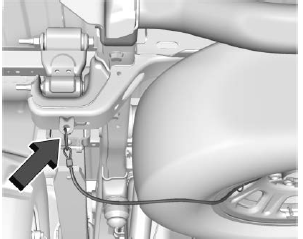
If equipped with a spare tire cable, reattach the clip to the frame attachment bracket. Note that there may be slack in the cable.
Repeat this tightness check procedure when checking the spare tire pressure according to the scheduled maintenance information or any time the spare tire is handled due to service of other components.
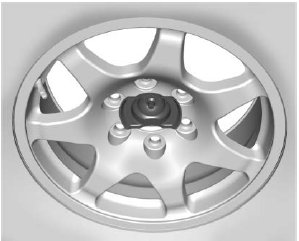
Correctly Stored
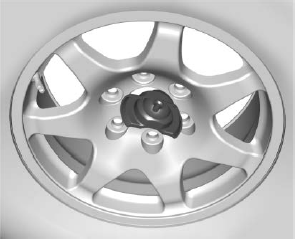
Incorrectly Stored
- Reinstall the spare tire lock, if the vehicle has one.
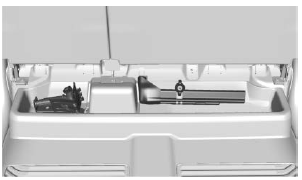
Return the jack and tools to their original location in the vehicle. See “Removing the Spare Tire and Tools.”