General Procedures - Fixed Glass
Special Service Tools / General Equipment
| Structural Sealer | |
| Power Fixed Glass Removal Tool | |
| Cold Knife | |
| Knife | |
| Vacuum cleaner |
Materials
| Name | Specification |
|---|---|
| Sika® SikaTack® MACH 60 / Sika® SikaTack® MACH 30 / Dow® BETASEAL™ Express | - |
| Sika Tack ASAP Urethane Adhesive | - |
| Motorcraft® Ultra Clean Glass Cleaner Spray ZC-23 |
ESR-M14P5-A |
| Sika Tack® MOVE.IT | - |
| Sika® Aktivator PRO / Dow® BETAPRIME™ 5504G / Sika® Primer-207 | - |
Repair
All vehicles
- The fixed glass is a windshield and is equipped with a camera bracket.
- The fixed glass is a windshield and is equipped with bonded moldings.
- The fixed glass is encapsulated with RIM.
- Cold Knife Method – A cold knife is used to cut the urethane from the outside of the vehicle, provided the blade can reach the bead.
Use general equipment: Cold Knife.
- Power Tool Method – Various power tools are used to cut the urethane from inside the vehicle using a cutting or oscillating blade.
Use special service tool: Power Fixed Glass Removal Tool.
- Piano Wire Method – Piano wire is used to cut the urethane from inside and outside the vehicle with the assistance of a helper.
- When using the cold knife method, apply tape to protect the perimeter of the window opening from paint damage. Multiple layers of tape may be required.


NOTICE: The new or used fixed glass must be installed within 2 hours after the urethane adhesive is cut. The exposed cut surfaces of the urethane oxidize and become inactive within 2 hours, reducing the effectiveness of the repair bond.
NOTICE: To prevent rust formation, use extreme care not to scratch the paint or primer or damage the pinch weld flange during glass removal.
NOTICE: Take precautions to avoid damaging other components when cutting the urethane.
- The fixed glass is a windshield and is equipped with a camera bracket.
- The fixed glass is a windshield and is equipped with bonded moldings.
- The fixed glass is encapsulated with RIM.
Use special service tool: Power Fixed Glass Removal Tool.
Use general equipment: Cold Knife.
Use general equipment: Knife.-
NOTICE: The new or used fixed glass must be installed within 2 hours after the urethane adhesive is cut. The exposed cut surfaces of the urethane oxidize and become inactive within 2 hours, reducing the effectiveness of the repair bond.
Prepare the pinch weld area for installation of the new or used fixed glass.- Trim or shave the original urethane adhesive on the pinch weld flange and on the glass (if reused) using a utility knife, leaving a base of 1 to 2 mm (0.04 to 0.08 in) on the surfaces, only when final installation will occur within 2 hours.
- Remove any foreign material or dirt from the pinch weld using a soft brush or vacuum cleaner.
Use general equipment: Vacuum Cleaner.
- If the paint layer has been damaged at the pinch weld to the point of penetrating to bare metal, apply primer only to these areas.
Material: Sika® Aktivator PRO / Dow® BETAPRIME™ 5504G / Sika® Primer-207. - Apply primer as necessary.
- Apply primer only to the areas that were previously primed.
Material: Sika® Aktivator PRO / Dow® BETAPRIME™ 5504G / Sika® Primer-207.
- If the clear coat layer has been damaged at the pinch weld without reaching bare metal, apply primer to these areas only.
Material: Sika® Aktivator PRO / Dow® BETAPRIME™ 5504G / Sika® Primer-207.
- Apply primer only to the areas that were previously primed.
Vehicles with Encapsulated RIM Glass
- Clean the inside surface of the rear glass encapsulation RIM surface with an alcohol-free cleaner, making sure the ceramic-coated area is clean. Allow five minutes to dry.
-
Apply primer to the encapsulation RIM in accordance with the new fixed glass manufacturer's instructions. Allow at least 10 minutes to dry.
Material: Sika® Aktivator PRO / Dow® BETAPRIME™ 5504G / Sika® Primer-207. -
Cut the tip of the urethane adhesive applicator to the specified size.
Material: Sika Tack® MOVE.IT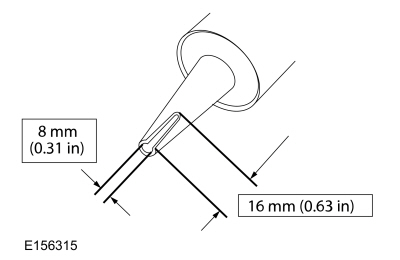
-
NOTICE: Make sure the urethane bead is uniform to prevent air and water leaks.
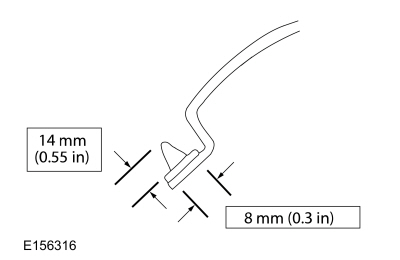
Apply a bead of urethane adhesive.- Start and finish at the overlap starting points to prevent air and water leaks.
- Apply a 14 mm (0.551 in) high and 8 mm (0.314 in) wide bead of urethane adhesive over the existing trimmed urethane adhesive bead on the weld flange.
Use common equipment: Power Caulk Gun
Material: Sika Tack® MOVE.IT
- Make sure there are no gaps in the bead.
Vehicles without encapsulated RIM glass
- Clean the inside surface of the new fixed glass with glass cleaner.
Material: Motorcraft® Ultra-Clear Glass Cleaner Spray / ZC-23 (ESR-M14P5-A) -
Apply primer in accordance with the manufacturer's instructions for the new fixed glass. Allow to dry for a minimum of 10 minutes.
Material: Sika® Aktivator PRO / Dow® BETAPRIME™ 5504G / Sika® Primer-207. - Visually inspect and remove residual urethane adhesive from the glass, leaving a thin layer to bond with the new urethane adhesive bead.
-
Apply primer in accordance with the manufacturer's instructions to the fixed glass wherever urethane adhesive was completely removed. Allow to dry for a minimum of 10 minutes.
Material: Sika® Aktivator PRO / Dow® BETAPRIME™ 5504G / Sika® Primer-207. -
Cut the tip of the urethane adhesive applicator to the specified size.
Material: Sika® SikaTack® MACH 60 / Sika® SikaTack® MACH 30 / Dow® BETASEAL™ Express
Material: Sika Tack ASAP urethane adhesive. -
NOTICE: Make sure the urethane bead is uniform to prevent air and water leaks.
Apply a bead of urethane adhesive.- Start and finish at the overlap starting points to prevent air and water leaks.
- Apply a 14 mm (0.551 in) high and 8 mm (0.314 in) wide bead of urethane adhesive over the existing trimmed urethane adhesive bead on the weld flange.
Use common equipment: Power Caulk Gun
Material: Sika® SikaTack® MACH 60 / Sika® SikaTack® MACH 30 / Dow® BETASEAL™ Express
Material: Sika Tack ASAP urethane adhesive.
- Make sure there are no gaps in the bead.
All vehicles
NOTICE: Door windows must remain open during adhesive curing.
Open the vehicle windows to prevent air pressure from closing the doors from disturbing the urethane adhesive bond.-
Install the fixed glass on the vehicle.- Install the fixed glass, pressing it firmly by hand to ensure good contact.
- Secure the fixed glass in the correct position with tape until the urethane adhesive has cured.
- If necessary, remove excess uncured urethane adhesive from the inside and outside surfaces of the fixed glass.
Material: Motorcraft® Ultra-Clear Glass Cleaner Spray / ZC-23 (ESR-M14P5-A) - If necessary, install all removed components.
- If equipped, perform the IPMA (Image Processing Module A) camera alignment.
REFER TO: Lane Keeping System Operation and Component Description (419-07 Lane Keeping System, Description and Operation).
Test yourself
A quick Ford Explorer quiz: every answer comes with an explanation and a link to the manual page.