HVAC
Condenser to Evaporator Line
In this manual: HVAC
13steps
~78min
3/5difficulty
Done 0 of 13
Material
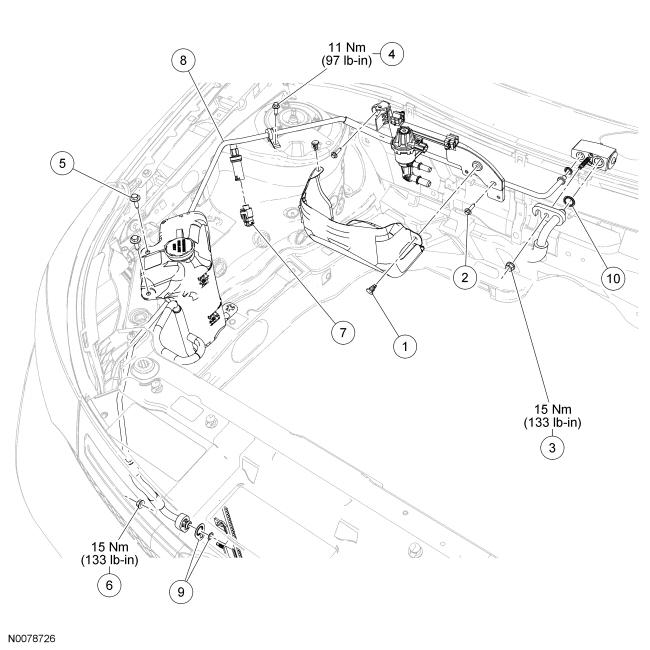
Removal and Installation
| Item | Specification |
|---|---|
| Motorcraft® PAG Refrigerant Compressor Oil YN-12-D | WSH-M1C231-B |
| Item | Part Number | Description |
|---|---|---|
| 1 | W709438 | Evaporative Emission (EVAP) canister purge valve heat shield pin-type retainer (2 required) |
| 2 | W704310 | EVAP canister purge valve bracket bolt (2 required) |
| 3 | W520413 | Thermostatic Expansion Valve (TXV) fitting nut |
| 4 | W500213 | Condenser-to-evaporator line bracket bolt |
| 5 | — | Coolant reservoir bolt (2 required) |
| 6 | W520413 | Condenser outlet fitting nut |
| 7 | — | A/C pressure transducer electrical connector (part of 14290) |
| 8 | 19835 | Condenser-to-evaporator line |
| 9 | 19B596 | O-ring seal and gasket seal kit |
| 10 | 19B596 | TXV fitting gasket seal (2 pieces from kit required) |
Removal and Installation
- With the vehicle in NEUTRAL, position it on a hoist. For additional information, refer to Section 100-02.
- Recover the refrigerant. For additional information, refer to Section 412-00.
- Remove lower radiator splash shield. For additional information, refer to Section 501-02.
- Remove the condenser outlet fitting nut and disconnect the fitting.
- Discard the O-ring seal and gasket seal.
- To install, tighten to 15 N·m.
- Remove the 2 Evaporative Emission (EVAP) canister purge valve heat shield pin-type retainers and remove the shield.
- Remove the 2 EVAP canister purge valve bracket bolts.
- Remove the Thermostatic Expansion Valve (TXV) fitting nut and disconnect the fitting.
- Discard the gasket seals.
- To install, tighten to 15 N·m.
- Disconnect the A/C pressure transducer electrical connector.
- Remove the condenser-to-evaporator line bracket bolt at the RH shock tower.
- To install, tighten to 11 N·m.
- Remove the 2 coolant reservoir bolts and position the coolant reservoir aside.
- Detach the condenser-to-evaporator line from the inner fender and remove the line.
- To install, reverse the removal procedure.
- Install new gasket seals and O-ring seals.
- Lubricate the refrigerant system with the correct amount of clean PAG oil. For additional information, refer to Section 412-00.
- Evacuate, leak test and charge the refrigerant system. For additional information, refer to Section 412-00.
Test yourself
A quick Ford Focus quiz: every answer comes with an explanation and a link to the manual page.
Was this page helpful?