Body and Paint
Rocker Panel - Removal and Installation
In this manual: Body and Paint
20steps
~120min
4/5difficulty
Done 0 of 20
Special Service Tools / General Equipment
| Resistance Spot Welding Equipment | |
| Heat gun | |
| 8 mm Drill Bit | |
| MIG/MAG Welding Equipment | |
| Spot Weld Drill Bit | |
| Locking Pliers |
Materials
| Name | Specification |
|---|---|
| Metal Bonding Adhesive TA-1, TA-1-B, 3M™ 08115, LORD Fusor® 108B |
- |
| Seam Sealer TA-2-B, 3M™ 08308, LORD Fusor® 803DTM |
- |
Removal
- Possible cut locations depend on the damage.

- Restore the vehicle to pre-accident dimensions.
Refer to: Body and Frame (501-26 Body Repairs - Vehicle Specific Information and Tolerance Checks, Description and Operation). - Disable the SRS.
Refer to: Disabling and Enabling the Supplemental Restraint System (SRS) (501-20B Supplemental Restraint System, General Procedures). - Remove the following components:
Refer to: Front Fender (501-02 Front End Body Panels, Removal and Installation).
Refer to: Sill Panel Molding (501-08 Exterior Trim and Ornamentation, Removal and Installation).
Refer to: Seat Belt Retractor and Pretensioner (501-20A Seat Belt Systems, Removal and Installation).
Refer to: Front Pillar Trim Panel (501-05 Interior Trim and Ornamentation, Removal and Installation).
Refer to: Center Pillar Trim Panel (501-05 Interior Trim and Ornamentation, Removal and Installation).
Refer to: Rear Pillar Lower Trim Panel (501-05 Interior Trim and Ornamentation, Removal and Installation).
Refer to: Front Door (501-03 Body Closures, Removal and Installation).
Refer to: Rear Door (501-03 Body Closures, Removal and Installation). - Move the carpet and wiring harness away from the repair area.
- Drill out the spot welds on the rocker panel.
Use common equipment: spot weld drill bit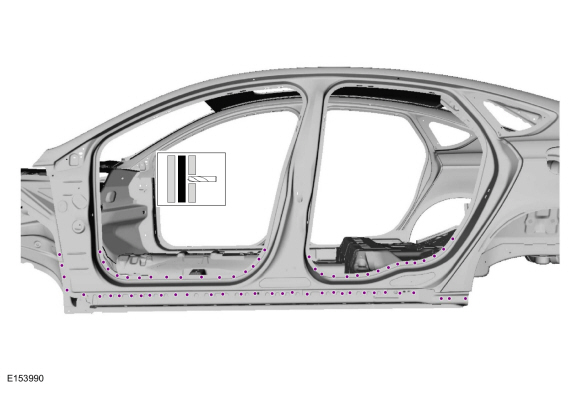
- Break the adhesive bond and remove the outer rocker panel section.
Use common equipment: heat gun.
Installation
- Drill the plug weld holes in the replacement rocker panel.
Use general equipment: 8 mm drill bit.
- Apply adhesive as indicated.
Material: Metal adhesive / TA-1, TA-1-B, 3M™ 08115, LORD Fusor® 108B
- Install, clamp and weld the replacement rocker panel.
Use major equipment: resistance spot welding equipment.
Use general equipment: locking pliers
- Seam weld and plug weld the rocker panel.
Use general equipment: MIG/MAG welding equipment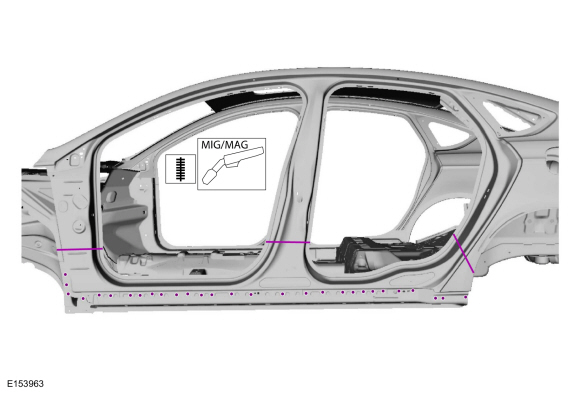
- Finish all joints using standard metal finishing methods.
- Grind and prime the repair area using a Ford-approved paint system.
- Sealing operations: All areas must be sealed to production level.
Material: Seam Sealer / TA-2-B, 3M™ 08308, LORD Fusor® 803DTM - Paint the repair area using a Ford-approved paint system.
- Restore corrosion protection.
Refer to: Corrosion Prevention (501-25 Body Repair - General Information, General Procedures). - Move the floor covering and wiring harness.
- Install the following components:
Refer to: Sill Panel Molding (501-08 Exterior Trim and Ornamentation, Removal and Installation).
Refer to: Front Fender (501-02 Front End Body Panels, Removal and Installation).
Refer to: Front Pillar Trim Panel (501-05 Interior Trim and Ornamentation, Removal and Installation).
Refer to: Center Pillar Trim Panel (501-05 Interior Trim and Ornamentation, Removal and Installation).
Refer to: Rear Pillar Lower Trim Panel (501-05 Interior Trim and Ornamentation, Removal and Installation).
Refer to: Front Door (501-03 Body Closures, Removal and Installation).
Refer to: Rear Door (501-03 Body Closures, Removal and Installation). - Align the doors.
Refer to: Front Door Alignment (501-03 Body Closures, General Procedures).
Refer to: Rear Door Alignment (501-03 Body Closures, General Procedures). - Reset the SRS.
Refer to: Disabling and Enabling the Supplemental Restraint System (SRS) (501-20B Supplemental Restraint System, General Procedures).
Test yourself
A quick Ford Fusion quiz: every answer comes with an explanation and a link to the manual page.
Was this page helpful?