Electrical
Thermostatic Expansion Valve. Removal and Installation
In this manual: Electrical
8steps
~48min
3/5difficulty
Done 0 of 8
Removal
NOTICE: When removing or installing components, caps, tape, or otherwise properly protect all openings and tubes/fittings to prevent dirt or other contamination from entering. Remove caps, tape, and other protective materials before installation.
- Refer to: Health and Safety Precautions for the Climate Control System (100-00 General Information, Description and Operation).
- Recover the refrigerant. Refer to the appropriate recovery procedure in Group 412.
- Remove the evaporator inlet and outlet manifold bracket nut.
Torque: 18 lb-in (2 N·m)
NOTICE: Make sure all openings are covered.
Loosen the nut on the evaporator inlet and outlet manifold, disconnect the fitting. Discard the seal washers.- Make sure to cap all open ports to prevent contamination of the system.
Torque: 133 lb-in (15 N·m)
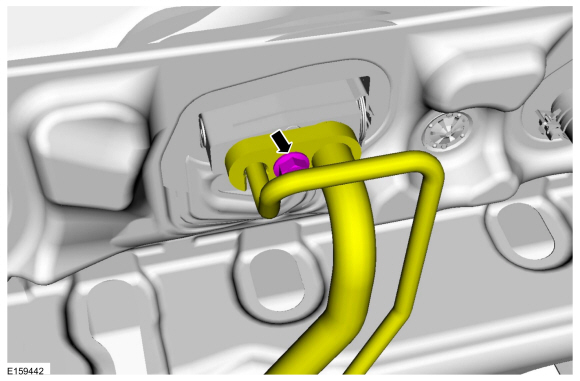
- Make sure to cap all open ports to prevent contamination of the system.
NOTICE: Make sure all openings are covered.
Remove the bolts and the thermostatic expansion valve. Discard the seal washers.- Make sure to cover all open ports to prevent debris from entering the system.
Torque: 71 lb-in (8 N·m)
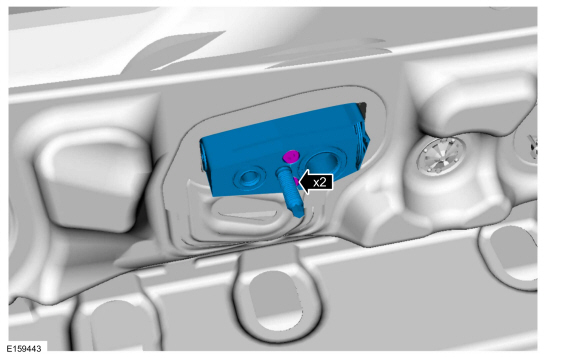
- Make sure to cover all open ports to prevent debris from entering the system.
Installation
- To install, reverse the removal procedure.
NOTICE: Use only the specified material to lubricate the seals.
Install and lubricate new O-rings. Refer to the applicable specifications in Group 412.- Lubricate the refrigerant system with the correct amount of clean PAG oil. Refer to the applicable refrigerant oil addition procedure in Group 412.
Test yourself
A quick Ford Fusion quiz: every answer comes with an explanation and a link to the manual page.
Was this page helpful?