Body (Interior and Exterior)
Rear Bumper Cover Repair Procedures
In this manual: Body (Interior and Exterior)
10steps
~60min
3/5difficulty
Done 0 of 10
Replacement
|
|

- When removing with a flat-blade screwdriver or removal tool, wrap the tools with protective tape to prevent damage to components.
- When removing interior trim components, use a plastic panel removal tool to avoid damaging the surface.
- Be careful not to bend or scratch the trim and panels.
- Remove the rear crossmember trim. (Refer to "Luggage Compartment Trim".)
- Completely remove the luggage compartment trim. (Refer to "Luggage Compartment Trim".)
- Remove the luggage under the cover. (Refer to "Luggage Compartment Trim".)
- Remove the luggage compartment side trim. (Refer to "Luggage Compartment Trim".)
- Loosen the nuts securing the combination lamp, then disconnect the connector (A).

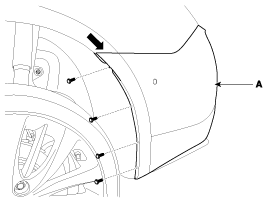
- After loosening the pin clips and screws on the side of the rear bumper (A), remove the rear bumper side portion.

- Lightly lift the edge of the rear bumper and pull it in the direction indicated by the arrow.

- Be careful not to damage the protrusions on the side of the front bumper.
- Loosen the lower stopper pins and nuts of the rear bumper. [Lambda Engine]


- Loosen the rear bumper mounting bolts inside the luggage compartment. [LH]


- Disconnect the rear bumper main connector (A).

- Install in the reverse order of removal.
- Make sure the connector is properly connected.
- Replace all damaged clips.
Test yourself
A quick Hyundai Genesis DH quiz: every answer comes with an explanation and a link to the manual page.
Was this page helpful?