Body (Interior and Exterior)
Repair Procedures
In this manual: Body (Interior and Exterior)
27steps
~162min
4/5difficulty
Done 0 of 27
Removal
|
|
- Remove the roof side molding. (Refer to Body Moldings - "Roof Side Moldings")
- Remove the front pillar garnish. (Refer to Interior Trim - "Front Pillar Trim")
- Remove the inside rear view mirror assembly. (Refer to Mirror - "Inside Rear View Mirror")
- Remove the hood top cover. (Refer to "Hood Top Cover")
- Remove the pillar garnish A. (Refer to Body Side Moldings - "Pillar Garnish")
- Remove the Lane Departure Warning System (LDWS) unit. (Refer to Body Electrical System - "Lane Departure Warning System (LDWS) Unit").
- Using a utility knife (A), carefully remove the windshield molding.

- Use a cutter with a blade length of 20 to 30 cm.
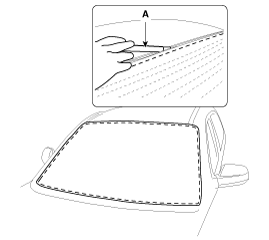
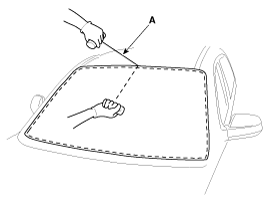
- Cut the sealant at the edge (B) by pulling the piano wire (A) left and right.

- Wear gloves to protect your hands.
- Heat may be generated when working with the wires. Be careful not to burn your hands.
- Be careful not to disconnect the piano wire.
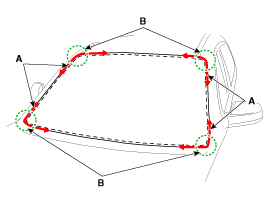
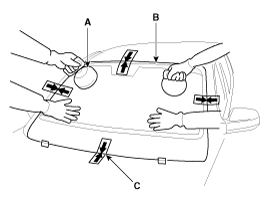
- Insert the piano wire (A) through the corner of the windshield, and attach wire handles to both ends of the wire.
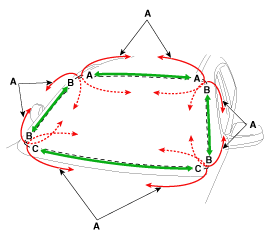
- Cut the sealant at (A-A), (B-B), and (C-C) by pulling the piano wire (A) left and right.
- Wear gloves to protect your hands.
- Heat may be generated when working with the wires. Be careful not to burn your hands.
- Be careful not to disconnect the piano wire.
- Carefully remove the windshield (B) using the glass holder (A).
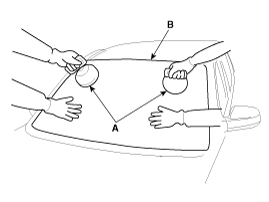
Installation
- Scrape off the remaining sealant around the body panel with a knife, leaving a sealant layer of approximately 2 mm (0.0079 in.) on the bonding surface. When installing a new windshield, make alignment marks on the windshield and the body.

- Be careful not to damage the painted body surface.
- If the surface is damaged, apply paint or rust inhibitor as required.
- Clean the edges of the body panel and windshield with alcohol. Apply glass primer to the edges of the windshield and attach the molding around the edges.
- Attach the molding (C) so that it aligns with the alignment marks (A), and place the windshield moldings (B) in their designated positions.

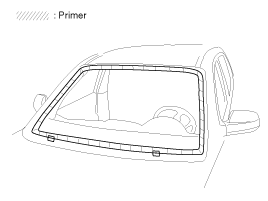
- Apply body primer to the bonding surface of the body panel.
- Be careful not to touch the primed surface, as contact may cause water leaks after the windshield is installed.
- Do not apply body primer to the glass.
- Remove foreign material from the primed surface.
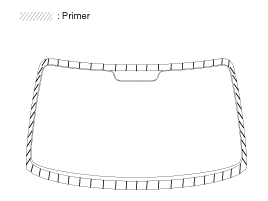
- Apply glass primer to the outer edge of the windshield.
- Be careful not to touch the primed surface, as contact may cause water leaks after the windshield is installed.
- Do not apply body primer to the glass.
- Remove any foreign material from the primed surface. • Apply the sealant within 5 minutes after applying the primer.
- Apply a bead of sealant (B) around the windshield (A).
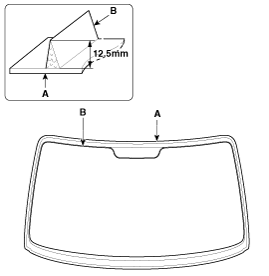
- Using the glass holder (A), position the windshield (B) so the alignment marks (C) on the body match, then press lightly on the windshield so the edges fully contact the bonding surface.
- Install the pillar garnish A. (Refer to Body Side Moldings - "Pillar Garnish")
- Install the hood upper cover. (Refer to "Upper Cover Cowl")
- Install the Lane Departure Warning System (LDWS) unit. (Refer to Body Electrical System - "Lane Departure Warning System (LDWS) Unit".)
- Install the roof side molding. (Refer to Body Moldings - "Roof Side Moldings")
- To make sure the applied sealant has fully cured, leave the vehicle on a level surface for at least 4 hours after installing the windshield.
- If driving the vehicle cannot be avoided, drive at low speed for at least 8 hours.
- Advise the driver to avoid aggressive driving or driving on rough roads for 2-3 days after windshield installation.
- Perform a water leak test.
- Perform the water leak test at least 4 hours after windshield installation is complete.
- Do not spray high-pressure water directly onto the joint area.
- If water leaks, apply sealant to the water leak point.
- Install the inside rear view mirror assembly. (Refer to Mirror - "Inside Rear View Mirror")
- Install the front pillar garnish. (Refer to Interior Trim - "Front Pillar Garnish".)
Test yourself
A quick Hyundai Genesis DH quiz: every answer comes with an explanation and a link to the manual page.
Was this page helpful?