When removing with a flat-blade screwdriver or removal tool, wrap the tools with protective tape to prevent damage to components.
When removing interior trim components, use a plastic panel removal tool to avoid damaging the surface.
Be careful not to bend or scratch the trim and panels.
Remove the front seat. (Refer to Front Seat - "Front Seat Assembly")
Remove the rear seat. (Refer to Rear Seat - "Rear Seat Assembly")
Remove the front pillar garnish. (Refer to Interior Trim - "Front Pillar Trim")
Remove the upper center pillar garnish. (Refer to Interior Trim - "Center Pillar Trim")
Remove the rear pillar garnish. (Refer to Interior Trim - "Rear Pillar Trim")
Remove the auxiliary sun visor. (Refer to Headliner - "Sun Visor")
Remove the sun visor and holder. (Refer to Headliner - "Sun Visor")
Remove the assist grip. (Refer to Headliner - "Assist Grip")
Remove the overhead console lamp. (Refer to Body Electrical System - "Overhead Console Lamp")
Remove the room lamp. (Refer to Body Electrical System - "Room Lamp")
Disconnect the ECM mirror connector. (Refer to Body Electrical System - "Electrochromic Inside Rearview Mirror")
Disconnect the rain sensor connector. (Refer to Body Electrical System - "Rain Sensor")
Disconnect the connector from the Lane Departure Warning System (LDWS) unit. (Refer to Body Electrical System - "Lane Departure Warning System (LDWS) Unit").
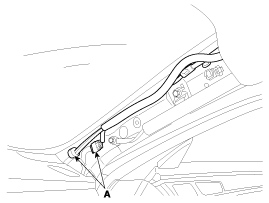
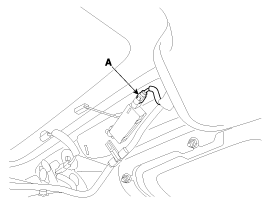
Disconnect the main connectors of the headliner (A) and the clips at the front pillar. [Driver][Passenger]
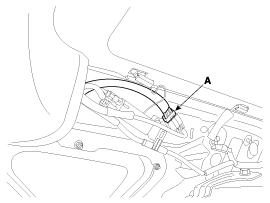
Disconnect the connectors (A) and the mounting clips at the rear pillar. [LH][RH]
Using a clip remover, disconnect the stopper pins (A) of the headliner assembly.
Remove the headliner assembly (A) from the body panel and take it out of the vehicle through the rear door.
Remove the vanity lamp. (Refer to Body Electrical System - "Vanity Lamp")
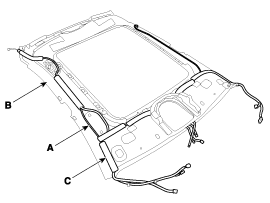
Disconnect the headliner wiring harness (A) from the headliner (B).
Be careful not to damage the headliner wiring harness (A) during removal.
When installing the headliner wiring harness (A) onto the headliner trim (B), continuously apply adhesive using a spray gun tool.
Attach the noise insulation pad (C) to the headliner (B) to reduce noise.
Install in the reverse order of removal.
Make sure the connector is properly connected.
Replace all damaged clips.
?
Test yourself
A quick Hyundai Genesis DH quiz: every answer comes with an explanation and a link to the manual page.