Brake System
Parking Brake Assembly Repair Procedures
In this manual: Brake System
84steps
~504min
4/5difficulty
Done 0 of 84
Removal
Parking brake pedal [Foot type]- Remove the lower driver airbag panel. (Refer to Body - "Driver Airbag Module")
- Remove the junction box. (See Body Electrical System - Fuses and Relays)
- Disconnect the parking brake switch connector (A).
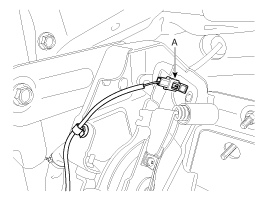
- Remove the parking brake pedal mounting bolts (A) and nut (B).

- Remove the parking brake cable mounting bolts.
- Remove the parking brake cable adjusting nut (A) and retainer clip (B), then remove the parking brake pedal.

- Remove the floor console. (Refer to Body - Console)
- Remove the floor console bracket.

- Remove the parking brake cable retainer (A) and bolts.

- Loosen the adjusting nut (A) and remove the front parking brake cable.

- Raise the vehicle and make sure it is securely supported.
- Remove the parking brake cable (A) after removing the snap ring (B).

- Loosen the parking brake cable bracket bolts and remove the rear parking brake cable.
- Remove the floor console. (Refer to Body - Console)
- Remove the floor console bracket.
- Disconnect the parking brake switch connector (A).
- Loosen the adjusting nut (A) and the parking brake cables.

- Remove the parking brake lever assembly by removing the 4 bolts (A), as shown below.

- Raise the vehicle and make sure it is securely supported.
- Remove the parking brake cable (A) after removing the retainer (B).
- Loosen the parking brake cable bracket bolts and remove the parking brake cable.
- Raise the vehicle and make sure it is securely supported.
- Remove the rear tire and wheel.
- Remove the rear brake caliper and rear disc brake. (See Rear Disc Brake Removal)
- Remove the parking brake cable (B) after removing the clip (A).

- Remove the shoe hold-down pin (A) and spring (B) by pressing and turning the spring.
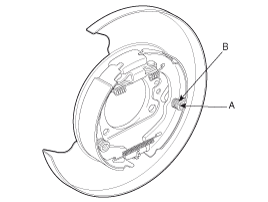
- Remove the adjuster assembly (B) and lower return spring (A).

- Remove the upper return spring (C) and parking brake shoes (D).
- Remove the operating lever assembly (E).
- Raise the vehicle and make sure it is securely supported.
- Remove the rear tire and wheel, then remove the brake caliper. (See Rear Disc Brake Removal)
- Remove the rear brake disc by loosening the screws (A).
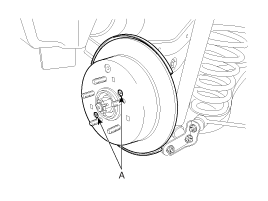
- Remove the rear hub bearing (A).

- Remove the shoe hold-down pin (A) and spring (B) by pressing the retaining spring and turning the pin.
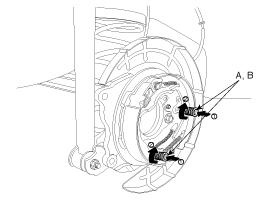
- Remove the adjuster assembly (A) and return spring (B).
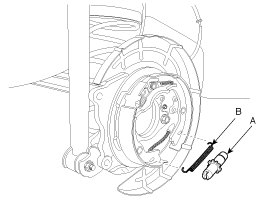
- Disconnect the parking brake cable (B) from the brake shoe (A).

- Remove the strut (C) and strut spring (D).

- Remove the brake pad.
- Disconnect the parking brake cable bracket (B) from the parking brake cable (A).
Installation
Parking brake shoe [2WD]- Install the operating lever assembly (E).
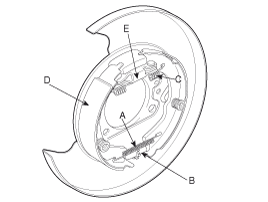
- Install the upper return spring (C) and the brake pads (D).
- Install the adjuster assembly (B) and the lower return spring (A).
- Install the shoe hold-down pin (A) and spring (B) by pressing and turning the spring.
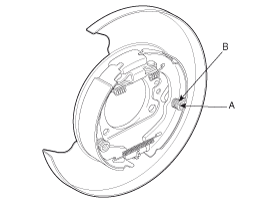
- Install the parking brake cable (B), then install the clip (A).
- Install the rear brake disc, then adjust the rear brake shoe clearance.
- Remove the plug from the disc.
- Turn the adjuster gear with a screwdriver until the disc does not move, then back it off 4 notches in the opposite direction.
- Install the brake caliper assembly. (Refer to "Rear Brake Installation")
- Install the tire and wheel after installing the cap on the disc.
- If the parking brake shoe or brake disc is replaced with a new one, perform the brake shoe break-in procedure.
- Hand-type: With the parking brake pedal depressed at 68.6 N (7 kgf, 15.4 lbf), drive the vehicle 500 meters (0.31 mile) at a speed of 30 km/h. Foot-type: With the parking brake lever pulled at 147 N (15 kgf, 33 lbf), drive the vehicle 500 meters (0.31 mile) at a speed of 30 km/h.
- Repeat the above procedure more than three times.
- Must hold on a 20% grade.
After adjusting the parking brake, check the following:
- There should be no problem when depressing the parking brake pedal with a force of 686.5 N (70 kgf, 154 lbf).
- Make sure all components operate smoothly.
- The parking brake warning lamp should illuminate when the parking brake pedal is depressed and go off when the pedal is released.
- Install the brake shoe (A) on the backing plate (B).

- Install the shoe hold-down pin (C) and spring (D) by pressing the retaining spring (D) and turning the pins.
- After installing the strut (A) and upper return spring (B), install the adjuster assembly (C) and lower return spring (D).
- Install the parking brake cable (A), then install the retainer (B).
- Apply a coat of the specified grease to each sliding part of the parking brake, as shown in the illustration.
Specified grease: Multi-purpose grease SAE J310, NLGI No. 2

- Install the rear brake disc, then adjust the rear brake shoe clearance.
- Remove the plug from the disc.
- Turn the adjuster gear with a screwdriver until the disc does not move, then back it off 4 notches in the opposite direction.
- Install the brake caliper. (See Rear Brake Installation)
- Install the tire and wheel.
- If the parking brake shoe or brake disc is replaced with a new one, perform the brake shoe break-in procedure.
- Hand-type: With the parking brake pedal depressed at 68.6 N (7 kgf, 15.4 lbf), drive the vehicle 500 meters (0.31 mile) at a speed of 30 km/h. Foot-type: With the parking brake lever pulled at 147 N (15 kgf, 33 lbf), drive the vehicle 500 meters (0.31 mile) at a speed of 30 km/h.
- Repeat the above procedure more than three times.
- Must hold on a 20% uphill grade.
After adjusting the parking brake, check the following:- There should be no problem when depressing the parking brake pedal with a force of 686.5 N (70 kgf, 154 lbf).
- Make sure all components operate smoothly.
- The parking brake warning lamp should illuminate when the parking brake pedal is depressed and go off when the pedal is released.
- Install the parking brake lever assembly, then tighten the mounting bolts (A).

- Apply the specified grease to each sliding part (A) of the ratchet plate or ratchet pawl.
Specified grease: Multi-purpose grease SAE J310, NLGI No. 2

- Install the parking brake cable adjuster, then adjust the parking brake lever stroke by turning the adjusting nut (A).
Parking brake lever stroke: 6 clicks (pull the lever with a force of 20 kgf)
After repairing the parking brake shoes, adjust the brake shoe clearance, then adjust the parking brake lever stroke. (Refer to "Parking Brake Shoe Installation")
- Fully release the parking brake lever and check that the brakes do not drag when the rear wheels are turned. Adjust if necessary.
- Make sure the parking brakes are fully applied when the parking brake lever is fully raised.
- Connect the parking brake switch connector.
When the brake lever is pulled: continuity. When the brake lever is released: no continuity.
Inspect the parking brake switch for continuity. - Install the floor console. (Refer to Body - Floor Console)
- Install the parking brake cable.
- Install the retaining clip (B) and cable adjusting nut (A) after securing the parking brake cable.
- Install the parking brake pedal, then install the mounting bolts (A) and nut (B) of the parking brake pedal.
- Adjust the parking brake pedal travel by turning the adjusting nut (A).
- Depress the parking brake pedal fully more than 3 times to seat the parking brake cables.
- Adjust the adjusting nut (A) so the parking brake pedal stroke is 4 notches when the operating force is 196 N (20 kgf, 44 lbf).
- The parking brake adjustment must be performed after the rear shoe adjustment.
- After adjusting the parking brake, check the following.
- There should be no clearance between the adjusting nut and the pin.
- Securely check that the brake does not slip.
- Reconnect the parking brake switch connector (A).
- Install the junction box. (See Body Electrical System - Fuses and Relays)
- Install the lower emergency cushion panel. (Refer to Body - Emergency Pad)
Adjustment
Parking Brake Shoe Clearance Adjustment- Raise the vehicle and make sure it is securely supported.
- Remove the rear tire and wheel.
- Remove the plug from the disc.

- Turn the adjuster gear with a screwdriver until the disc does not move, then back it off 4 notches in the opposite direction.
- Install the rear tire and wheel after installing the cap on the disc.
- Depress the parking brake pedal fully more than 3 times to seat the parking brake cables.
- Adjust the parking brake pedal stroke adjusting nut (A) to 4 notches when the operating force is 196 N (20 kgf, 44 lbf).
- The parking brake adjustment must be performed after the rear shoe adjustment.
- After adjusting the parking brake, check the following.
- There should be no clearance between the adjusting nut and the pin.
- Securely check that the brake does not slip.
- Raise the vehicle and make sure it is securely supported.
- Remove the floor console trim.
- Adjust the parking brake lever stroke by turning the adjusting nut (A).
Parking brake lever stroke: 6 clicks (pull the lever with a force of 20 kgf)
After repairing the parking brake shoes, adjust the brake shoe clearance, then adjust the parking brake lever stroke. (Refer to "Parking Brake Shoe Installation") - Fully release the parking brake lever and check that the brakes do not drag when the rear wheels are turned. Adjust if necessary.
- Make sure the parking brakes are fully applied when the parking brake lever is fully raised.
- Install the floor console.
Test yourself
A quick Hyundai Tucson LM quiz: every answer comes with an explanation and a link to the manual page.
Was this page helpful?