Lights and Switches Operation Inspection
First Step
- Set the gear position in the neutral position.
- Turn the ignition switch to ON.
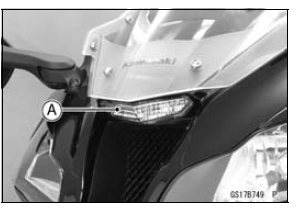
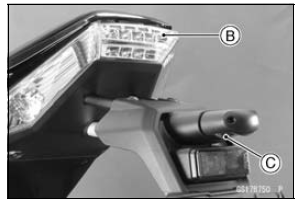
- The following lights should go on according to below table.
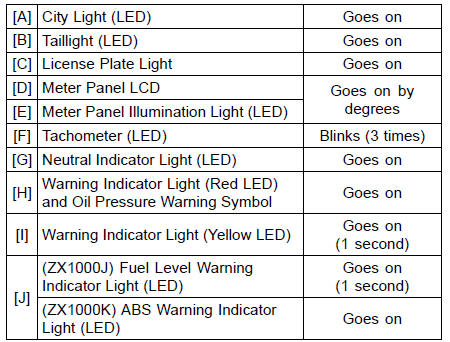
If the following light does not go on, inspect the meter unit (see Meter Unit Inspection in the Electrical System chapter).
Meter Panel LCD
Meter Panel Illumination Light (LED)
Neutral Indicator Light (LED)
Warning Indicator Light (Red LED)
Warning Indicator Light (Yellow LED)
(ZX1000J) Fuel Level Warning Indicator Light (LED)
(ZX1000K) ABS Warning Indicator Light (LED)

If the light does not go on, inspect or replace the following parts.
Battery (see Charging Condition Inspection in the Electrical System chapter) City Light (see City Light Removal/Installation in the Electrical System chapter) License Plate Light Bulb (see License Plate Light Bulb Replacement in the Electrical System chapter) ECU (see ECU Power Supply Inspection in the Fuel System (DFI) chapter) Main Fuse 30 A, Meter Fuse 10 A and Brake Light/Horn Fuse 10 A (see Fuse Inspection in the Electrical System chapter) Ignition Switch (see Switch Inspection in the Electrical System chapter) Oil Pressure Switch (see Switch Inspection in the Electrical System chapter) Gear Position Switch (see Gear Position Switch Inspection in the Electrical System chapter) Harness (see Wiring Inspection in the Electrical System chapter)
- Turn the ignition switch to OFF.
- The all lights should go off.
For models equipped with an immobilizer system, warning indicator light (Red LED) will blinks. Refer to the Immobilizer System (Equipped Models) section in the Electrical System chapter.
If the light does not go off, replace the ignition switch.
Second Step (∼ ZX1000JC/KC)
- Turn the ignition switch to P (Park) position.
- The city light, taillight and license plate light should go on.
If the light does not go on, inspect or replace the ignition switch (see Switch Inspection in the Electrical System chapter).
Third Step
- Turn the ignition switch to ON.
- Turn the turn signal switch [A] to ON (left or right position).
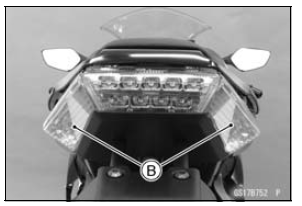
- The left or right turn signal lights [B] (front and rear) according to the switch position should flash.
- The turn signal indicator light (LED) [C] in the meter unit should flash.
If the each light does not flash, inspect or replace the following parts.

Front Turn Signal Light (see Upper Fairing Assembly Removal/ Installation in the Frame chapter) Rear Turn Signal Light Bulb (see Rear Turn Signal Light Bulb Replacement in the Electrical System chapter) Turn Signal Indicator Light (LED) (seeMeter Unit Inspection in the Electrical System chapter) Turn Signal Relay Fuse 10 A (see Fuse Inspection in the Electrical System chapter) Turn Signal Switch (see Switch Inspection in the Electrical System chapter) Turn Signal Relay (see Turn Signal Relay Inspection in the Electrical System chapter) Harness (see Wiring Inspection in the Electrical System chapter)
- Push the turn signal switch.
- The turn signal lights and indicator light (LED) should go off.
If the light does not go off, inspect or replace the following parts.

Turn Signal Switch (see Switch Inspection in the Electrical System chapter) Turn Signal Relay (see Turn Signal Relay Inspection in the Electrical System chapter)
Fourth Step
- Set the dimmer switch [A] to low beam position.
- Start the engine.
- The low beam headlight should go on.

If the low beam headlight does not go on, inspect or replace the following parts.
Headlight Low Beam Bulb (see Headlight Bulb Replacement in the Electrical System chapter) Headlight Fuse 15 A (see Fuse Inspection in the Electrical System chapter) Dimmer Switch (see Switch Inspection in the Electrical System chapter) Headlight Relay (see Relay Circuit Inspection in the Electrical System chapter) Harness (see Wiring Inspection in the Electrical System chapter)
- Set the dimmer switch to high beam position.
- The low beam [A] and high beam [B] headlights should go on.
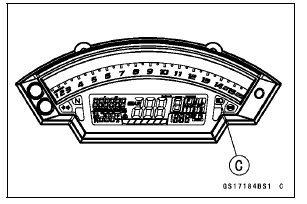
- The high beam indicator light (LED) [C] should go on.
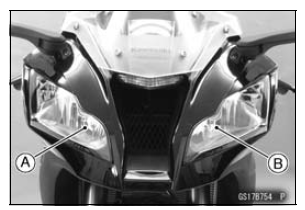
If the high beam headlight and/or high beam indicator light (LED) does not go on, inspect or replace the following parts.
Headlight High Beam Bulb (see Headlight Bulb Replacement in the Electrical System chapter) Dimmer Switch (see Switch Inspection in the Electrical System chapter)
- Turn the engine stop switch to stop position.
- The low beam and high beam headlights should stay going on.
If the headlights and high beam indicator light (LED) does go off, inspect or replace the headlight relay (see Relay Circuit Inspection in the Electrical System chapter).
- Turn the ignition switch to OFF.
- The headlights and high beamindicator light (LED) should go off.
Headlight Aiming Inspection
- Inspect the headlight beam for aiming.
If the headlight beam points to one side rather than straight ahead, adjust the headlight aiming.
Test yourself
A quick Kawasaki Ninja ZX-10R quiz: every answer comes with an explanation and a link to the manual page.