High voltage battery handling guide
High voltage battery system inspection guide
Carry out a visual inspection to determine whether the vehicle requires general repair or accident repair.
For the general repair, perform the repair based on the repair process for that DTC code.
For the car accident repair, determine the accident type before repair.
Over-charge/discharge: Displays a battery over voltage (P1B71) code /low voltage (P1B70) code (Refer to the DTC diagnosis guide).
Short: Displays a high voltage short (P1B77, P1B25) codes (Refer to the DTC diagnosis guide).
| Classification | Inspection process | Inspection results | Measures | |
| Fire outside of the high voltage battery mount ※Example) Engine fire |
|
High voltage battery insulation damaged | Remove the high voltage battery and repair the insulation process/coating. | |
| High voltage battery not damaged | DTC code | If a DTC code occurs, comply with DTC diagnosis guide and repair process. | ||
| No DTC code and battery appears normal | Do not replace the high voltage battery (if the battery is damaged and must be disposed of, perform the high voltage battery disposal process). | |||
| Fire in the high voltage battery mount ※Example) Trunk fire |
|
High voltage battery appears damaged (heat, soot, etc.) | Remove the service disconnect plug and perform the salt water battery disposal process. | |
| High voltage battery insulation damaged | Remove the high voltage battery and repair the coating/insulation. | |||
| High voltage battery not damaged | DTC code | If a DTC code occurs, perform the repair process outlined in the DTC diagnosis guide. | ||
| No DTC code and battery appears normal | Do not replace the high voltage battery (if the battery is damaged and must be disposed of, perform the high voltage battery disposal process). | |||
3) Collision
| Classification | Inspection process | Inspection results | Measures | |
| Collision damage to areas other than the high voltage battery mount ※Example) Front/side collision |
|
High voltage battery insulation damaged | Remove the high voltage battery and repair the coating/insulation. | |
| High voltage battery not damaged | DTC code | If a DTC code occurs, perform the repair process outlined in the DTC diagnosis guide. | ||
| No DTC code and battery appears normal | Do not replace the high voltage battery (if the battery is damaged and must be disposed of, perform the high voltage battery disposal process). | |||
| Collisions involving the high voltage battery mount ※Example) Rear-end collision |
|
High voltage battery insulation damaged | ⇑ Follow the measures outlined above. ※ If the high voltage battery mount is inaccessible due to trunk or door damage, bend or cut the exterior panels without damaging the high voltage system and carry out the inspection and repair process. |
|
| High voltage battery not damaged | DTC code | |||
| No DTC code and battery appears normal |
||||
4) Submersion
| Classification | Inspection process | Inspection results | Measures | |
| High voltage battery not submerged |
|
High voltage battery insulation damaged | Remove the high voltage battery and repair the coating/insulation. | |
| High voltage battery not damaged | DTC code | If a DTC code occurs, perform the repair process outlined in the DTC diagnosis guide. | ||
| No DTC code and battery appears normal | Do not replace the high voltage battery (if the battery is damaged and must be disposed of, perform the high voltage battery disposal process). | |||
| High voltage battery submerged [Regardless of water conditions] |
|
Carry out these measures regardless of the inspection results | Remove the high voltage battery and repair the coating/insulation. | |
Main Fuse Inspection
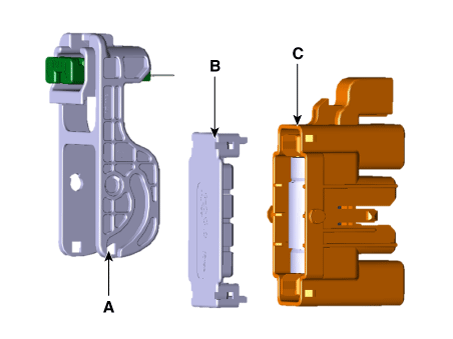
Remove the safety plug lever (A).
Remove the safety plug cover (A) and then remove the main fuse (B) by removing the mounting bolts.
Measure the resistance of main fuse.
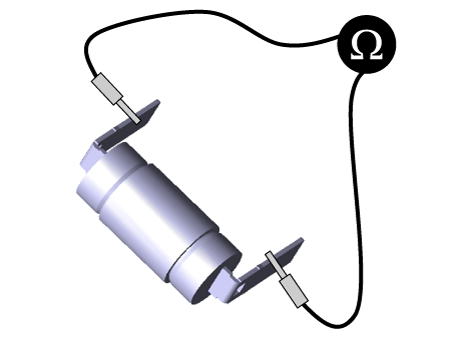
Specification: 1 Ω or less [20 °C(68°F]
If the measured resistance is not within the specification, replace the main fuse.
Checking for Welding in the High Voltage Main Relay
In order to safely remove the battery pack assembly, you must first inspect the high voltage main relay for signs of weld damage.
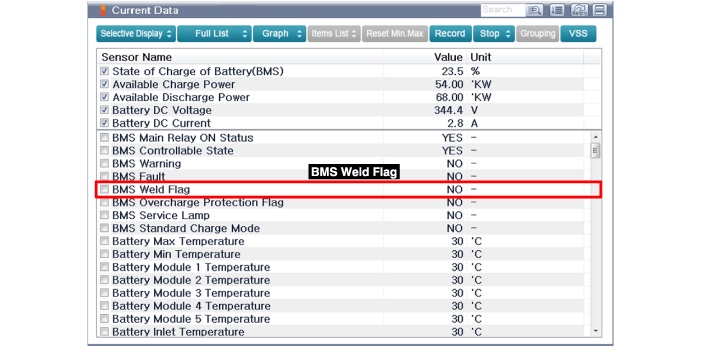
You can use Gloval Diagnostic System (KDS/GDS) service data to detect weld damage in the high voltage main relay.
[Using KDS/GDS service data to check for main relay weld damage]
Connect the KDS/GDS to the self-diagnosis connector (DLC).
Turn on the ignition.
Check the BMS weld damage state in the KDS/GDS service data.
[Using a Multimeter to measure weld damage]
Shut off the High Voltage circuit.
(Refer to Hybrid Control System - “High Voltage Shutoff Procedure”)
Remove the rear seat cushion.
(Refer to Body - "Rear Seat Assembly")
Remove the rear door scuff trim.
(Refer to Body - "Door Scuff Trim")
Remove the inlet cooling duct.
(Refer to High Voltage Battery Cooling System - "Cooling Duct")
Remove the high voltage battery rear cover.
(Refer to High Voltage Battery System - "Case")
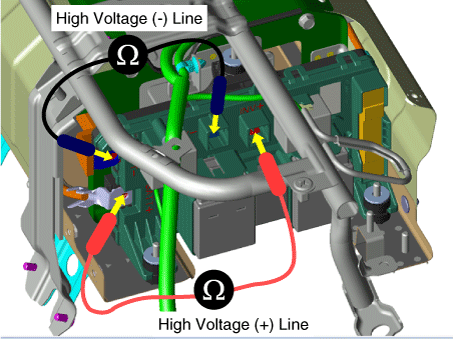
Disconnect the high voltage (-) connector (A) and high voltage (+) connector (B).
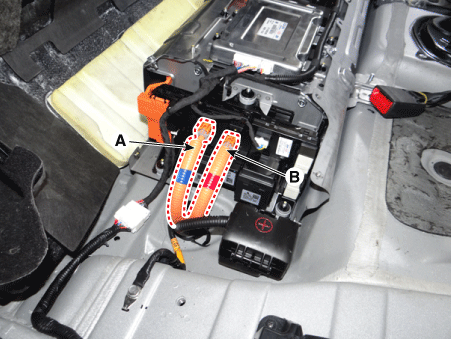
Measure the high voltage main relay resistance and check for signs of weld damage.
Specification: 1 Ω or less [20 °C]
Isolation Resistance Inpection
The high voltage isolation used in hybrid systems can be checked using KDS/GDS service data or by measuring it directly.
[Using KDS/GDS service data to check isolation resistance]
Connect the KDS/GDS to the self-diagnosis connector (DLC).
Turn on the ignition.
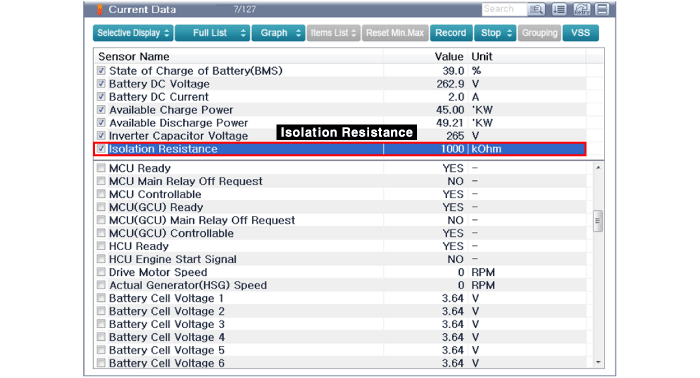
Check the isolation resistance in the KDS/GDS service data.
Normal insulation resistance range: Around 1.0 MΩ
[Measuring isolation resistance using an insulation tester (MΩ tester)]
Shut off the high voltage circuit.
(Refer to Hybrid Control System - "High Voltage Shut-off Procedures")
Remove the rear seat cushion.
(Refer to Body - "Rear Seat Assembly")
Remove the rear door scuff trim.
(Refer to Body - "Door Scuff Trim")
Remove the inlet cooling duct.
(Refer to High Voltage Battery Cooling System - "Cooling Duct")
Remove the high voltage battery rear cover.
(Refer to High Voltage Battery System - "Case")
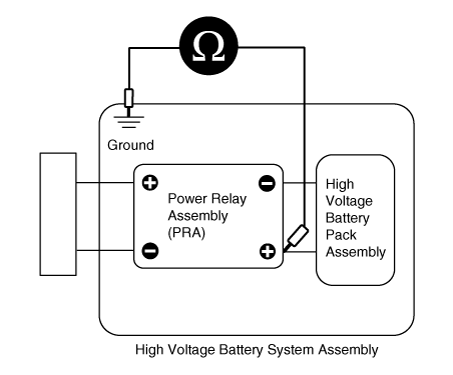
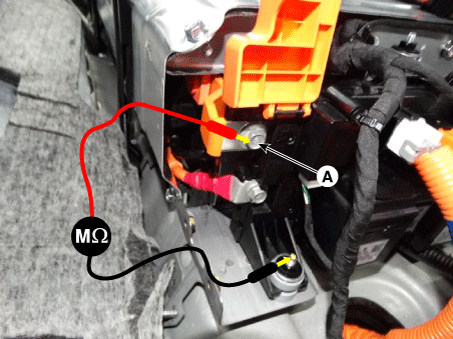
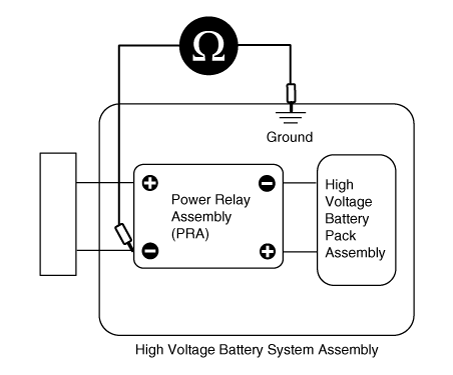
Connect the insulation tester (-) terminal (A) to the battery system case (or ground).
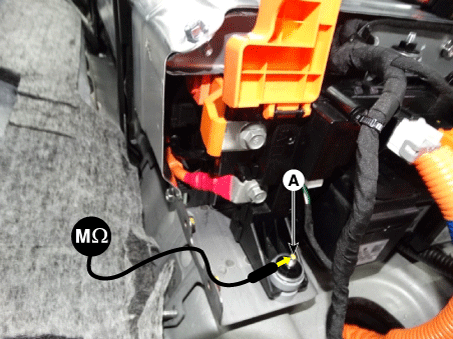
Connect the insulation tester (+) terminal to the high voltage battery (+) and (-). Measure the resistance.
[Measure the isolation resistance on the power relay assembly high voltage power terminal (+)]
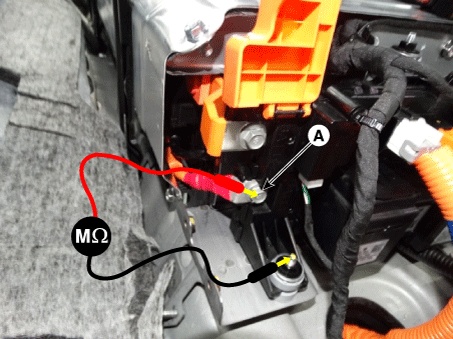
Connect the insulation tester (+) terminal to the (+) PRA high voltage power terminal (A).
Supply 500V through the insulation tester and wait one minute to measure the stable resistance.
Check the isolation resistance.
Normal insulation resistance range : Above 1.0 MΩ
[Measure the isolation resistance on the power relay assembly high voltage power terminal (-)]
Connect the insulation tester (+) terminal to the (-) PRA high voltage power terminal (B).
Supply 500V through the insulation tester and wait one minute to measure the stable resistance.
Check the isolation resistance.
Normal insulation resistance range: Above 1.0 MΩ

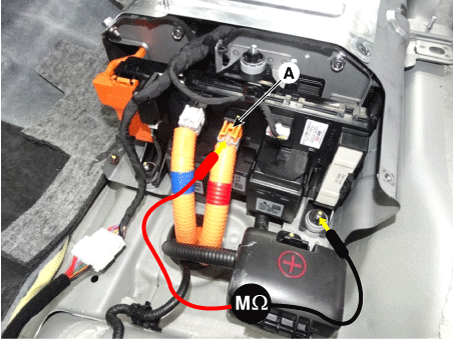
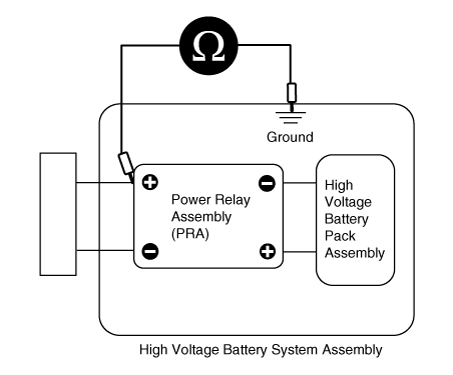
[Measure the isolation resistance on the power relay assembly inverter power terminal (+)]
Connect the insulation tester (+) terminal to the (+) PRA inverter power terminal (A).
Supply 500V through the insulation tester and wait one minute to measure the stable resistance.
Check the isolation resistance.
Normal insulation resistance range: Above 1.0 MΩ
[Measure the isolation resistance on the power relay assembly inverter power terminal (-)]
Connect the insulation tester (+) terminal to the (-) PRA inverter power terminal (B).
Supply 500V through the insulation tester and wait one minute to measure the stable resistance.
Check the isolation resistance.
Normal insulation resistance range: Above 1.0 MΩ

1. High voltage battery system handling process

2. Defective high voltage battery system handling / Inspection
| Classification | Item | Measures | |
| Undamaged Battery | Storage | Remove the service disconnect and store the battery under the same conditions as a new battery. | |
| Transport | Minimize impacts and ensure the battery does not come in contact with other parts. | ||
| Disposal | Transport the battery to the designated disposer | ||
| Damaged battery | Common | Inspection method |
|
| Damaged battery | Damaged battery check results: normal | Storage | Remove the service disconnect plug and store the battery under the same conditions as a new battery. |
| Transport | Minimize impacts and ensure the battery does not come in contact with other parts. | ||
| Disposal | Transport the battery to the designated disposer; discharge it by submersing it completely in salt water and carry out the disposal procedure. | ||
| Damaged battery check results: abnormal | Storage | Remove the service disconnect plug; insulate all exposed terminals; place the battery in a cool, dry place away from volatile or combustible substances; use insulating materials (insulation tape, rubber caps, etc.) or vinyl to wrap the battery; use anti-shock materials inside the box. ▶ Insulation action: Refer to "Take insulation actions for parts that may short circuit. ▶ Packing: Abnormal battery must be packed as same as a new battery. |
|
| Transport | Minimize impacts and ensure the battery does not come in contact with other parts. | ||
| Disposal | Transport the battery to the designated disposer; discharge it by submersing it completely in salt water and carry out the disposal procedure. | ||
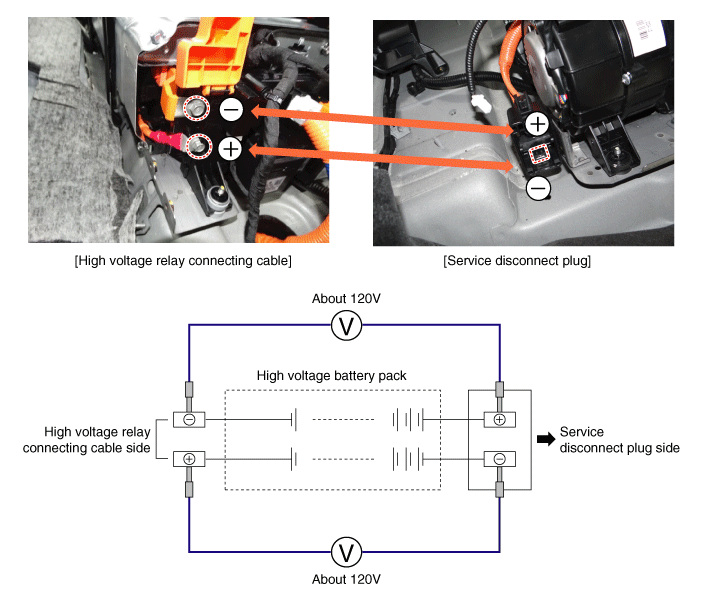
Voltage Check
Measure the voltage between the service disconnect plug upper (+) terminal and [High voltage battery –PRA] connecting cable (-) terminal.
→ Specification: About 120 V
Measure the voltage between the service disconnect plug lower (-) terminal and [High voltage battery –PRA] connecting cable (+) terminal.
→ Specification: About 120 V
Take insulation actions for parts that may short circuit
High voltage battery – PRA cable terminal
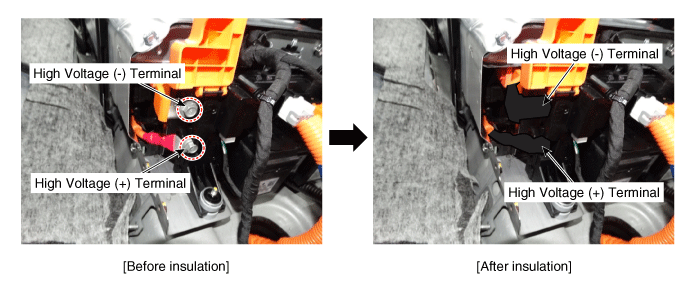
Place the insulation tape or rubber cap around the (+), (-) cable terminal to prevent short circuit to the battery pack.
Secure the cable to the battery pack case with the insulation tape to prevent cables from moving.
BMS voltage sensing connector
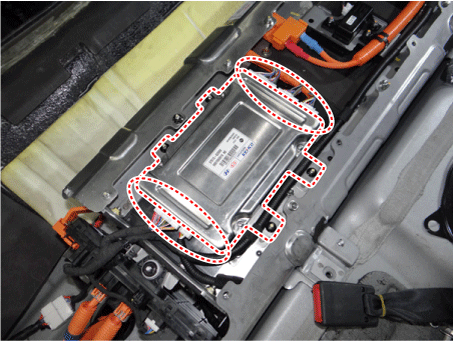
▶ Insulation actions
Place the insulation tape or rubber cap around connectors to prevent short circuit to the battery cells, modules.
Secure the wiring to the battery pack case with the insulation tape to prevent wiring from moving.
Discharging high voltage batteries
High voltage batteries can cause electric shocks or other injuries. If the following symptoms are detected in a high voltage battery, discharge it as soon as possible by submersing it in salt water.
There are traces of fire or smoke.
The voltage of the battery is abnormally high (302 V or higher).
The temperature of the high voltage battery continues to rises abnormally.
It smells like chemicals or acryl, which suggests electrolyte leakage.
Pour about 53 gallons (200 liters) water into a plastic container (Ex. Poly Propylene) that cans submerge the whole battery.
Add 238 pounds of salt to the water. Stir the water until the salt dissolves into the solution.
Use a lift jack to submerge the high voltage battery in the salt water.
Leave the battery in the salt water for 12 hours before taking it out a drying it thoroughly.
